Training SmartCapture for Data Extraction
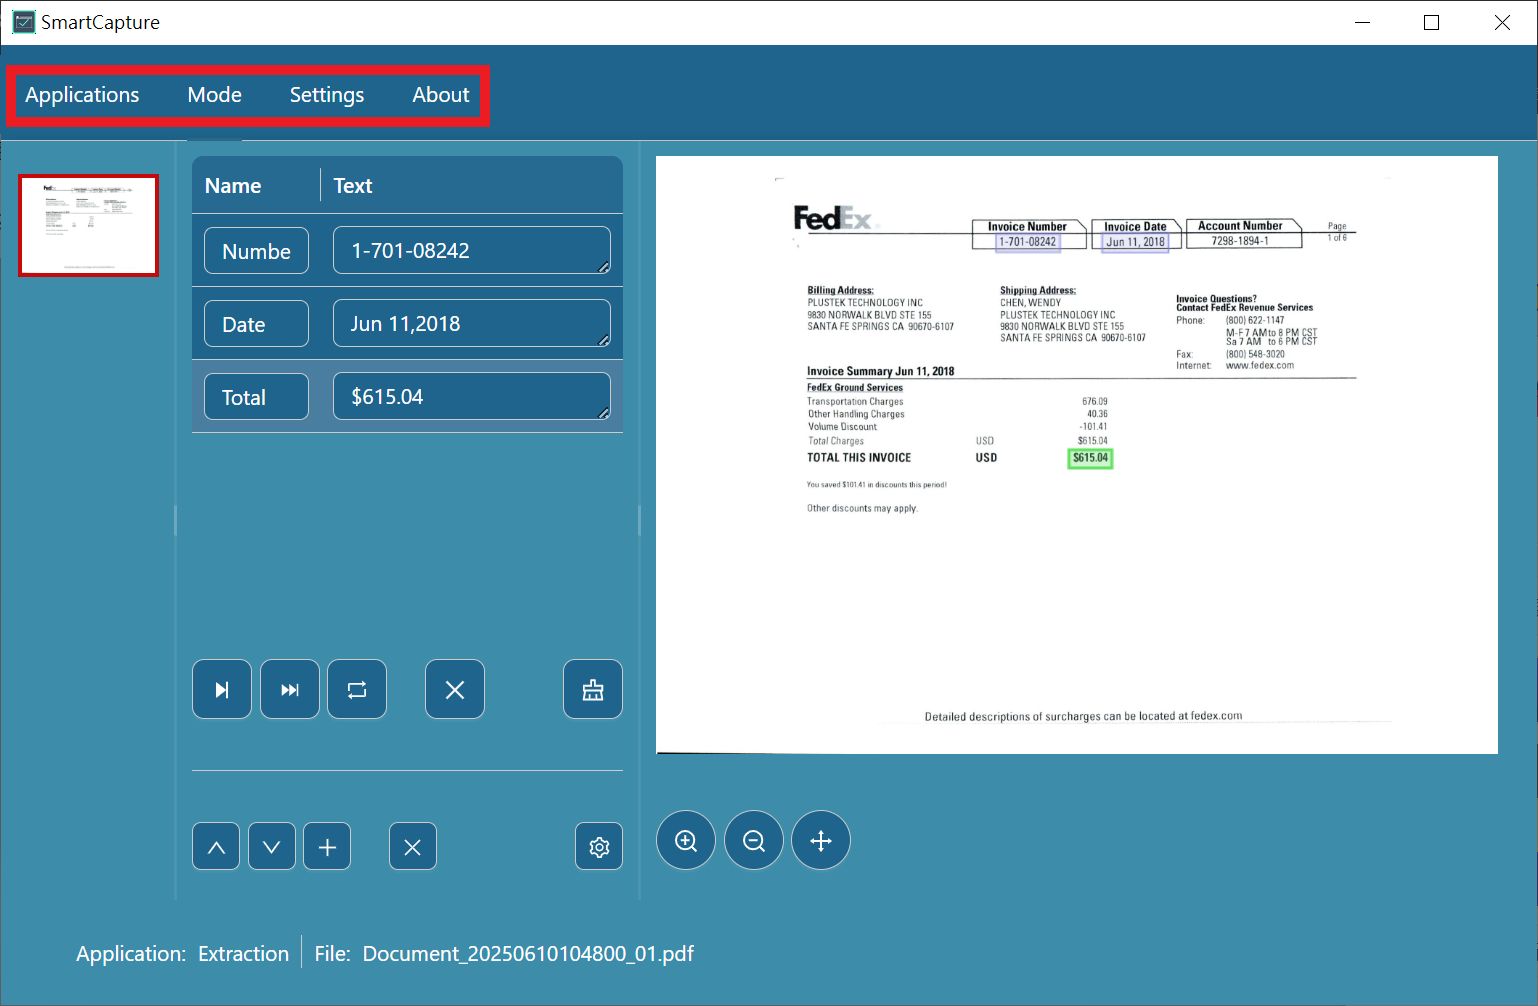
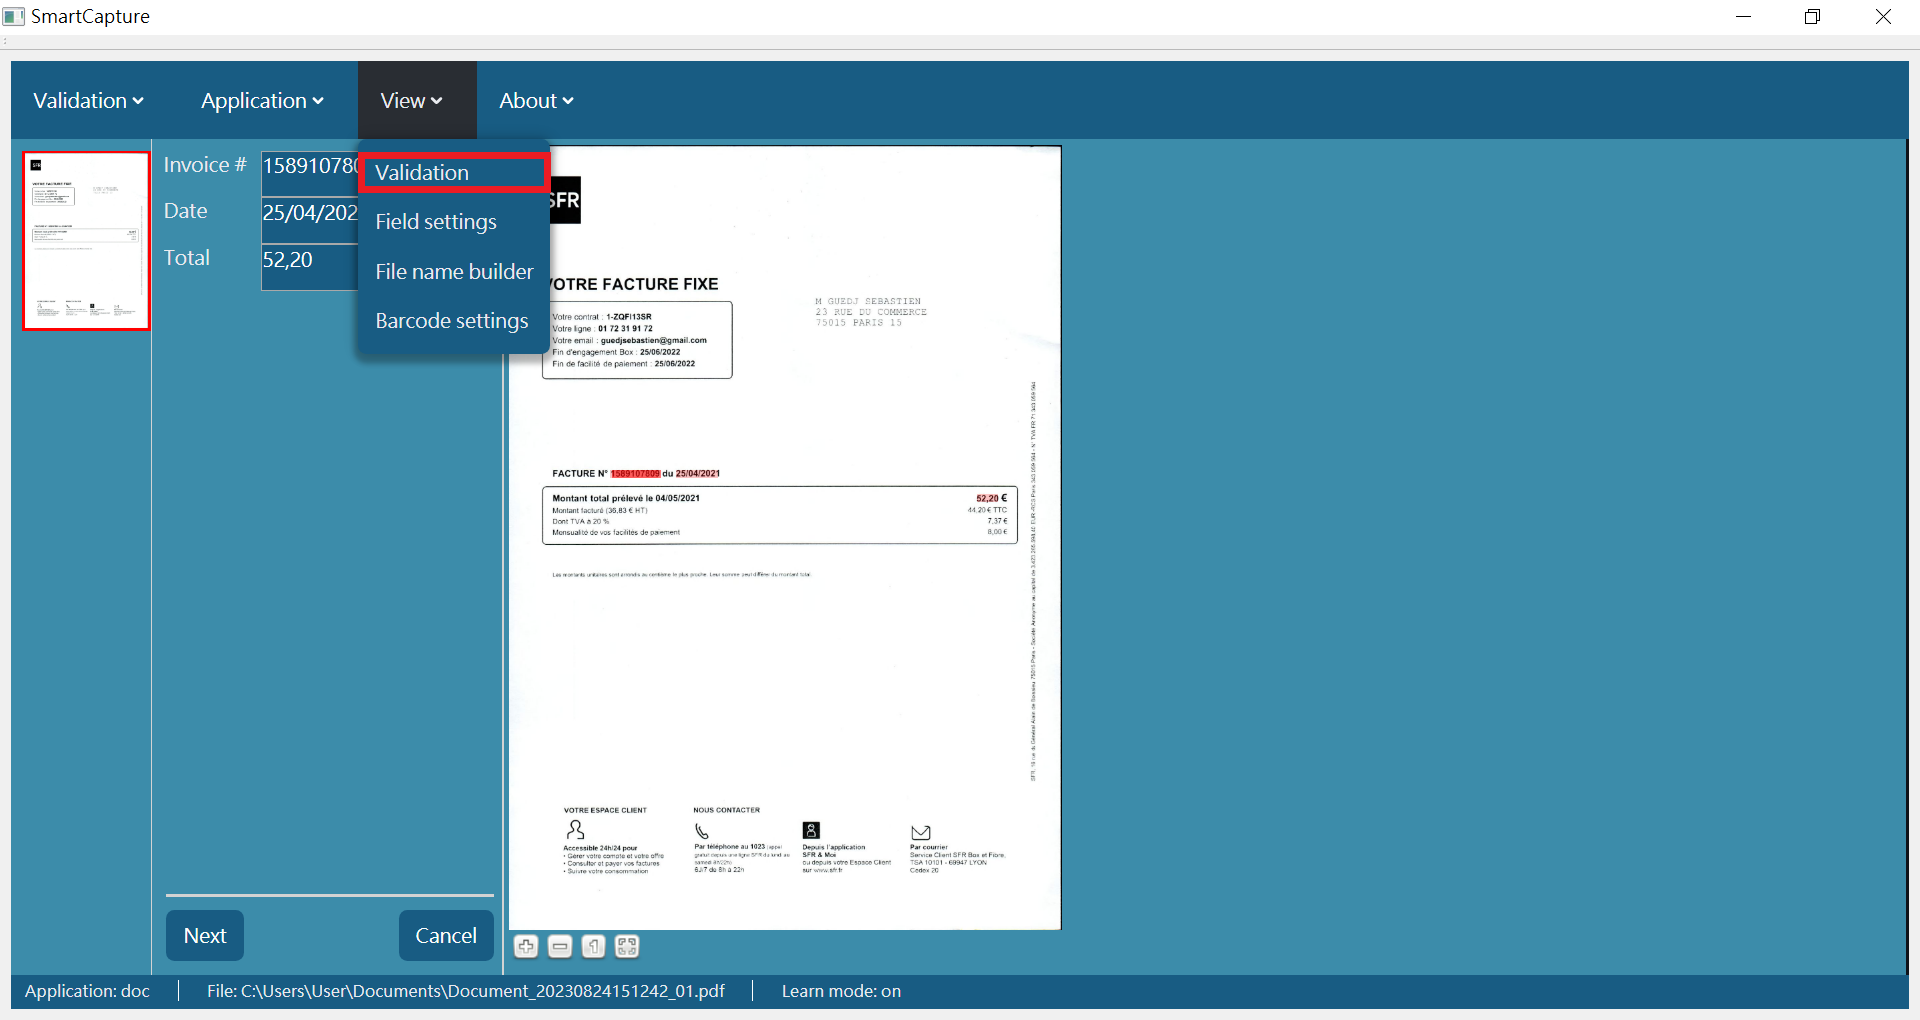
After the Optical Character Recognition (OCR) process completes successfully, SmartCapture will open in a new window.
On the left side of the interface, you'll see your preset index fields — the specific data points SmartCapture is set up to extract.
Initially, these fields will appear blank, indicating that SmartCapture is ready for manual field mapping and training.
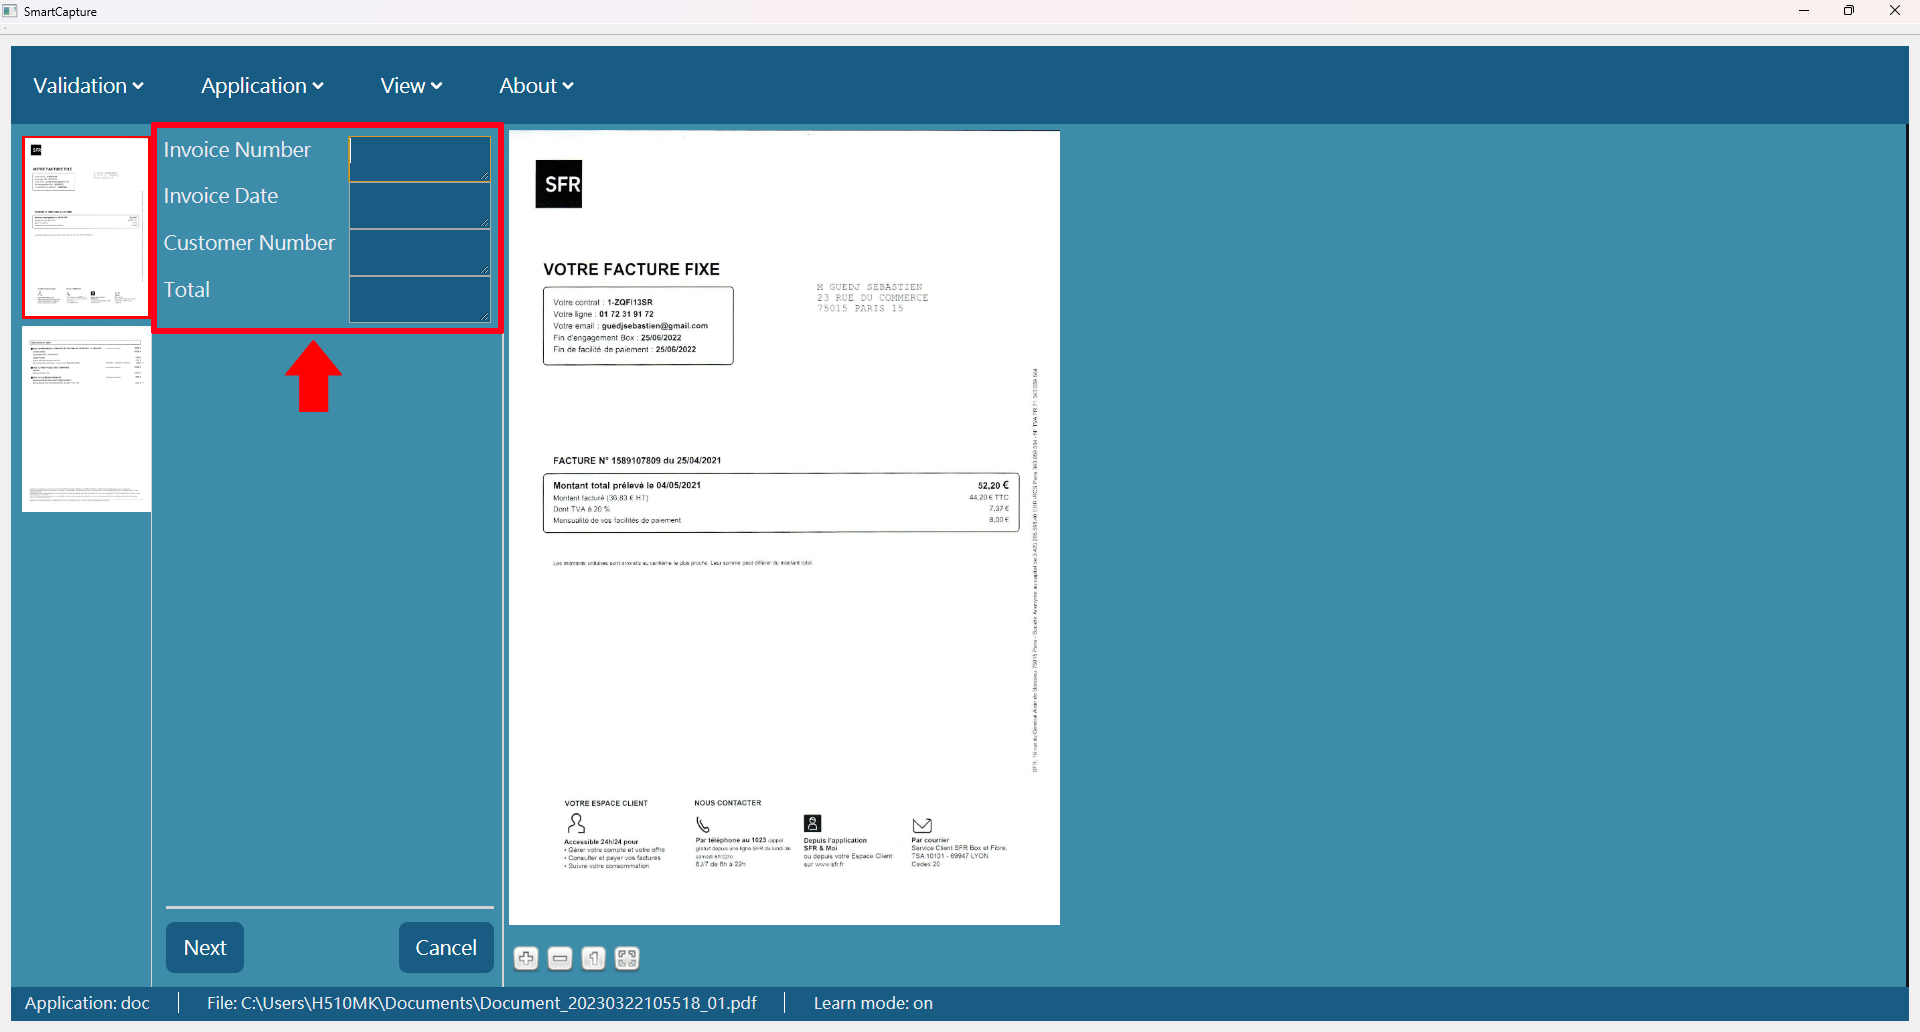
Defining Fields Manually
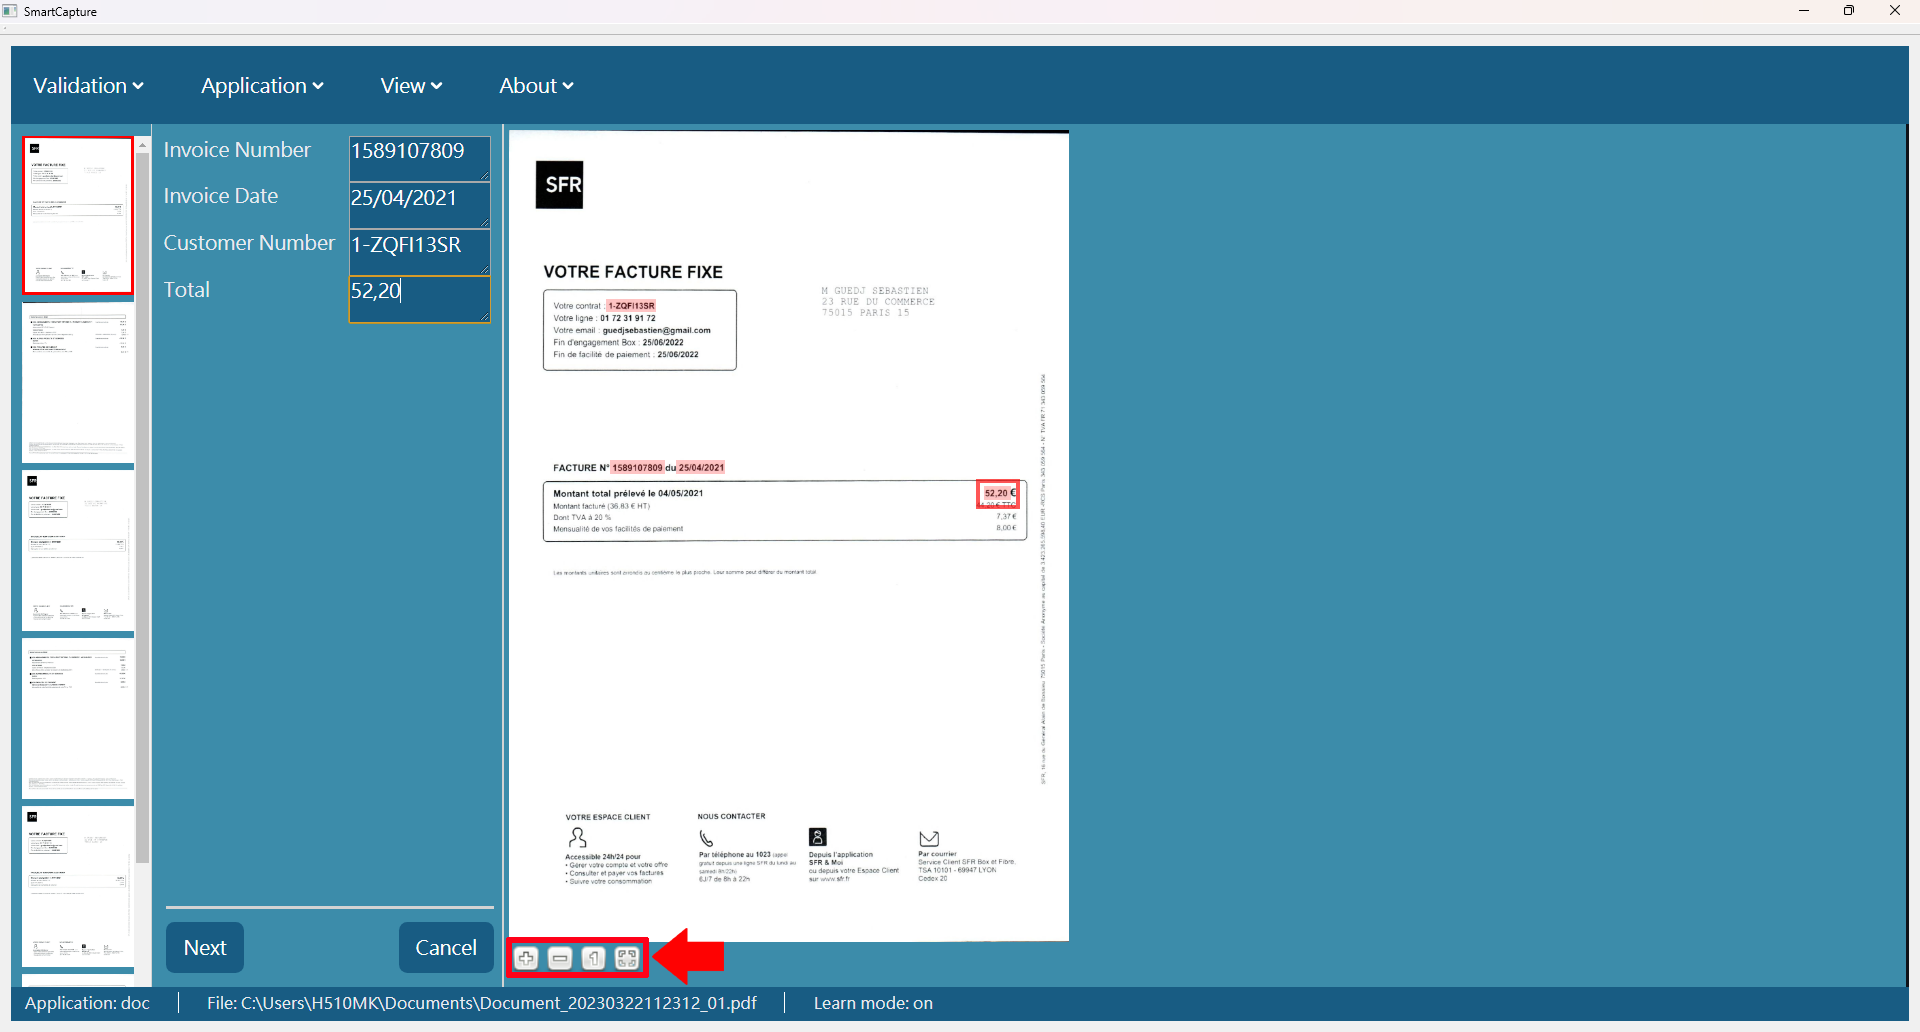
To train SmartCapture for the current document layout:
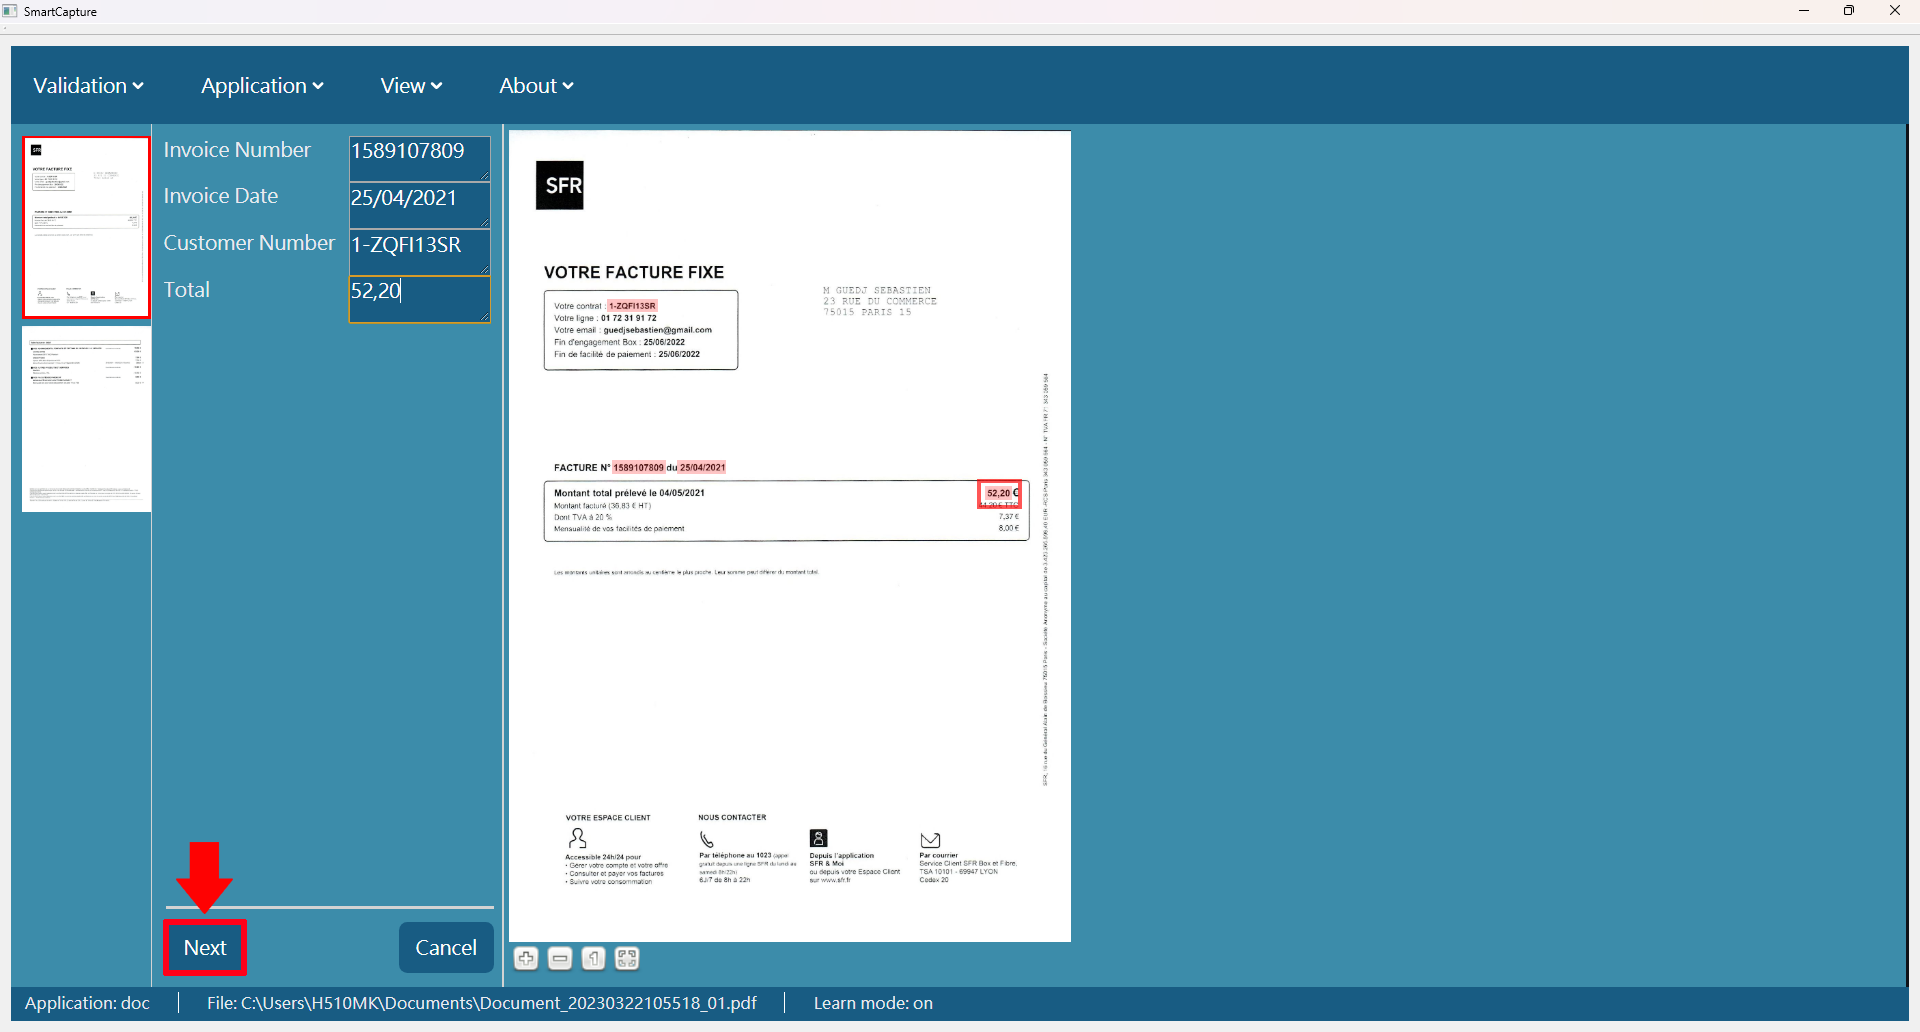
Use your mouse to click and highlight the data on the document that corresponds to each index field.
As you select each item, the value will automatically appear in the related field on the left.
Repeat this step for all fields you want SmartCapture to extract.
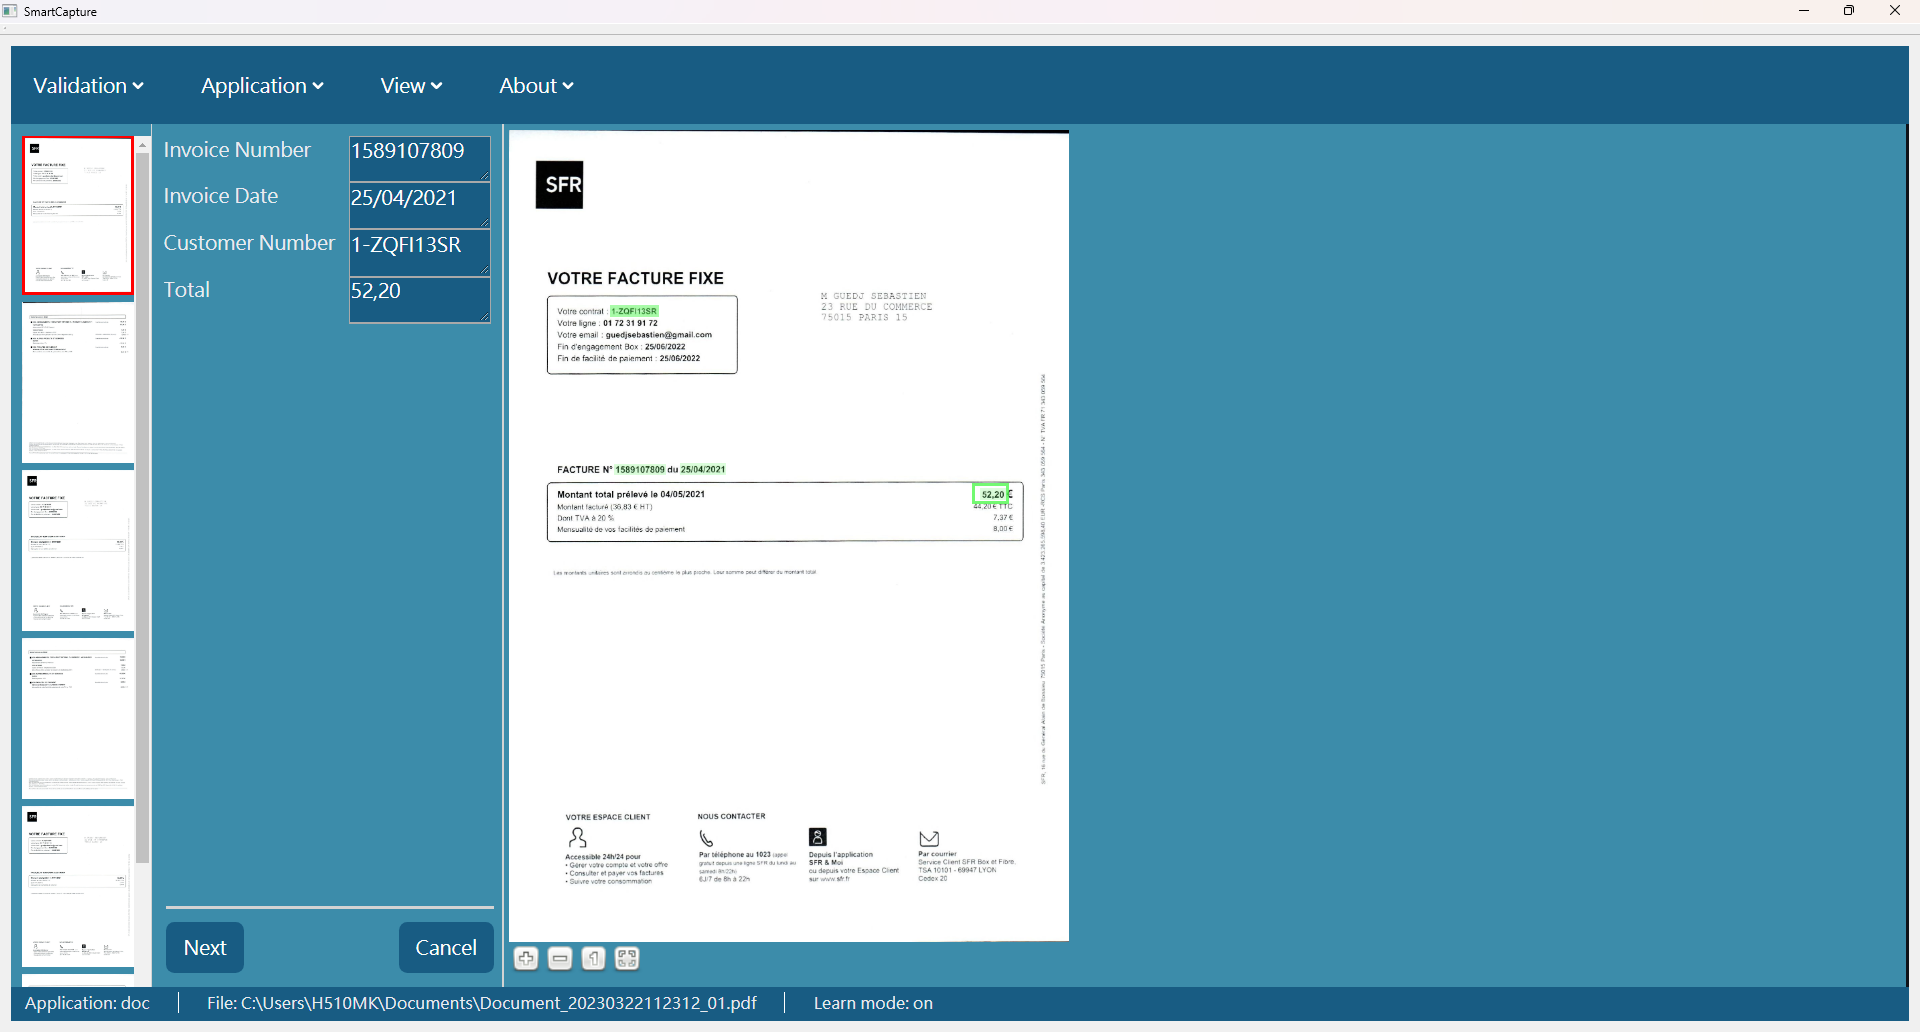
Once trained, SmartCapture will automatically recognize and extract these same fields when scanning documents of the same format in the future.
Reloading the Document (If Needed)
If you select incorrect data or want to restart:
Click the ![]() "Reload Document" button.
"Reload Document" button.
This will reload the current document and clear all previously marked areas, allowing you to start the field mapping again.

Finalizing the Training
Once all fields are correctly mapped and filled with the appropriate values:
Click ![]() “Confirm and Next Document” to save your settings and proceed with the next document in your batch.
“Confirm and Next Document” to save your settings and proceed with the next document in your batch.
Repeat this training process for each new document layout that hasn't yet been recognized by SmartCapture.
Automating and Managing Repeated Document Processing in SmartCapture
SmartCapture simplifies the handling of documents with similar layouts or structures by learning from previously defined fields.
Once you’ve manually mapped fields for a document type and clicked ![]() “Confirm and Next Document,” SmartCapture will automatically apply those same mappings to all future documents of the same format—no need to redefine them manually.
“Confirm and Next Document,” SmartCapture will automatically apply those same mappings to all future documents of the same format—no need to redefine them manually.
This saves time when processing large batches of similar documents, such as invoices, forms, or standardized templates.
When a New Document Format is Detected
If a new document type is introduced—one that doesn’t match the existing layout—SmartCapture will prompt you to manually define the fields again, just like in the initial training step.
Batch Processing Tools
To streamline document handling, SmartCapture offers the following options:
![]() Start Autoplay
Start Autoplay
Enables automatic processing of documents with the same structure. SmartCapture will auto-extract and move to the next document without manual input.
![]() Dismiss and Next Document
Dismiss and Next Document
Skips the current document and proceeds to the next one in the batch. This is useful if a document cannot be processed or you want to review it later.
Managing Field Recognition Settings
If the extracted data appears incorrect or inconsistent:
Click ![]() “Reset AutoAnchor Class” to clear all previously mapped fields and start over with manual field selection for that document type.
“Reset AutoAnchor Class” to clear all previously mapped fields and start over with manual field selection for that document type.
You can also manually configure and organize recognition fields using the toolbar:
![]() Add Field – Insert a new data field for extraction.
Add Field – Insert a new data field for extraction.
![]() Delete Field – Remove the selected field from the list.
Delete Field – Remove the selected field from the list.
![]() /
/![]() Move Up / Move Down – Reorder the selected field.
Move Up / Move Down – Reorder the selected field.
![]() Field Settings – Configure settings for the selected field, such as setting filters or matching criteria (e.g., must contain digits, specific text format, etc.).
Field Settings – Configure settings for the selected field, such as setting filters or matching criteria (e.g., must contain digits, specific text format, etc.).
Viewing and Navigating the Document
For better visibility while working with scanned documents:
Use the Zoom In / Zoom Out buttons to adjust image scale.
Click Fit to Window to automatically resize the image to match the viewing area.

Overview of the SmartCapture Feature Menu
SmartCapture offers a user-friendly top menu bar with key options for configuration and application management. Below is a brief introduction to each main menu item:
Applications Menu
This menu provides options for managing your SmartCapture environment:
•Backups – Restore application data from a previously saved backup file.
•Edit – Add, delete, or reset application components (e.g., recognition templates or index fields).
•Quit – Close the SmartCapture application window.
Mode Menu
The Mode menu allows you to define how SmartCapture handles document recognition:
•Single Class – Check this box if you're processing only one type of document.
•Single Page – Uncheck this option if your documents include multiple pages.
•Enable Changes – Uncheck this to lock your recognition settings, preventing further modifications by other users.
💡 These settings help tailor SmartCapture’s behavior to your specific workflow.
Settings Menu
This menu provides access to advanced configuration options:
•File Names – Set custom file naming rules for exported documents (e.g., include barcode values, dates, or document types). Detailed information please refer to File Name Generation section.
•Barcode – Select which barcode types to recognize.
🔍 Deselecting unused barcode types can significantly speed up processing.
•Exporter – Adjust export settings such as file format, destination folder, or integration options.
About Menu
Click the About menu item to view the current SmartCapture version number and software information.