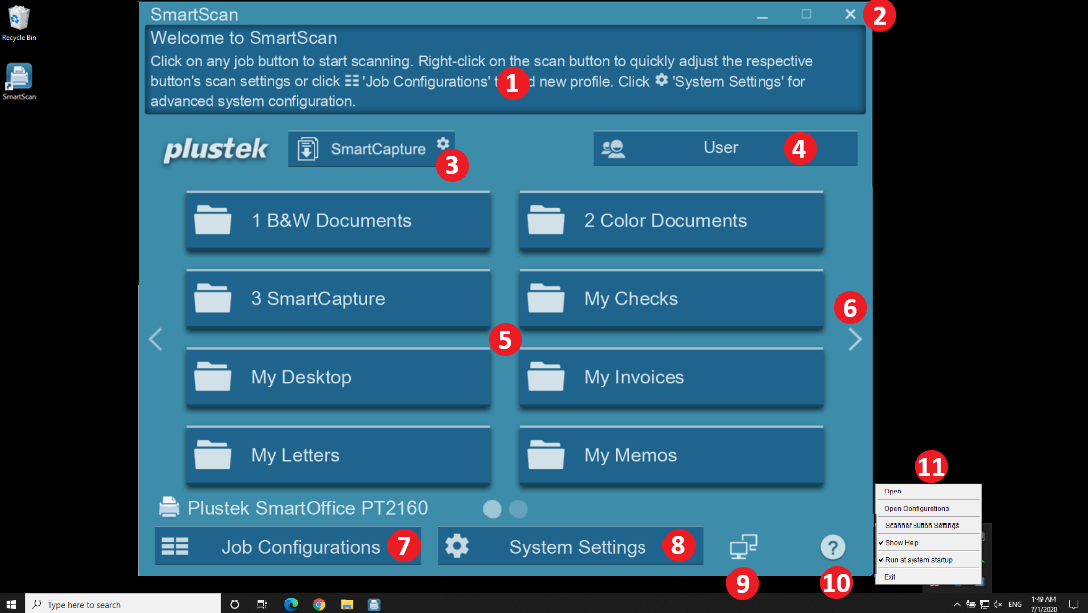
1. Help Guide
This area provides basic guildance to operation on each interface.
To turn off the guide, refer to item 11 for more info.
2. Minimizing and Close Application Windows to System Tray
Click this area to minimize the application to task bar or click "X" to minimize to system tray.
To terminate the application, right-click from the application on the system tray and click "Exit" to completely exit SmartScan.
3. Electronic Import Button
You may import electronic document in BMP/PNG/JPEG/TIFF/PDF to access SmartCapture function for data extraction. There are two methods for electronic document importing:
a. Drag and drop the electronic document to this button
b. Save the electronic document in C:\Users\User\Documents\SmartCapture\Hot_Folder
Every time when electronic document is imported, SmartCapture will automatically execute the preset data extraction task.
4. Groups
Click to view full list and scroll / click to access a particular group.
Groups can conveniently assist users to categorize job buttons (e.g. by departments, people, scanning type, or more) and is displayed in alphabetical order.
Each group contains a maximum of 16 job buttons.
It is recommended to create no more than 10 groups per device to ensure smooth operation.
5. Job Button
Job buttons created are displayed directly on the interface.
By default, SmartScan will create default profiles to scan and save to the respective location.
Each page contains 8 job buttons, each group contains a maximum of 16 buttons.
To create a new job button, refer to Create and Add a New Job Button.
Right-click on a job/scan button to quickly adjust the respective scan profile and settings.
Right-click on a job/scan button icon to quickly modify the Job Name and Group.
6. View and Access Other Job Buttons
Click on the left/right arrows or scroll to view and access other pages.
7. Job Configurations
Create accounts, job buttons and scanning profiles.
8. System Settings
Configure system settings. System settings allow you to configure, adjust, duplicate, import/export device settings, as well as enable adminstrator management rights.
9. Internet Availability
Ethernet and WiFi indicator signals connection availability.
It is strongly advice to connect via Ethernet for stability and data transmit speed.
10. Online User's Guide
Click for the online user's manual with detailed walkthroughs and navigation of the SmartScan application.
11. System Tray Settings
Click to use the shortcuts for the following:
•Open the application or double click on the icon
•Go to Configurations
•Go to Scanner Button Settings, to adjust SmartScan's job buttons with scanner's hardware scan buttons
•Enable/disable the help menu
•Enable/disable if the application should be launched during startup