Overview
What is eConnector?
eConnector provides greater flexibility by offering users to scan directly to more destinations. User can customize each eConnector button and scan through a single touch scan button; whether through the main button on the application or on scanner’s panel. Scanned documents are automatically sent directly various destinations in standard imaging formats, including JPEG, TIFF, and PDF.
Single Click of a Button:
Scan documents directly into Local Folder
Scan documents directly into Network Folder (SMB/CIFS 2.0/3.0)
Scan documents directly into FTP/SFTP/FTPS
Scan documents directly into eMail (via SMTP)
Scan documents directly into Microsoft SharePoint On-Premises 2010/2013/2016/2019
Scan documents directly into Microsoft Office 365 SharePoint
Scan documents directly into Microsoft Office 365 OneDrive
Scan documents directly into Microsoft Office 365 Outlook (as a new email message)
Scan documents directly into Microsoft Office 365 OneNote Online
Scan documents directly into Microsoft Exchange
Scan documents directly into Google Drive
Scan documents directly into Dropbox
Scan documents directly into Box
Scan documents directly into Evernote
eConnector provides administrator control to the functions below:
- Account Management- Manage user account and accessibility
- Job Management- Manage the upload destination and scan settings of each job profiles
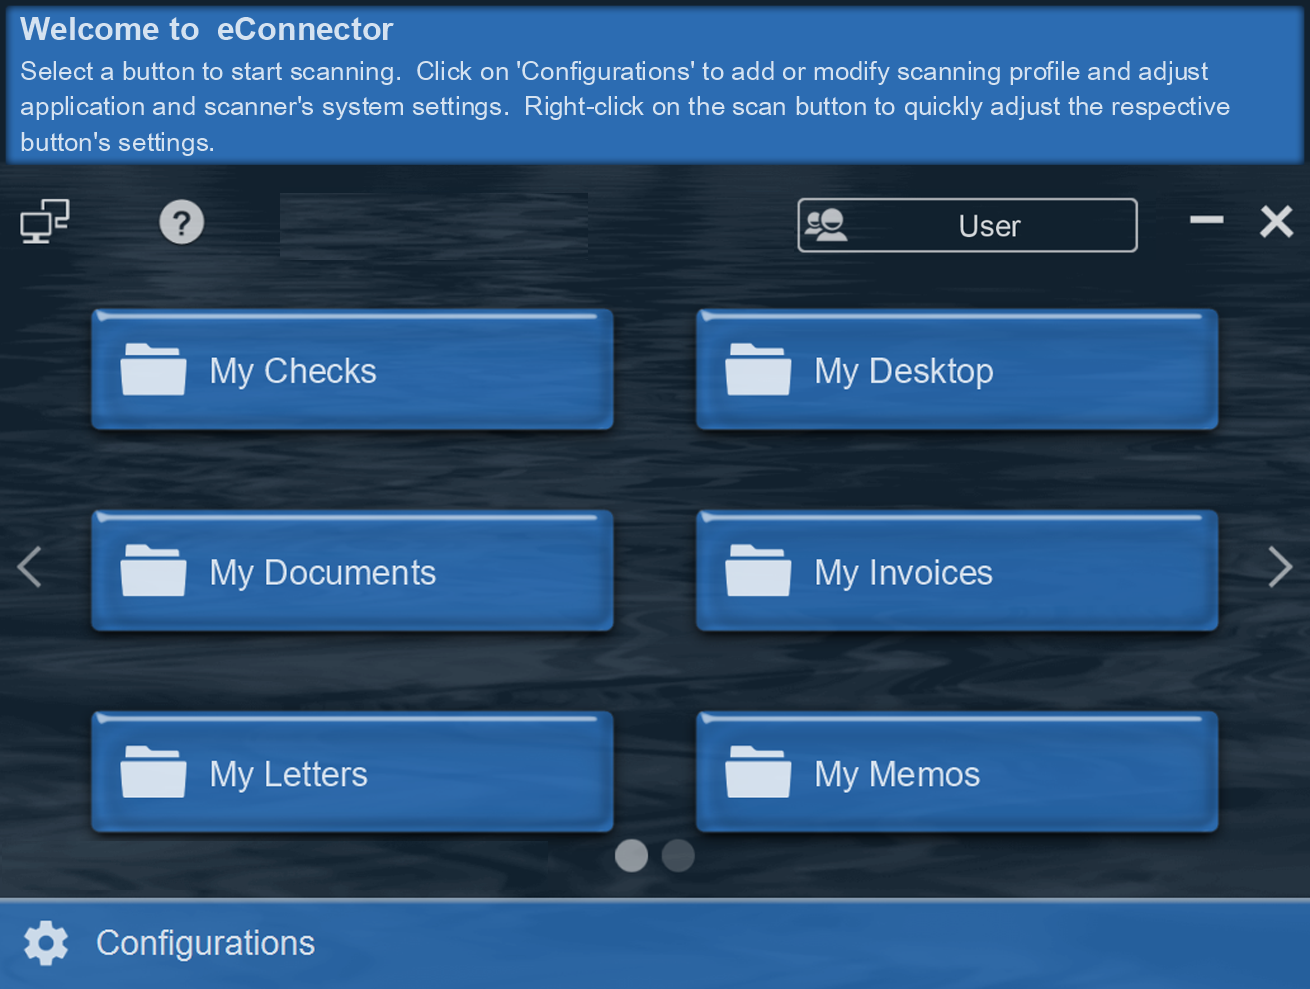
Main Menu/Interface
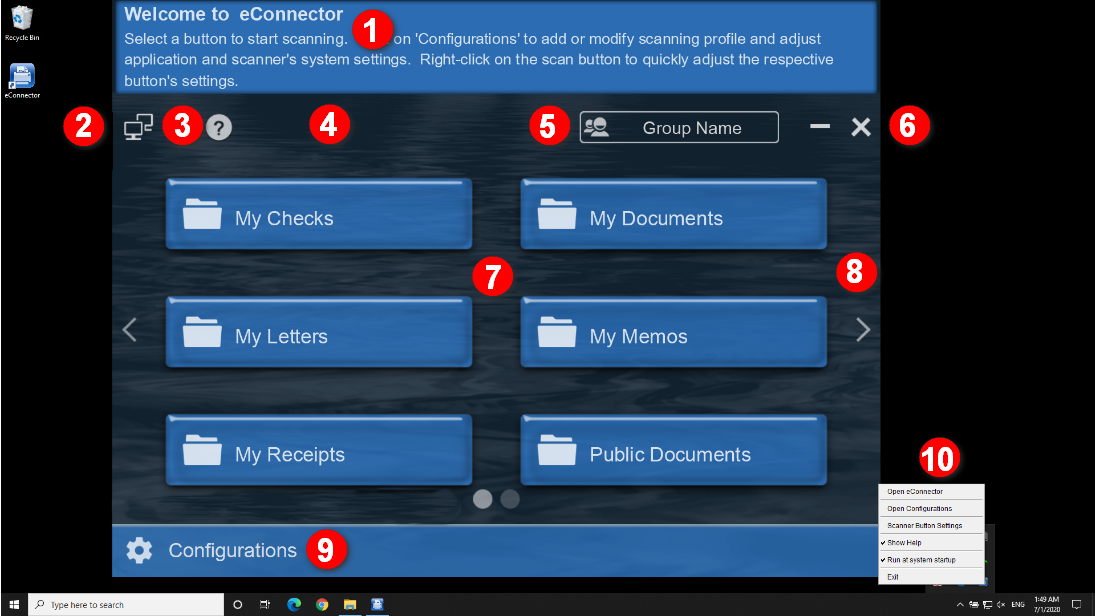 >
>
-
❶ Help Guide
This area provides basic guildance to operation on each interface.
To turn off the guide, refer to item 10 for more info. -
❷Internet Availability
Ethernet and WiFi indicator signals connection availability.
It is strongly advice to connect via Ethernet for stability and data transmit speed. -
❸ Online User's Guide
Click for the online user's manual with detailed walkthroughs and navigation of the eConnector application.
-
❹Reposition the Application Screen
To reposition the application screen on your Windows desktop, simply return to the main interface and click the indicated area
(sometimes there will be a logo overlay) and drag to your desire location. -
❺ Groups
Click to view full list and scroll / click to access a particular group.
Groups can conveniently assist users to categorize job buttons
(e.g. by departments, people, scanning type, or more) and is displayed in alphabetical order.
Each group contains a maximum of twelve job buttons.
It is recommended to create no more than 10 groups per device to ensure smooth operation. -
❻ Minimizing and Close Application Windows to System Tray
Click this area to minimize the application to task bar or click "X" to minimize to system tray.
To terminate the application, right-click from the application on the system tray and click "Exit" to completely exit eConnector. -
❼ Job Button
Job buttons created are displayed directly on the interface.
By default, eConnector will create default profiles to scan and save to the respective location.
Each page contains six job buttons, each group contains a maximum of twelve buttons.
To create a new job button, refer to Create and Add a New Job Button.
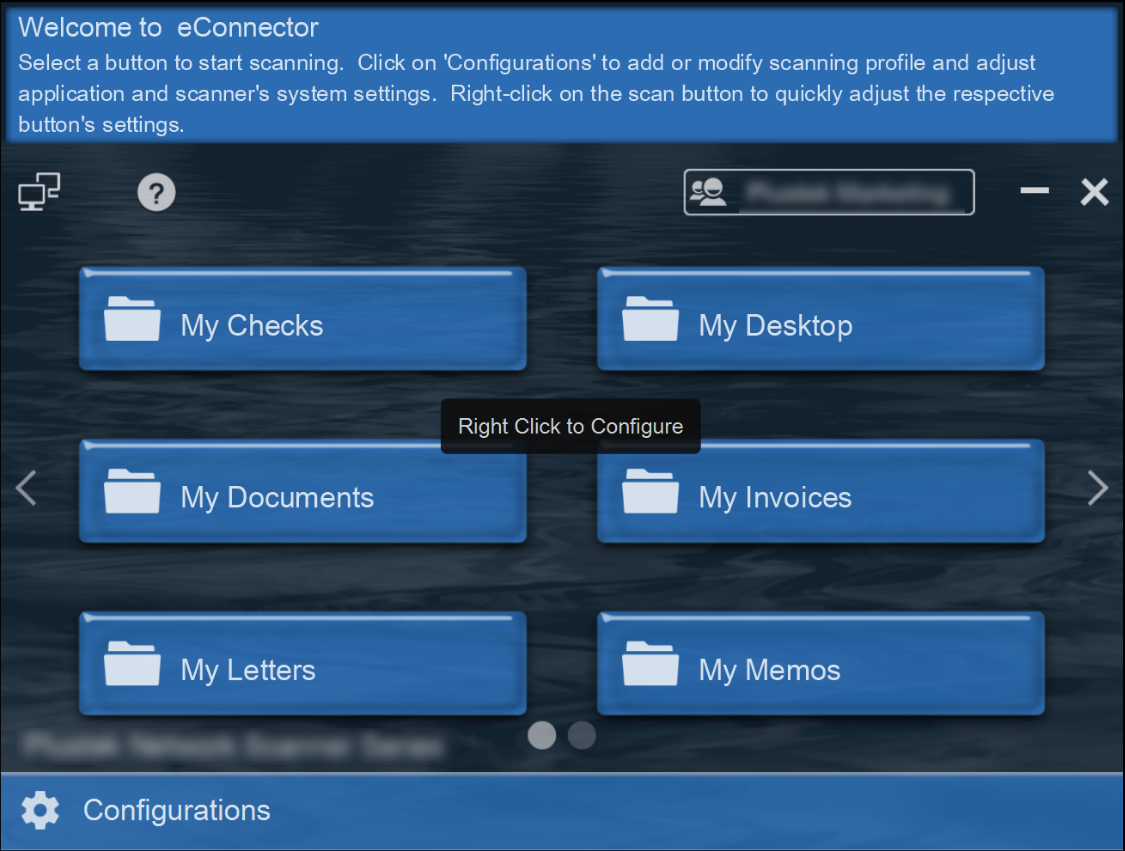
Right-click on a job/scan button to quickly adjust the respective scan profile and settings. -
❽ View and Access Other Job Buttons
Click on the left/right arrows or scroll to view and access other pages.
-
❾ Configuration
Create accounts, job buttons and scanning profiles, as well as configure system settings.
-
❿ System Tray Settings
Click to use the shortcuts for the following:
Open the application or double click on the icon
Go to Configurations
Go to Scanner Button Settings, to adjust eConnector's job buttons with scanner's hardware scan buttons
Enable/disable the help menu
Enable/disable if the application should be launched during startup
Create a New Account



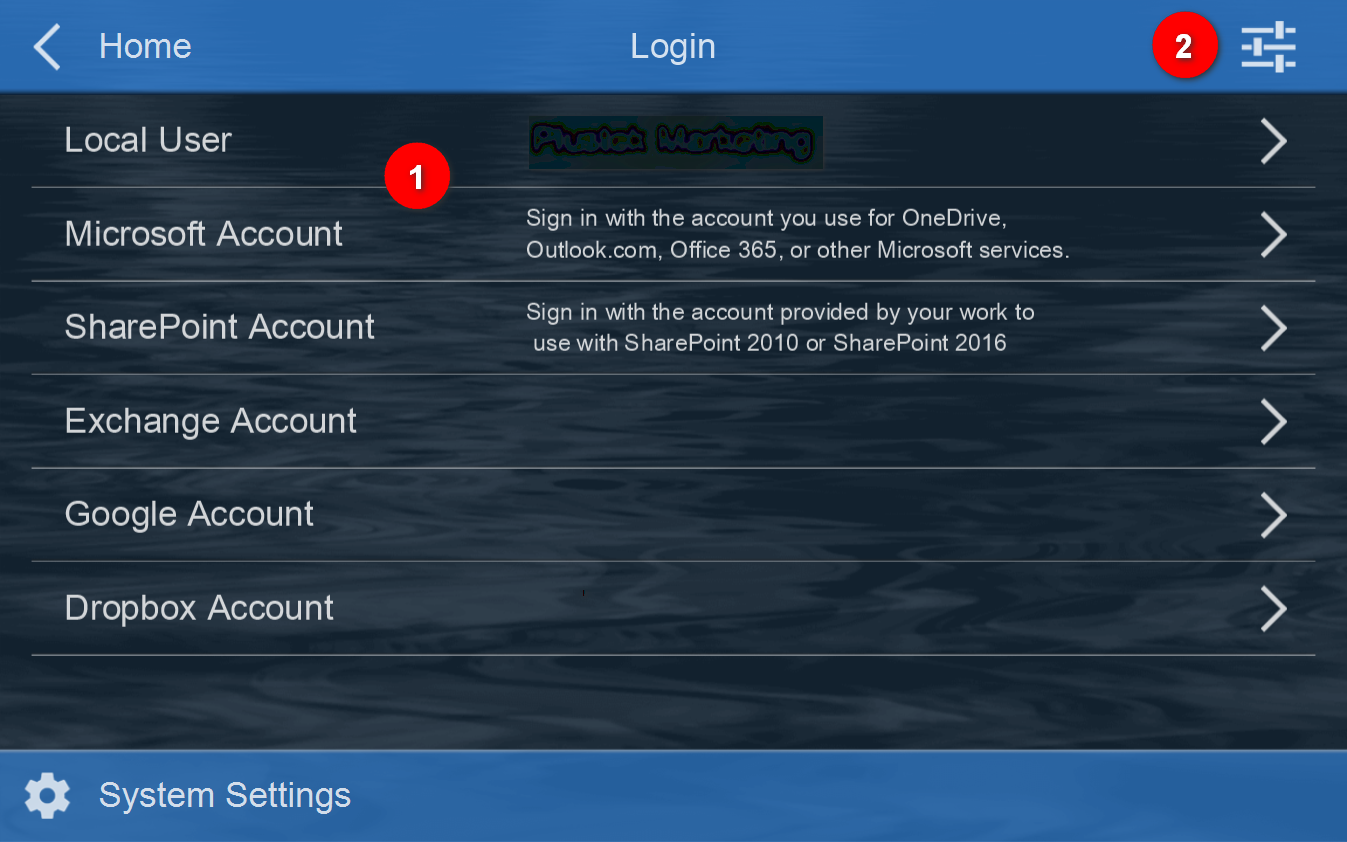
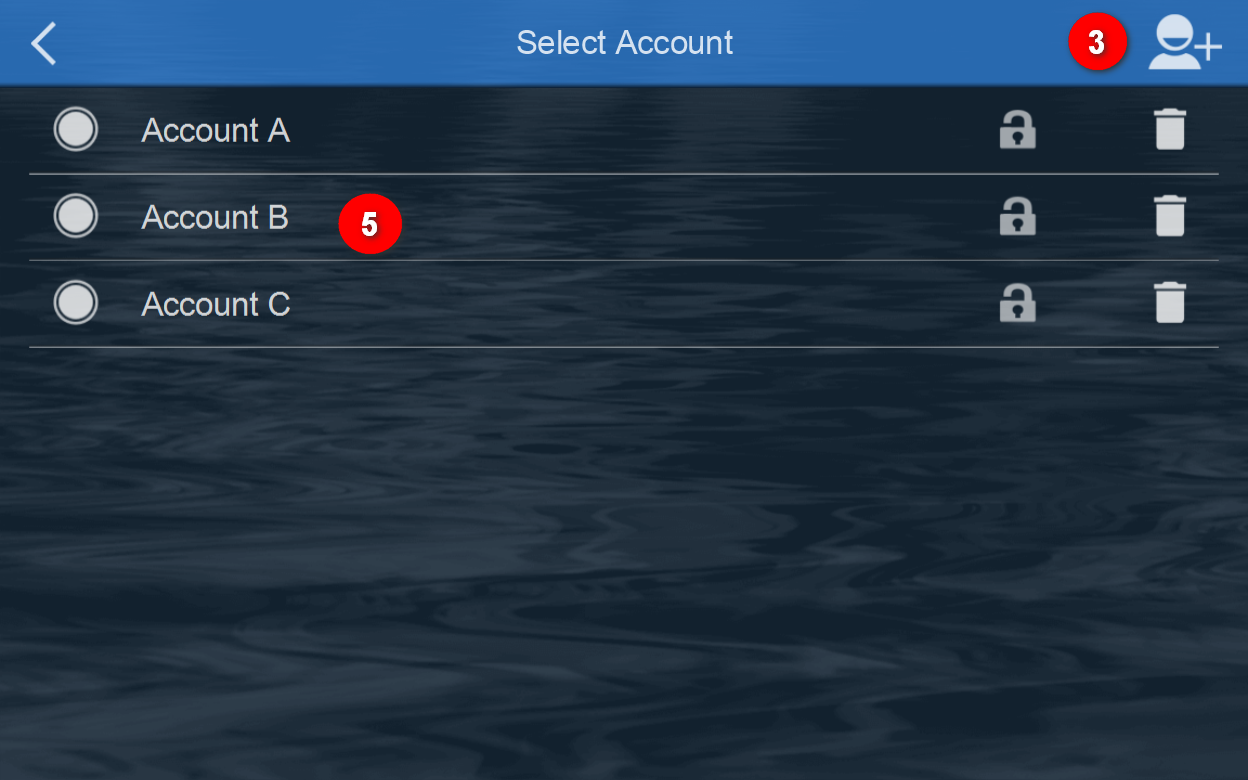
❶Click on 'Configuration' and select a login account
❷Click to enable/disable login accounts
❸Add a new account
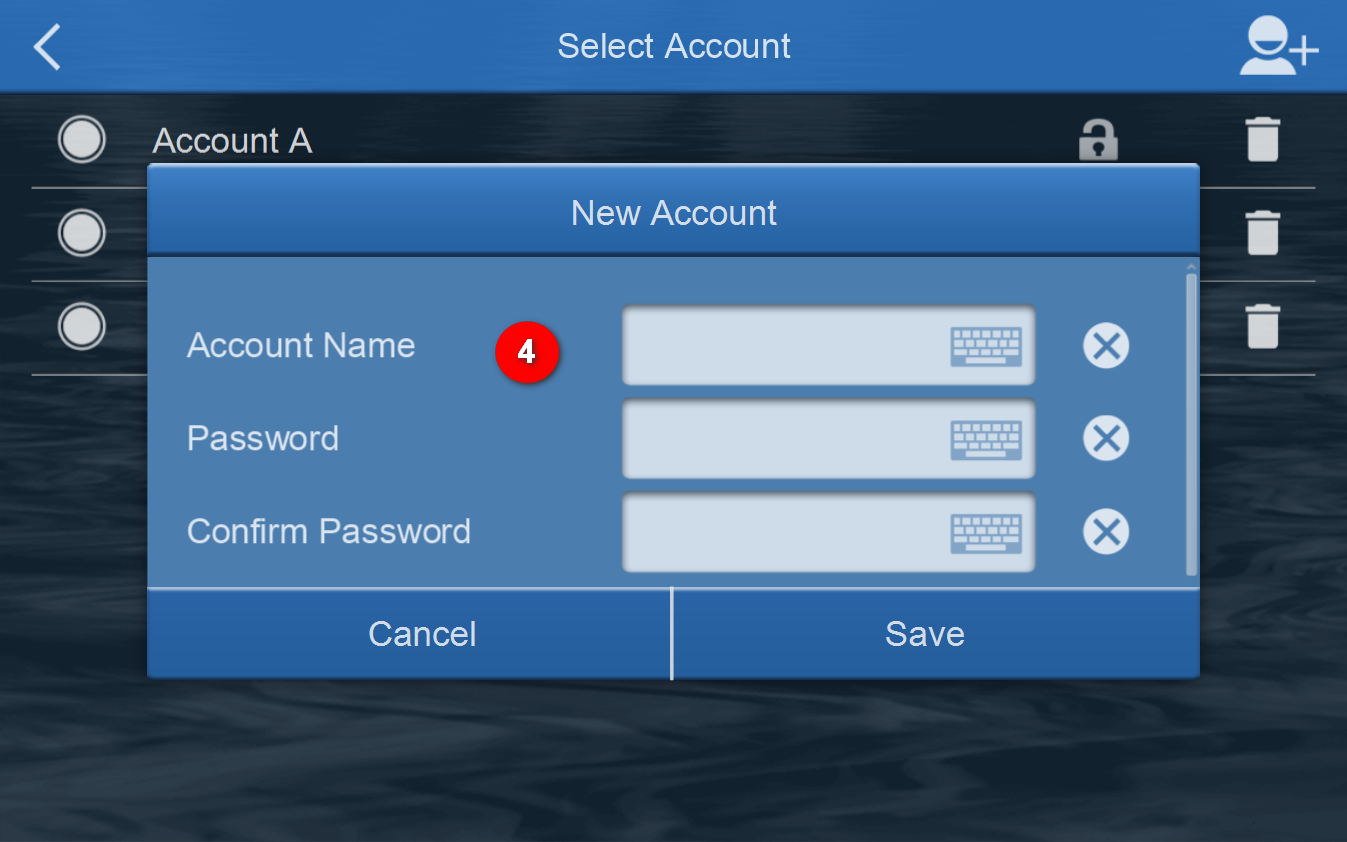
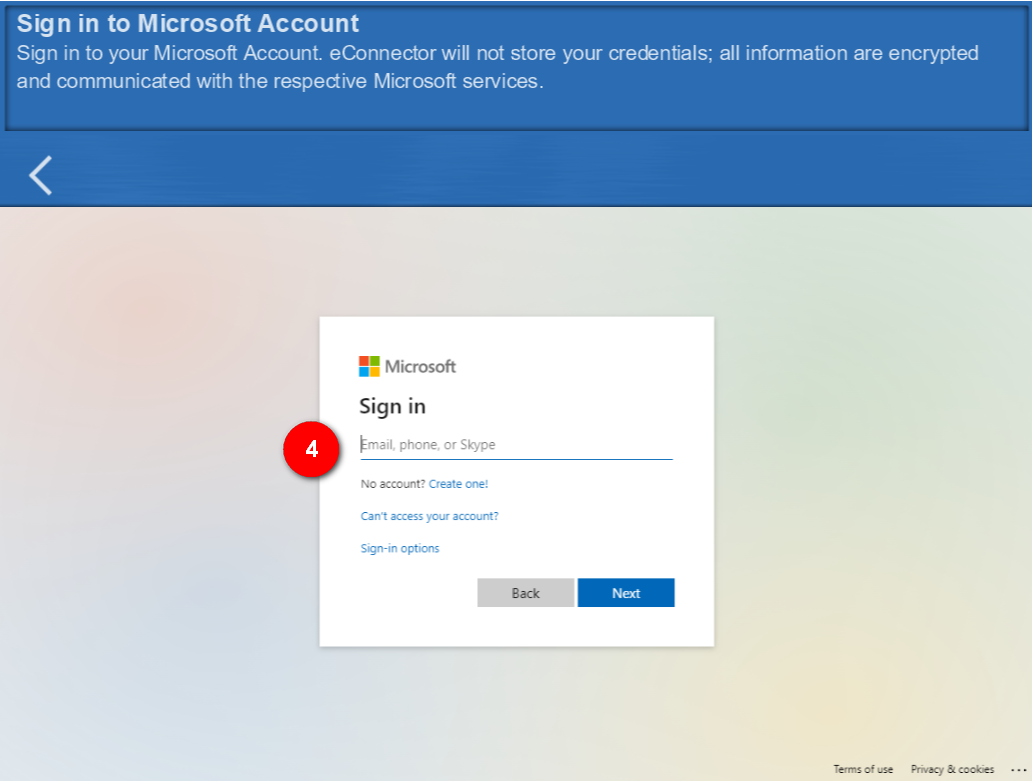
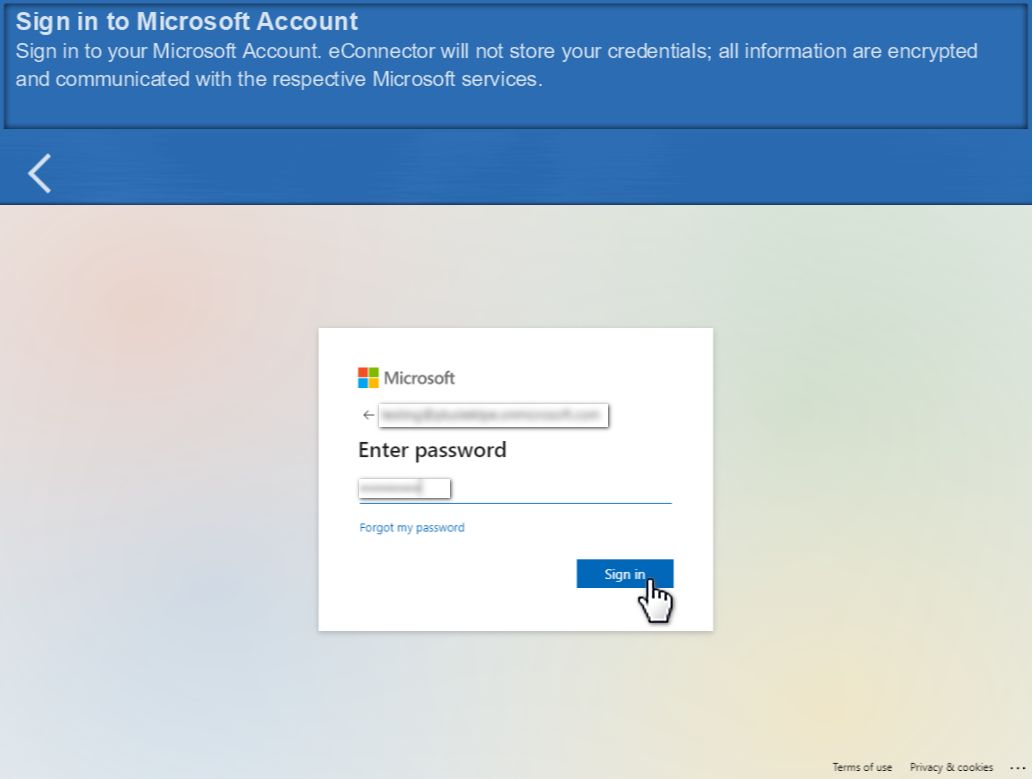
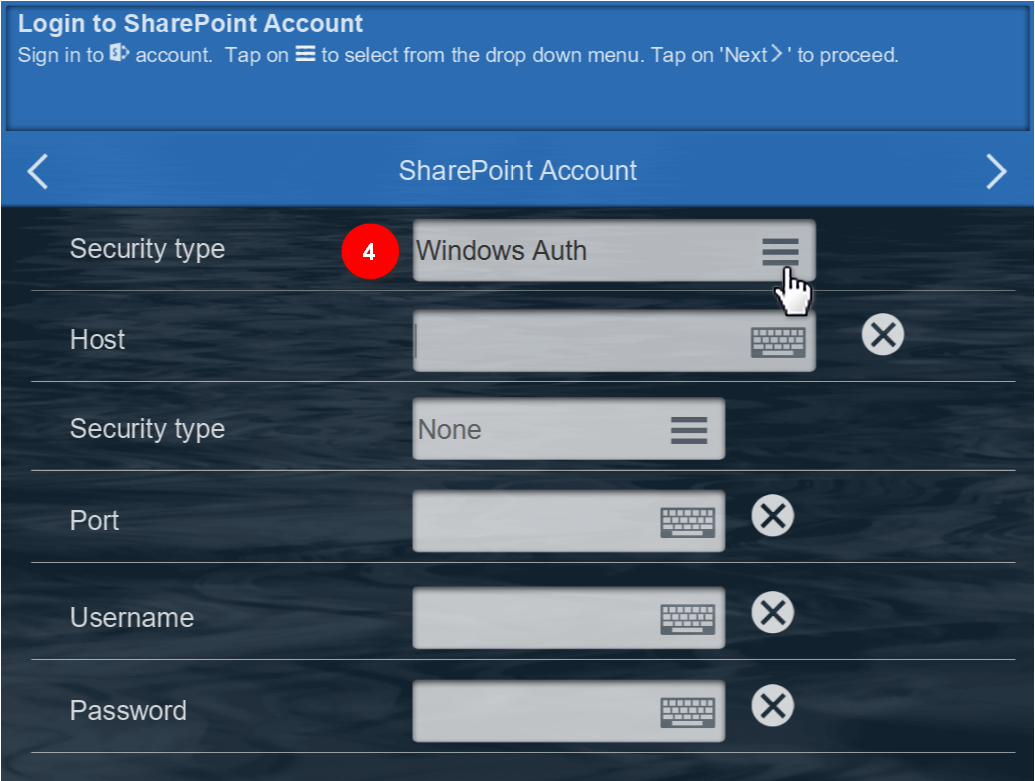
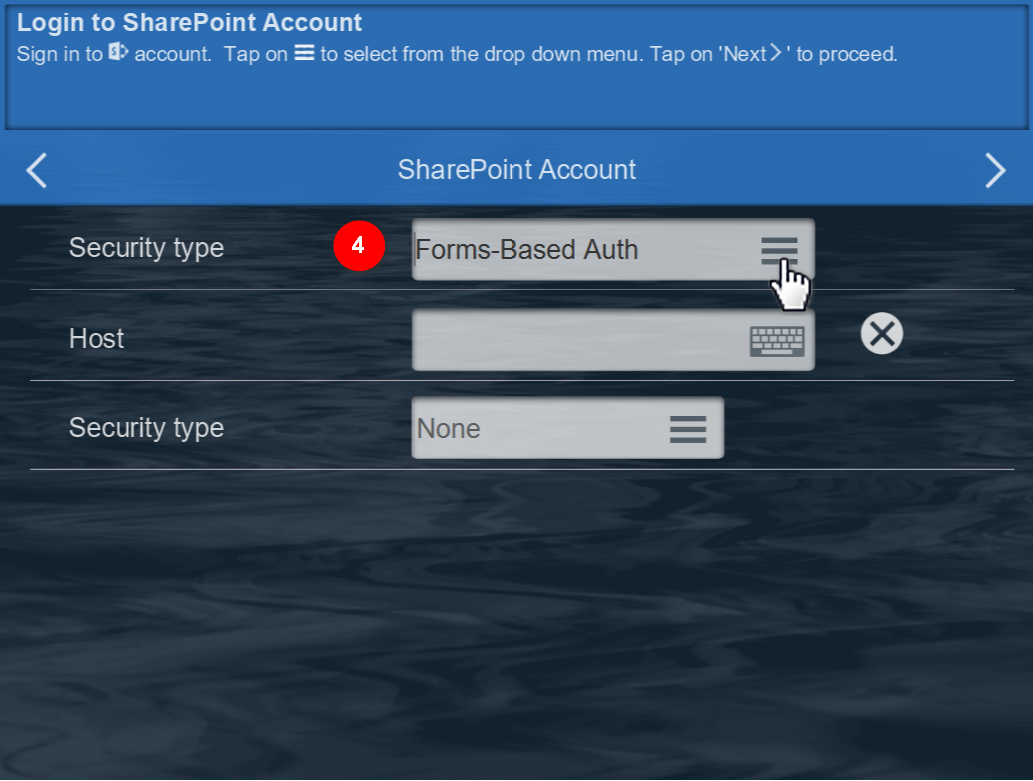
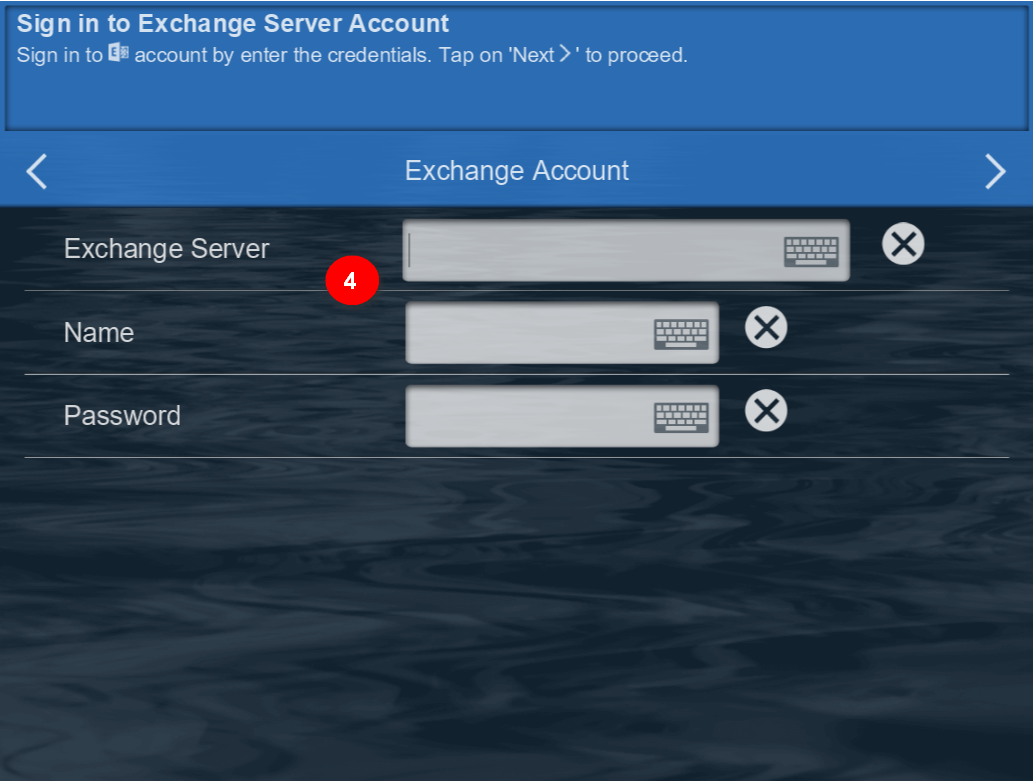
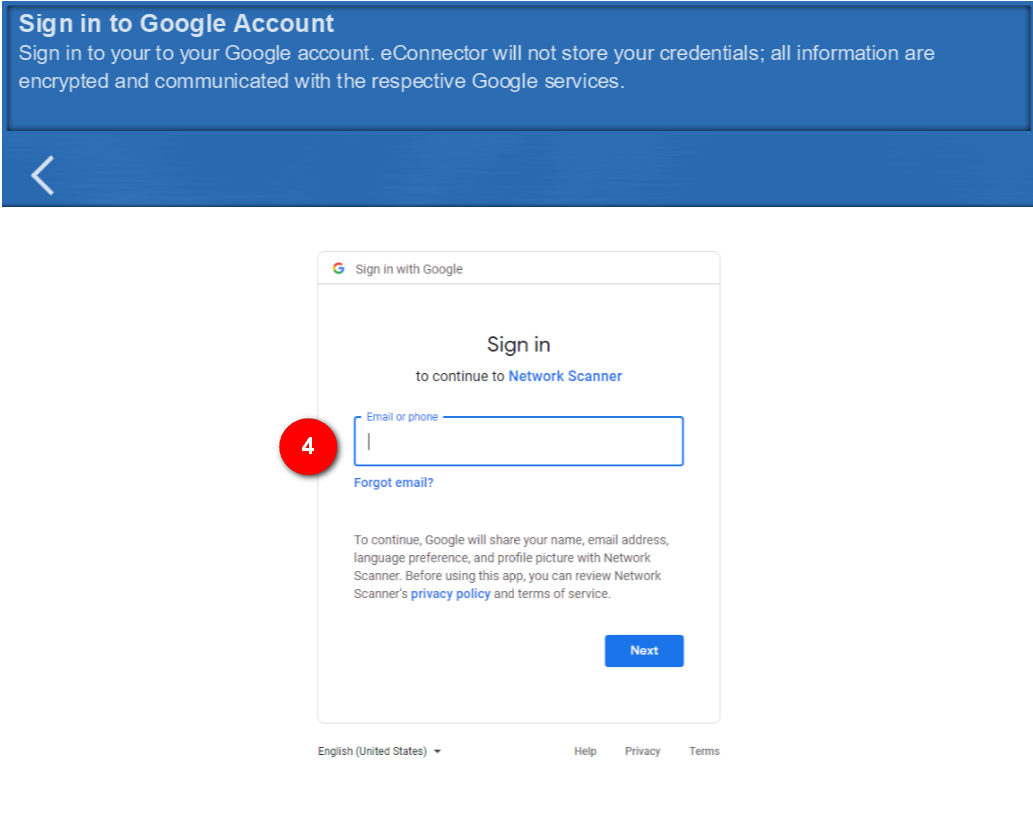
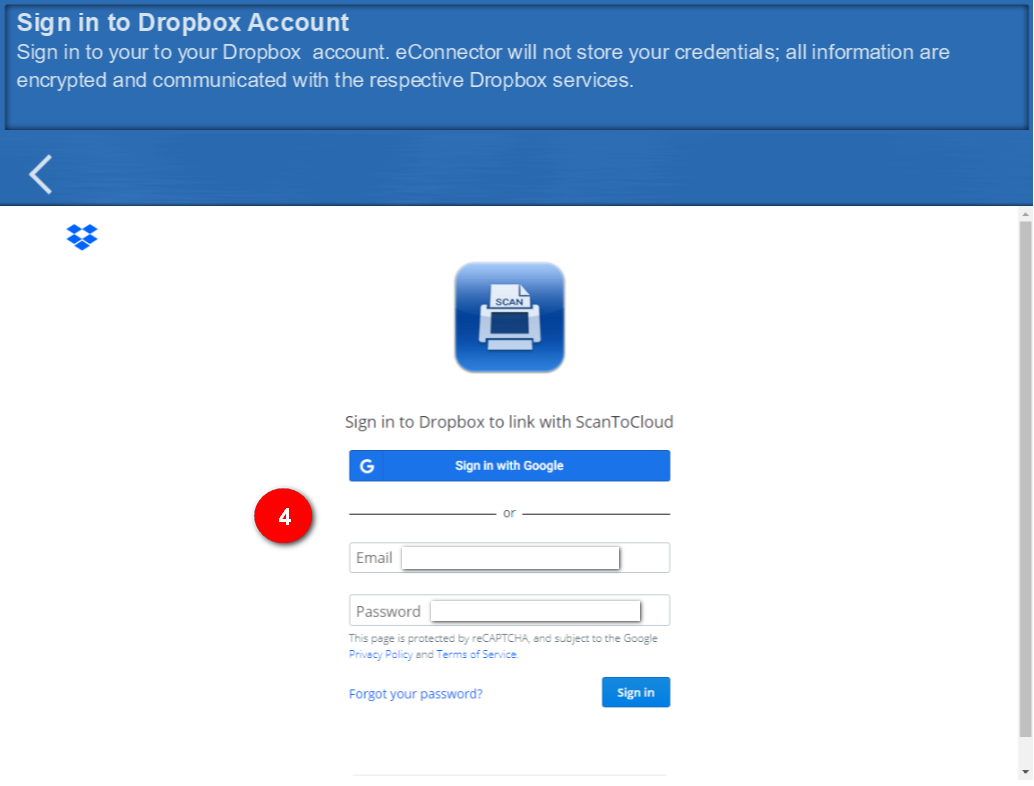
❹Enter information as shown on‘New Account’interface
❺Accounts created are show on‘Select Account’menu
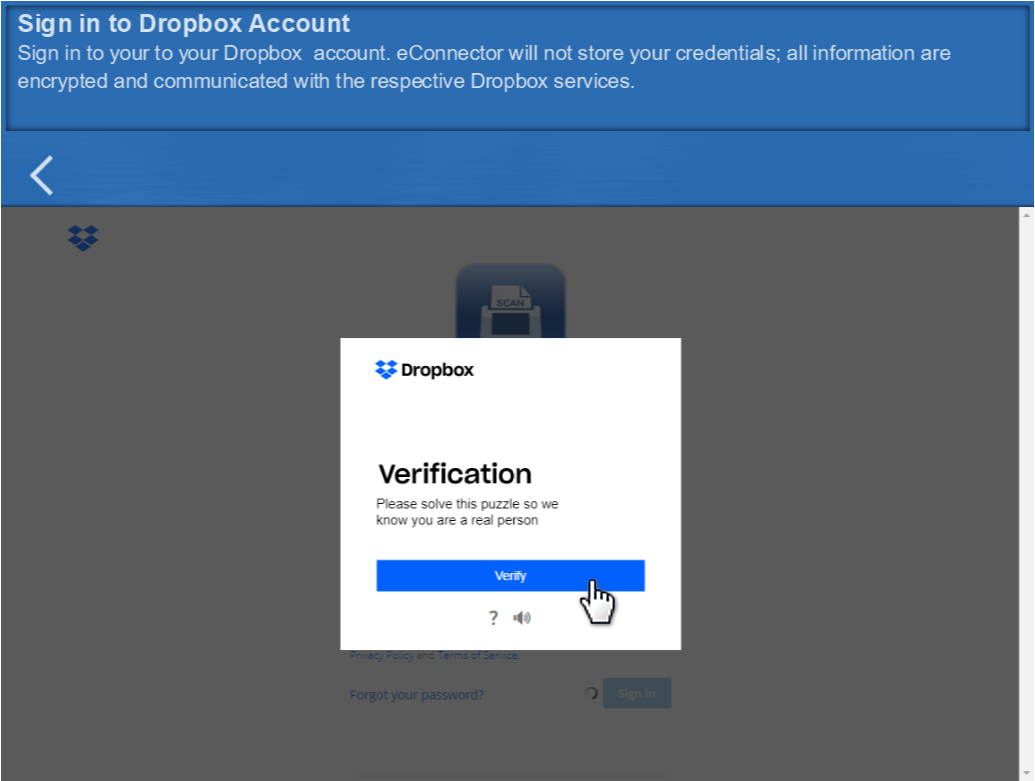
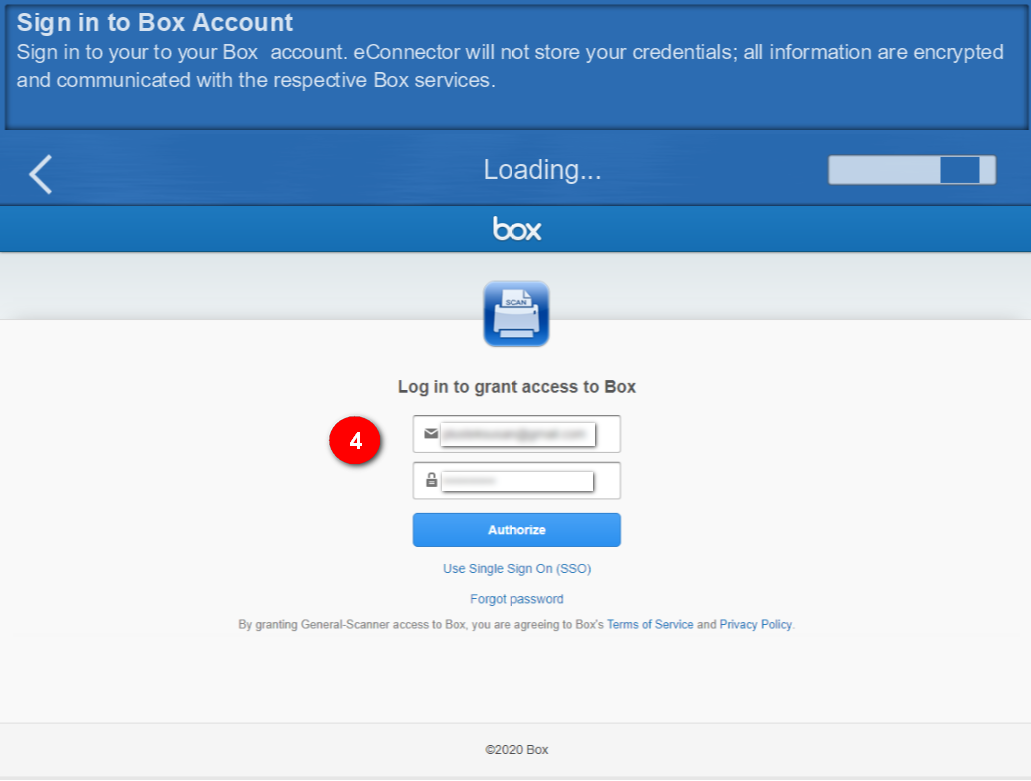
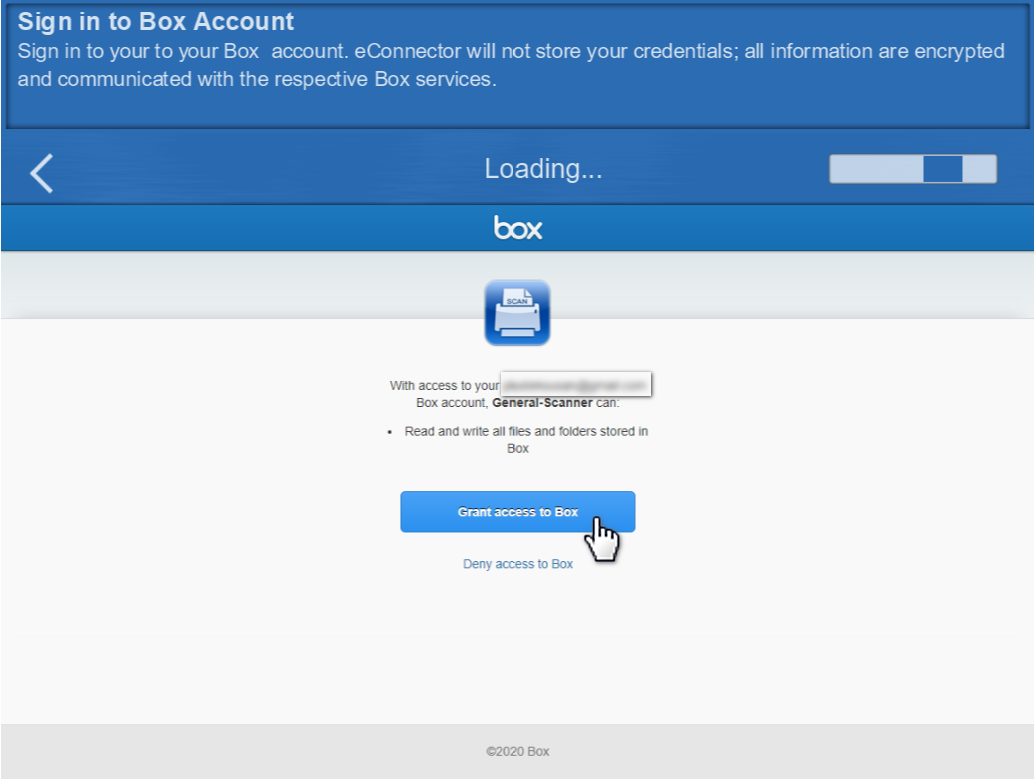
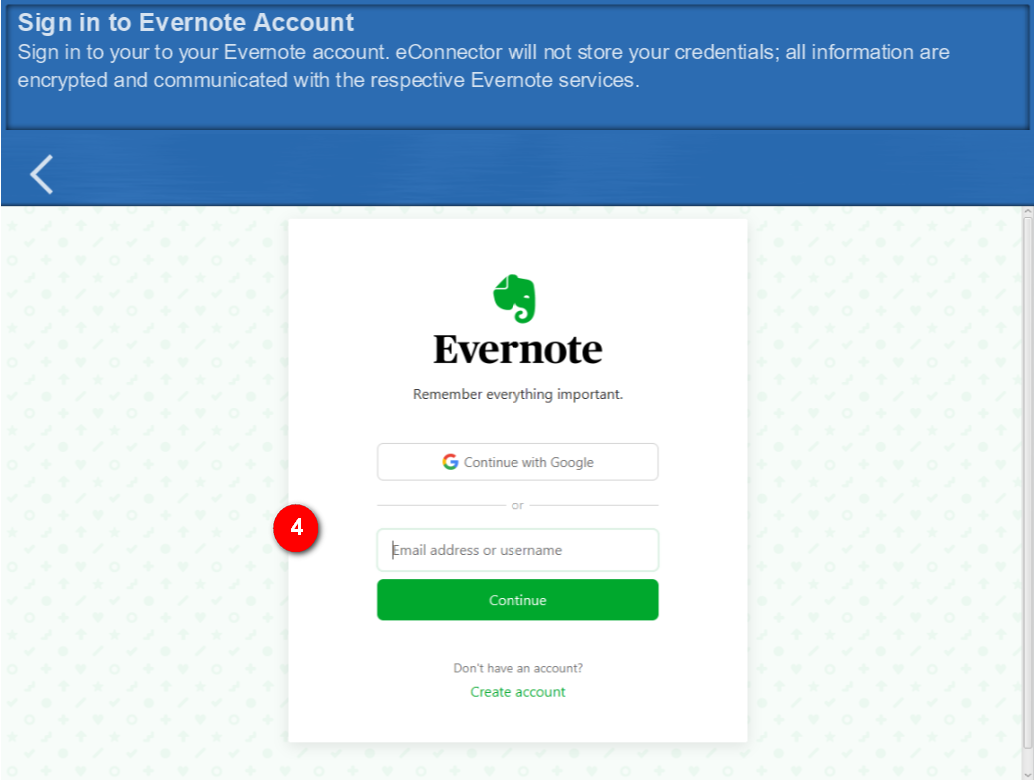
Note: login interface (new account interface) varies depending on the account choosen and will provide different account accessibility.
Account Accessibility List:
Local User Account: Folder, FTP/SFTP/FTPS, Share Folder (SMB 2.0/3.0, CIFS, Azure File Storage, and eMail (SMTP)
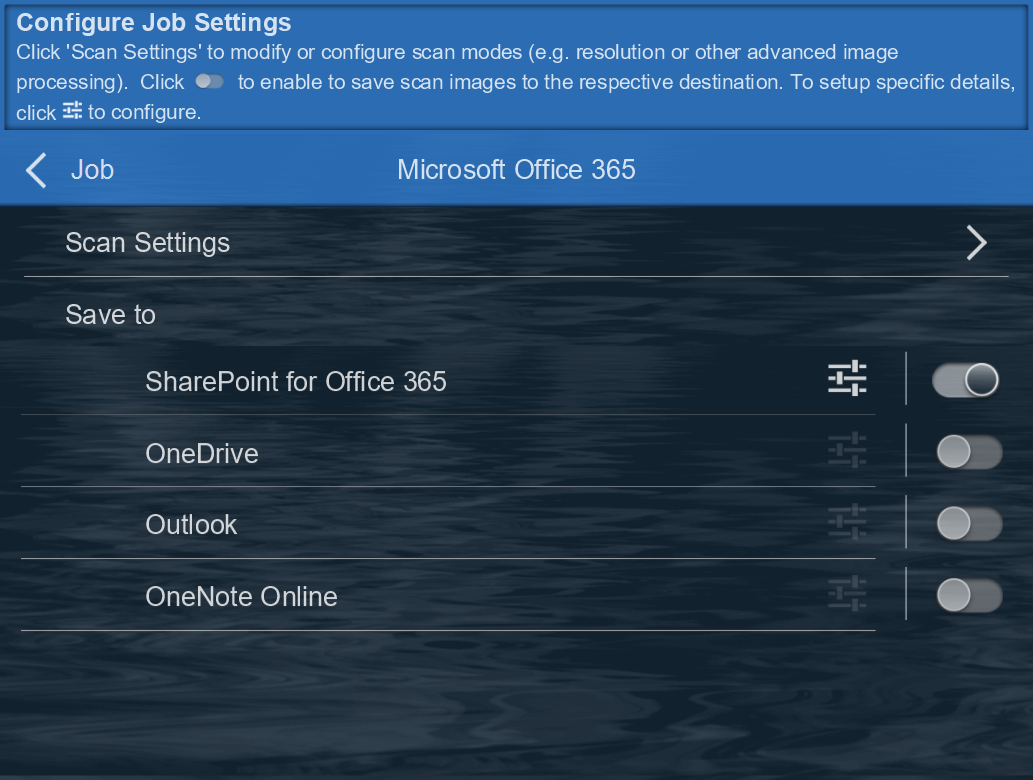
Microsoft Account: Office 365 for SharePoint, OneDrive, Outlook, OneNote Online
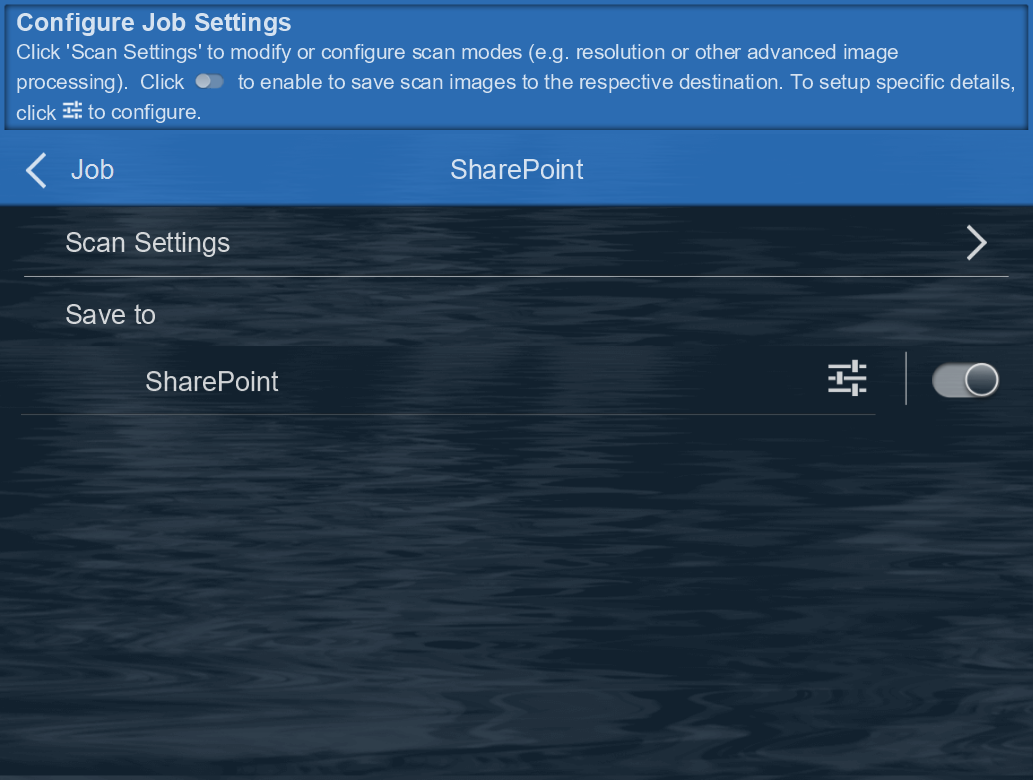
SharePoint Account: SharePoint On-Premises Server 2010/2013/2016/2019
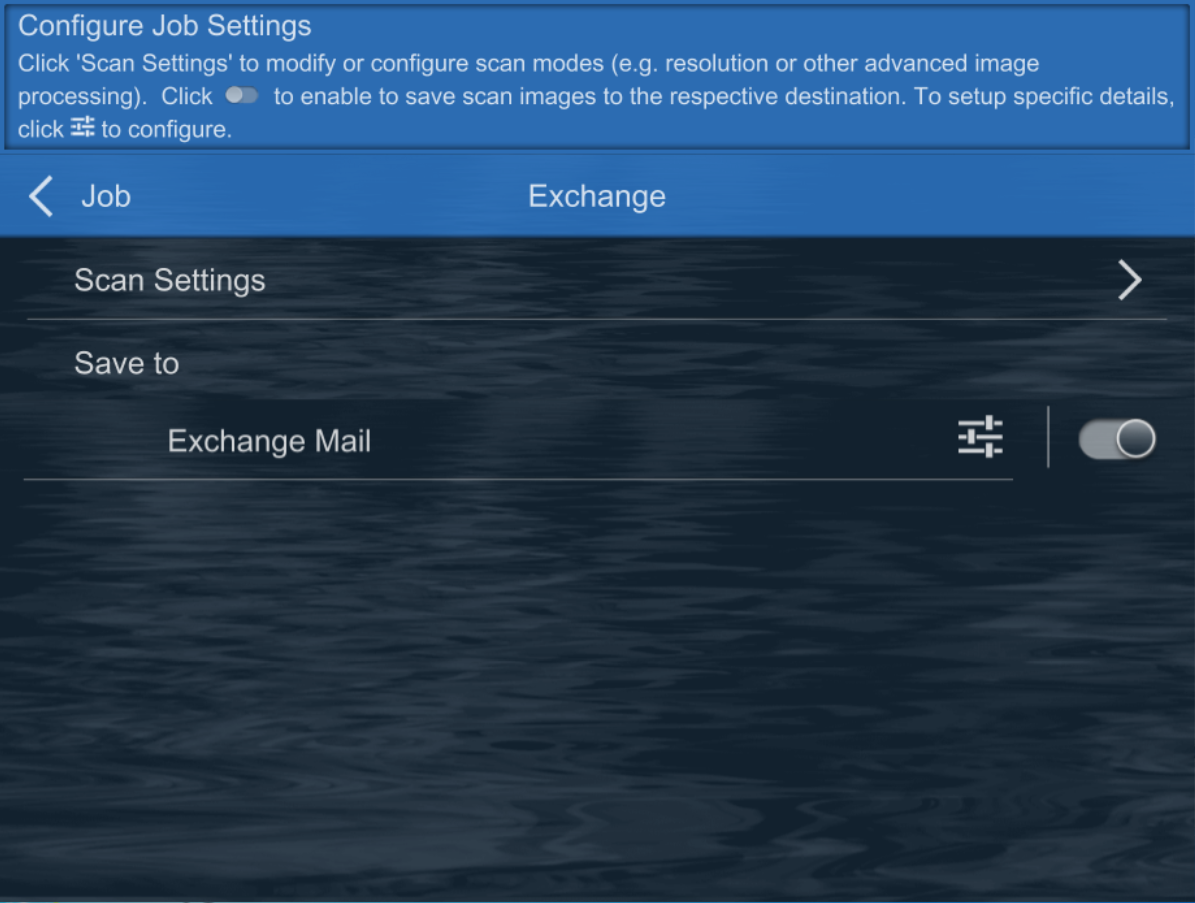
Exchanage Account: Microsoft Exchange Server
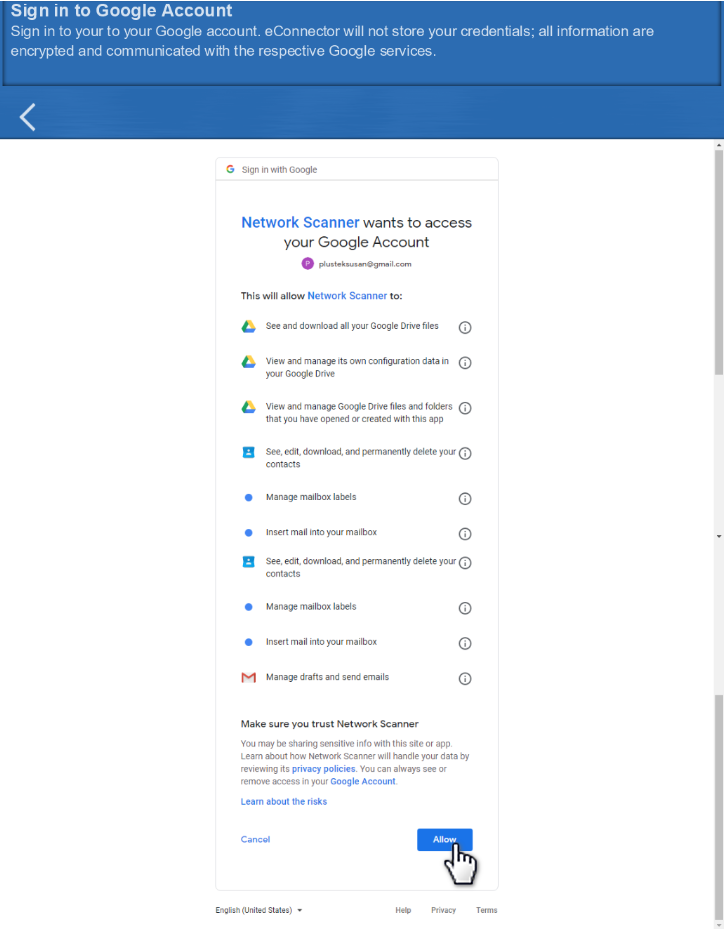
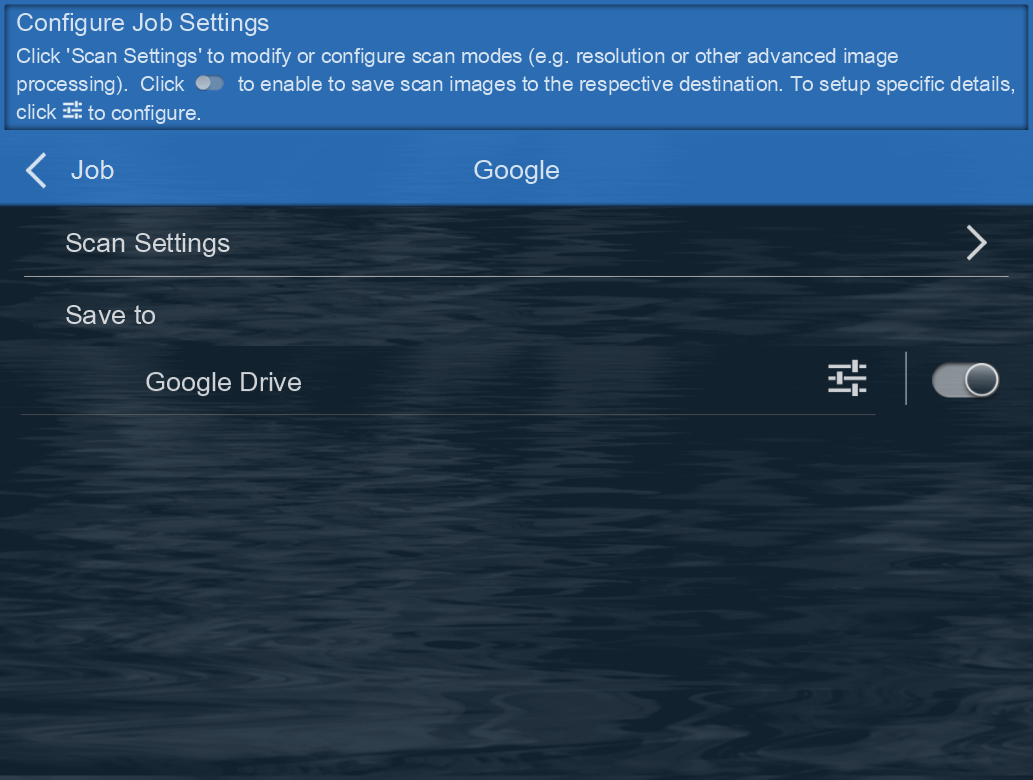
Google Account: Google Drive
Dropbox Account: Dropbox
Box Account: Box
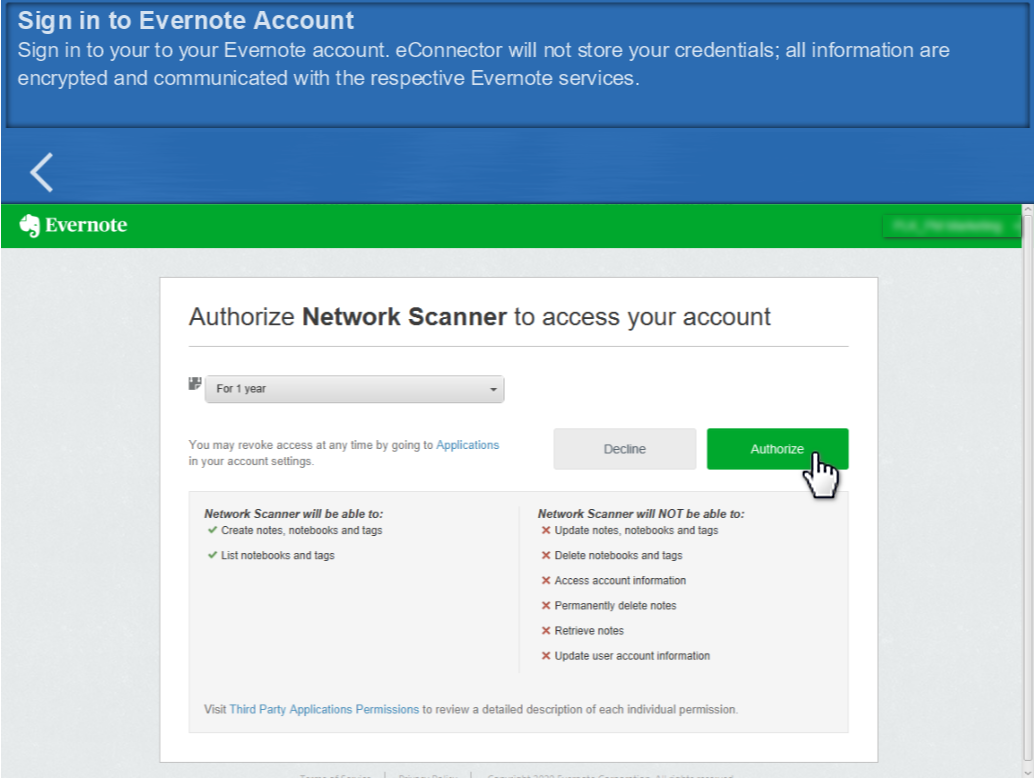
Evernote Account: Evernote
Edit Job Profile (Button)
Edit a preconfigure job button/profile, by simply right click on the individual button on the main menu. It will take you immediately to the respective job settings. Each job profile 'Save to' varies depending on the account type. Refer to 'Create Account' Accessibility list for detail.
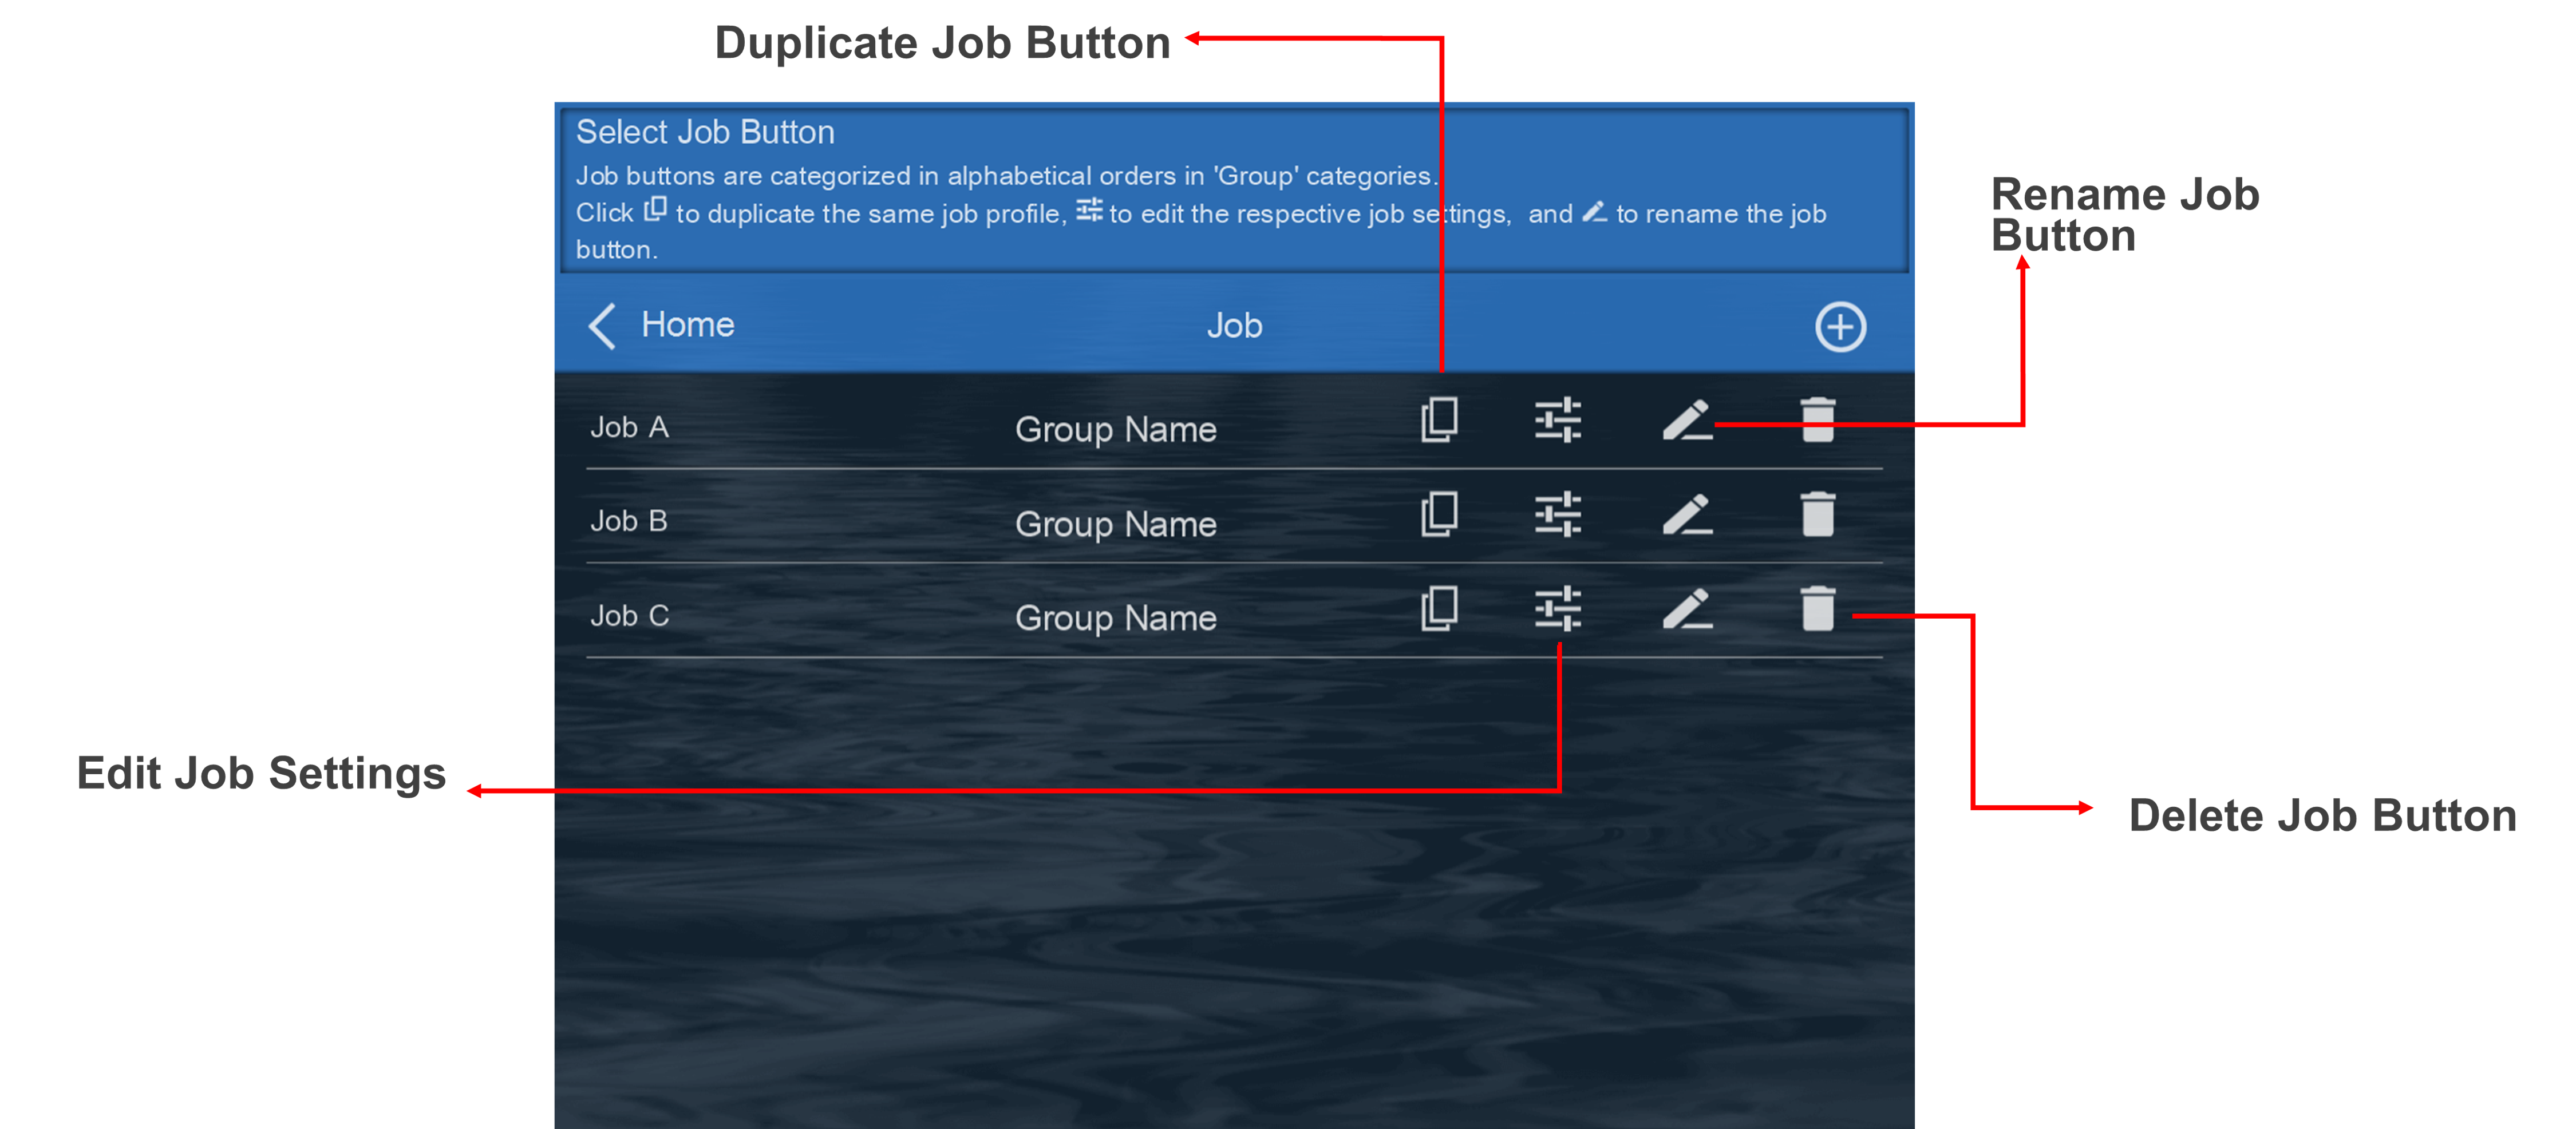
Manage Job Profile:
Manage job button to edit settings at any time.
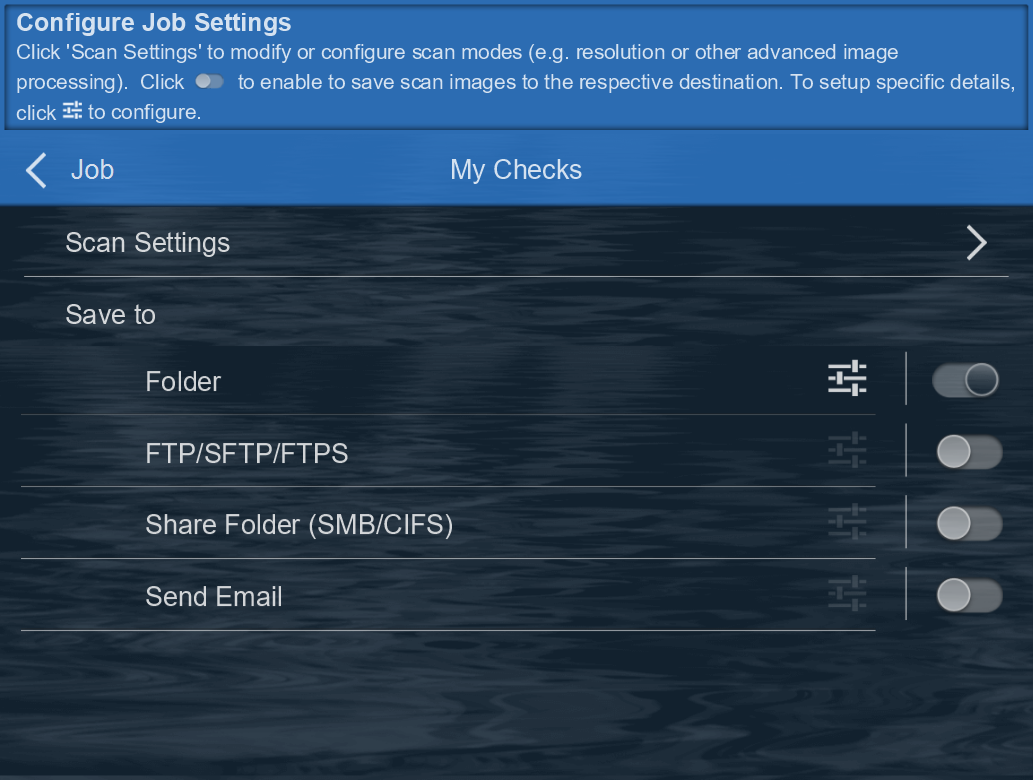
Configure Individual Job Profile:
A job profile consist of two major setting groups:
1. Scan Settings
Click'Scan Settings'to modify or configure scan modes (e.g. resolution or other advanced image processing).
2. Save Location Settings
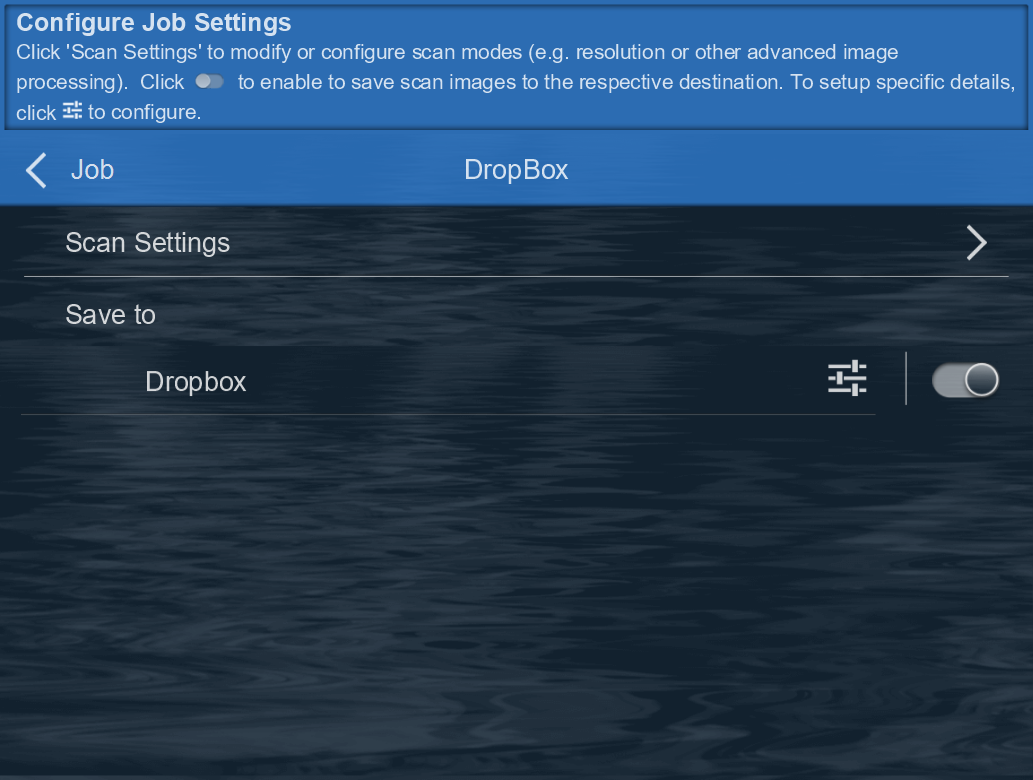
Click  to enable and save scan image to the respective destionation. To setup specific details, click
  to configure.
Local User Account:
Microsoft Account:
SharePoint Account:
Exchanage Account:
Google Account:
Dropbox Account: Dropbox
Box Account: Box

Evernote Account: Evernote
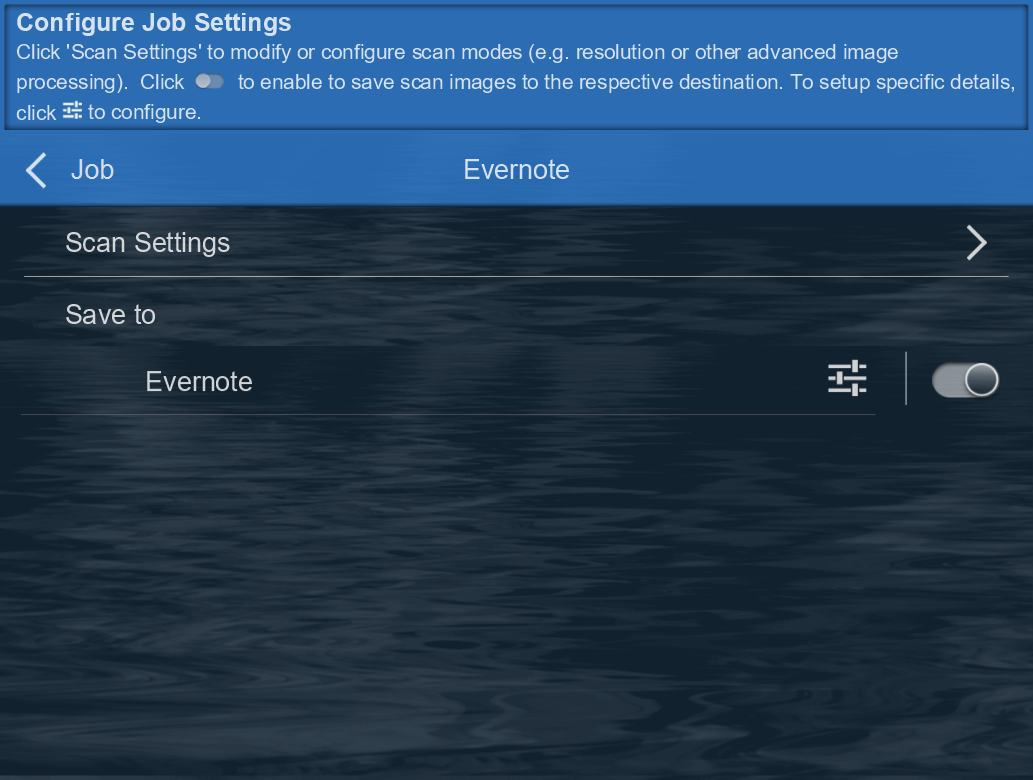
A job profile consist of two major setting groups:
1. Scan Settings
Click'Scan Settings'to modify or configure scan modes (e.g. resolution or other advanced image processing).
2. Save Location Settings
Click
 to enable and save scan image to the respective destionation. To setup specific details, click
  to configure.
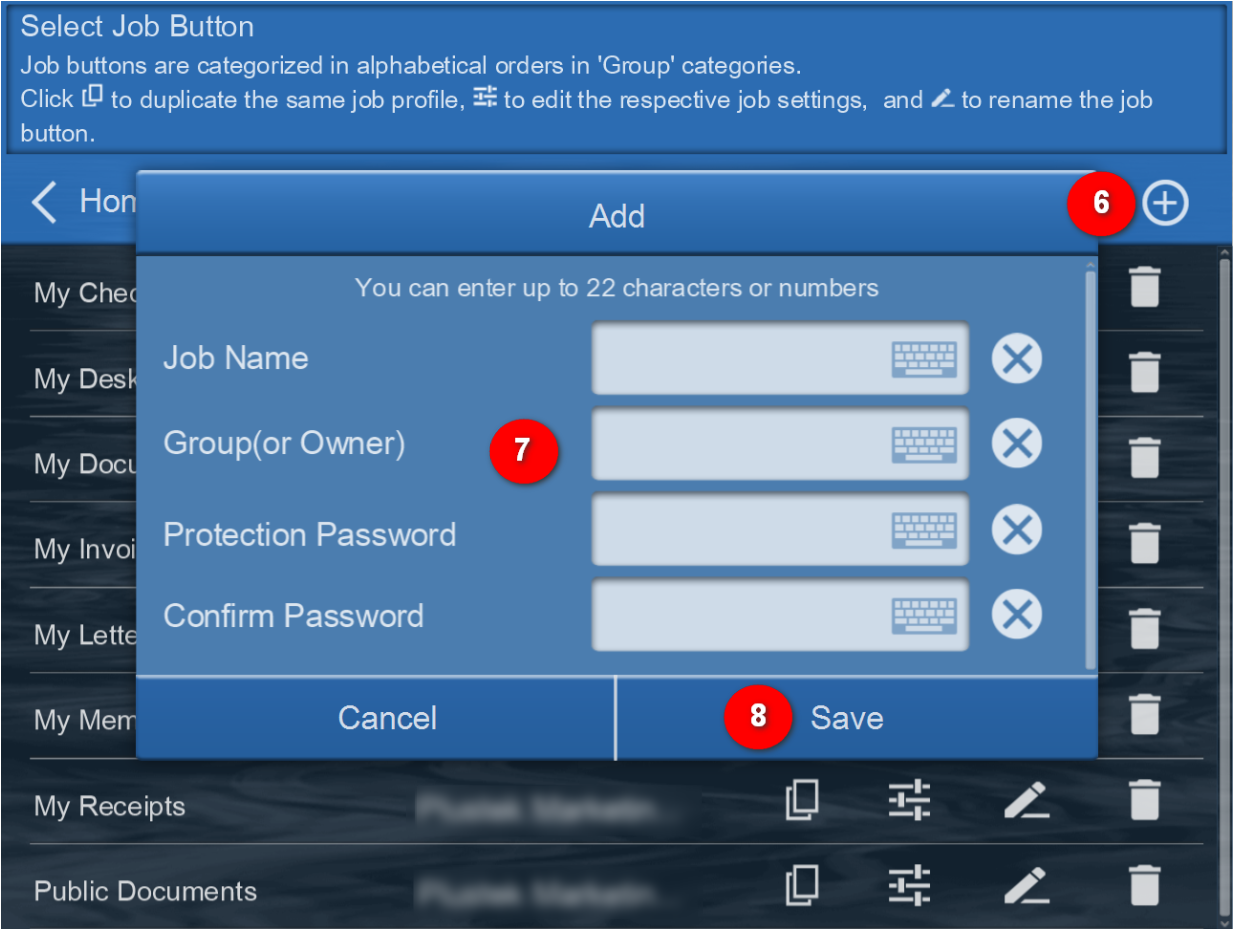
Create A New Job Button
❻ Click ⊕ to start creating job buttons.
❼ Enter Job Name and Group (or Owner).
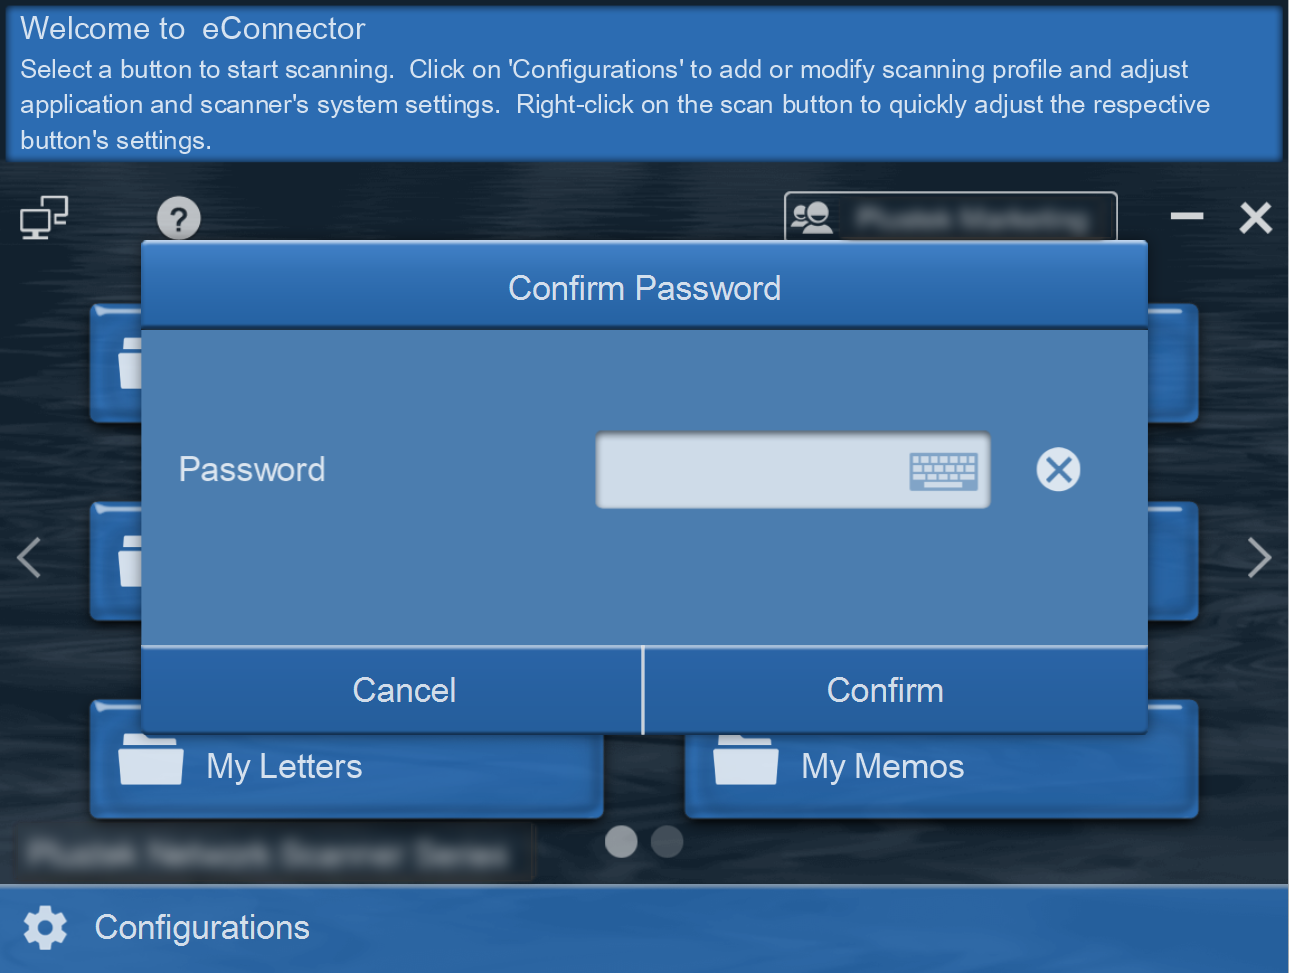
Optional password can be setup for button access control (User will be prompt to enter a password before scanning).
❽ Click 'Save" to continue setup.
Job Name
Name the job profile to be displayed on the Main Menu. Create up to 12 job profile buttons for each Group.
Group(or owner)
Groups can conveniently assist users to categorize job buttons (e.g. by departments, names, scanning type, or more) and is displayed in alphabetical order. Each group contains a maximum of twleve job buttons. It is recommended to create no more than 10 groups per device to ensure smooth operation.
Password
The optional feature provides you additional control to what gets scan and deliver to your preconfigure archive location. Credentials are madatory if enable before each scan.
Scan Settings
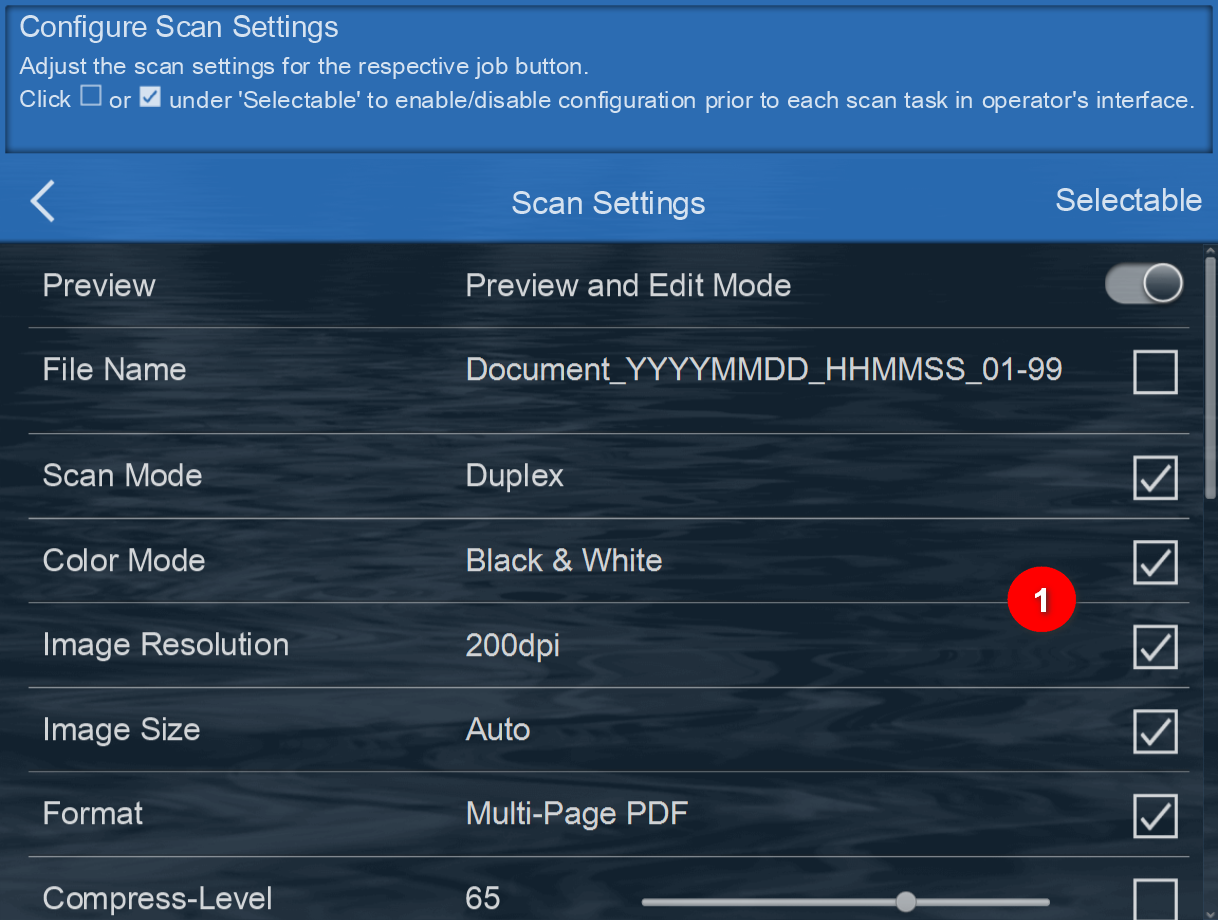
Click the checkbox in the ❶'Selectable' column to enable the respective settings, to make it adjustable in the User's/Operator's interface.
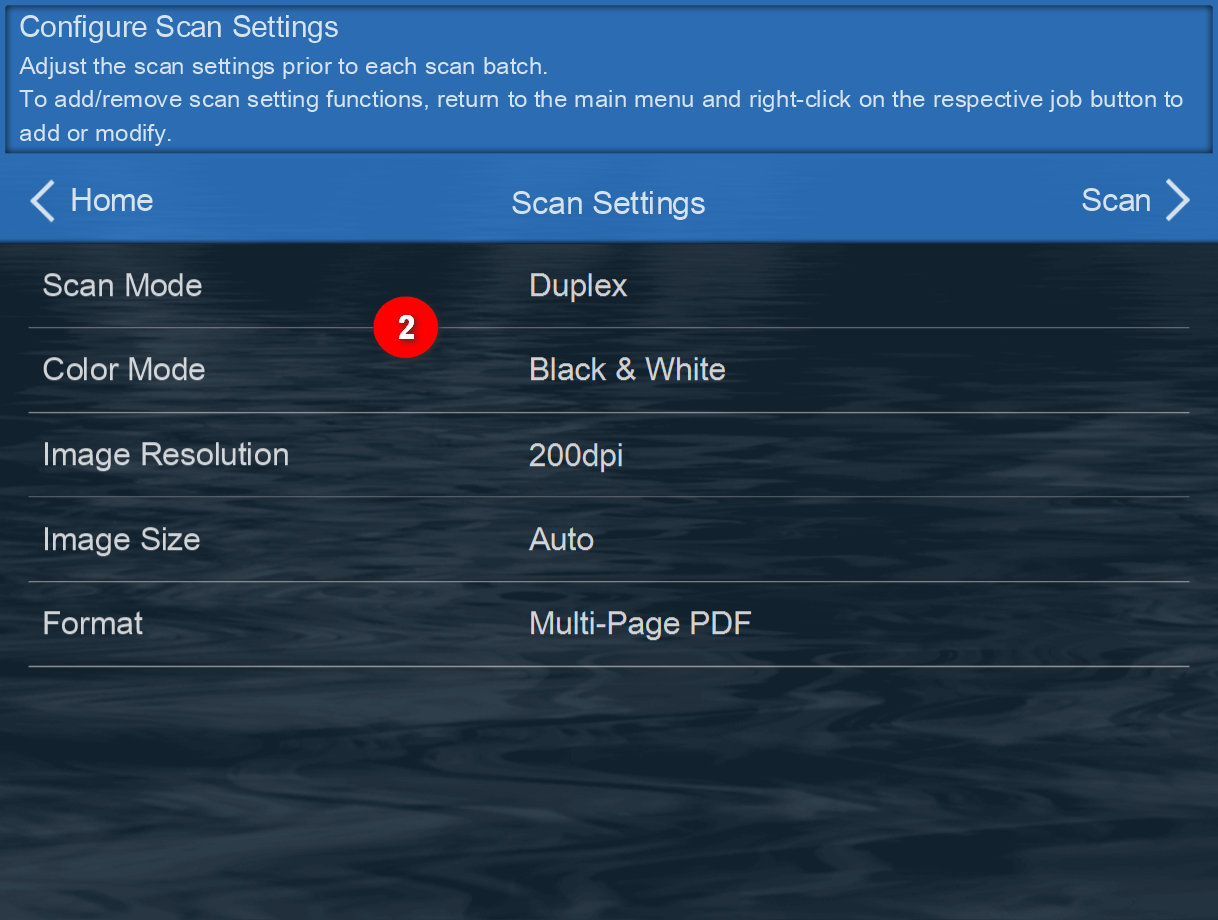
User/Operator can adjust the selected ❷scan settings from the adminstrator view in the User's Operator's interface prior to each scanning batch.
Note:
When no checkbox is selected. User/Operator will perform scan according to default settings.
Administrator View
Operator View
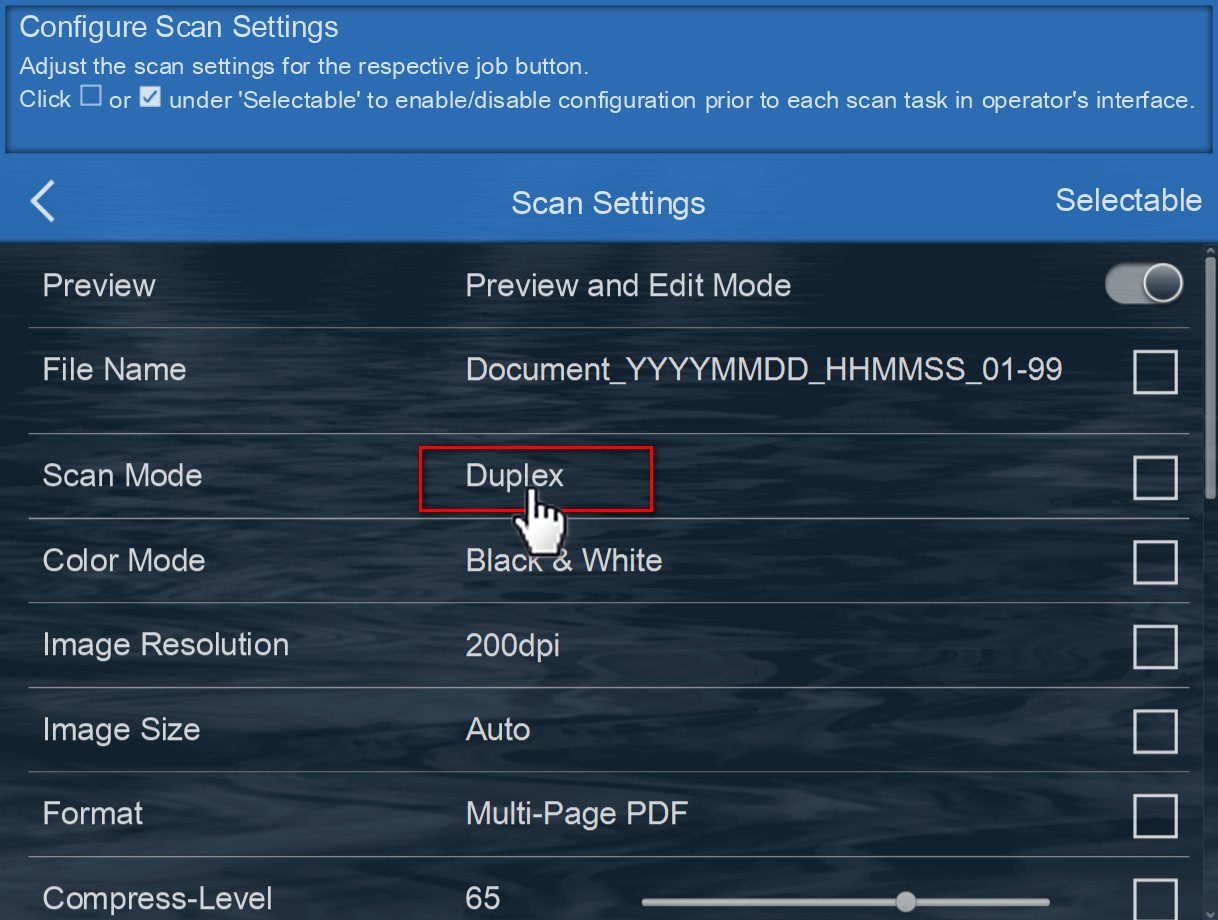
* Scroll down for more scan settings functions. Please note that some features requires you to enable and configure additonal settings. (e.g. choose between simplex/duplex by clicking on the respective function)
Click to bring up additional settings
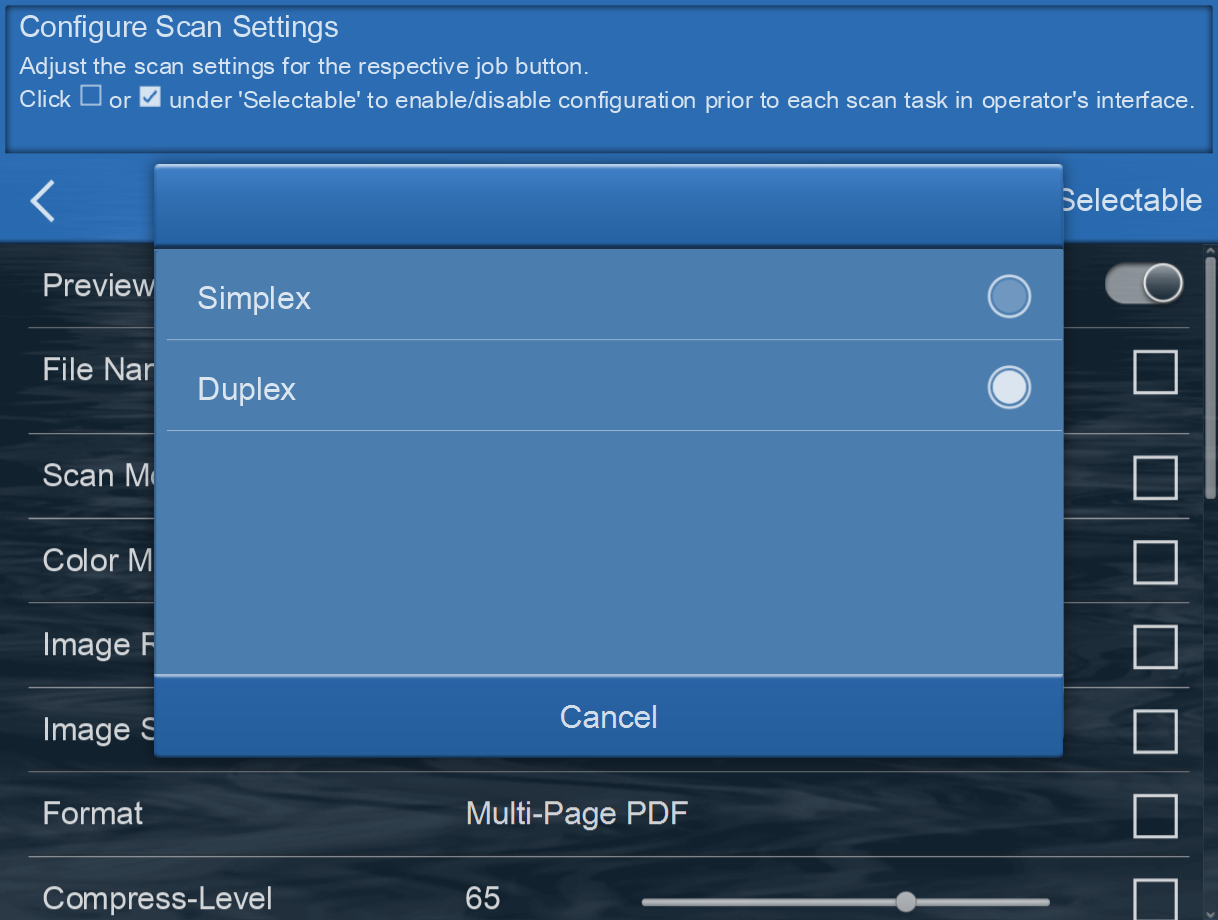
Select and setting will save automatically
Advanced Scan Settings
The following settings can be changed:
Preview
Enable Preview and Edit Mode to review the images created from the batch of scans. User may rotate images, continue scanning, click on the image to crop and make edits. When scanning in Multi-Page PDF/TIFF, splitting files can be done manually by click between the scan images.
File Name
File Name for the scan documents can be preconfigure under ‘File Name’ interface.
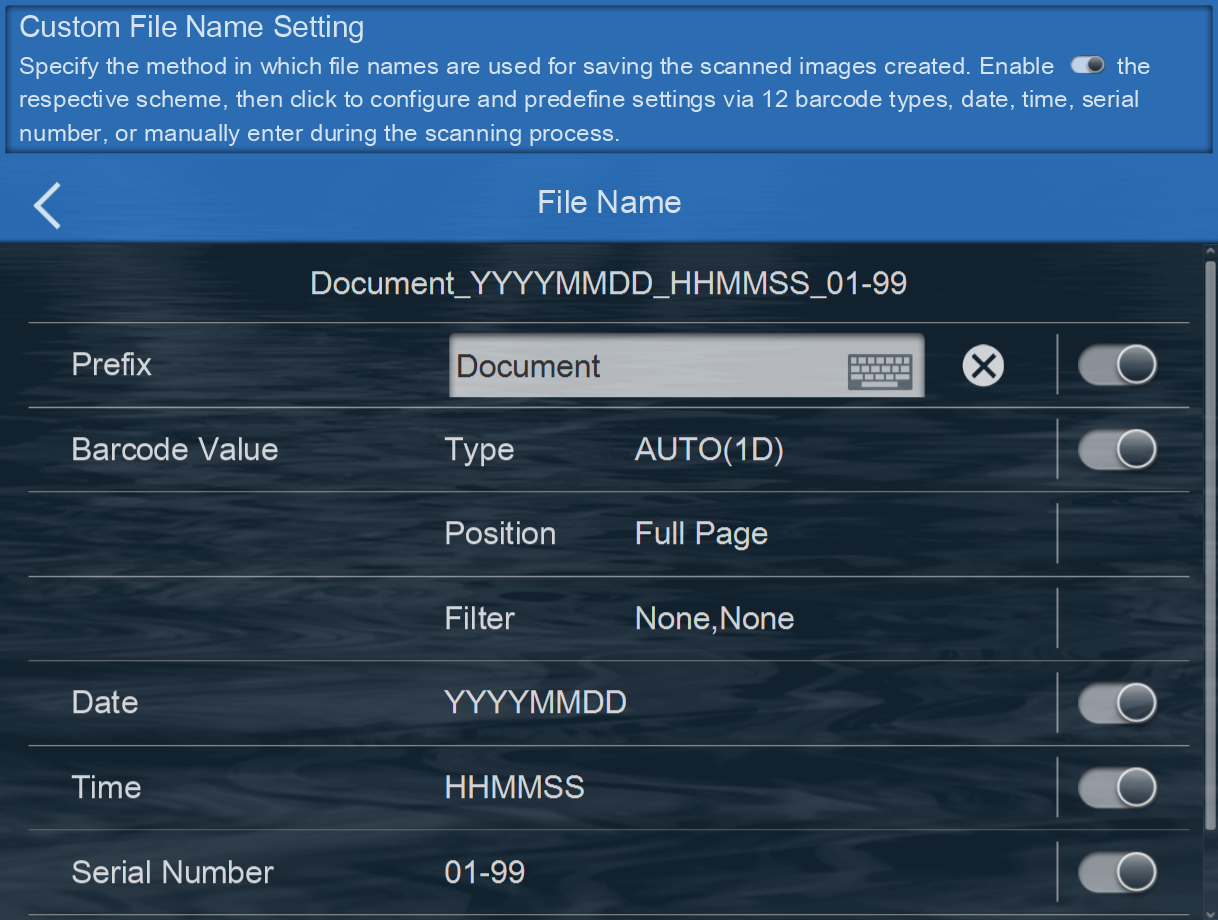
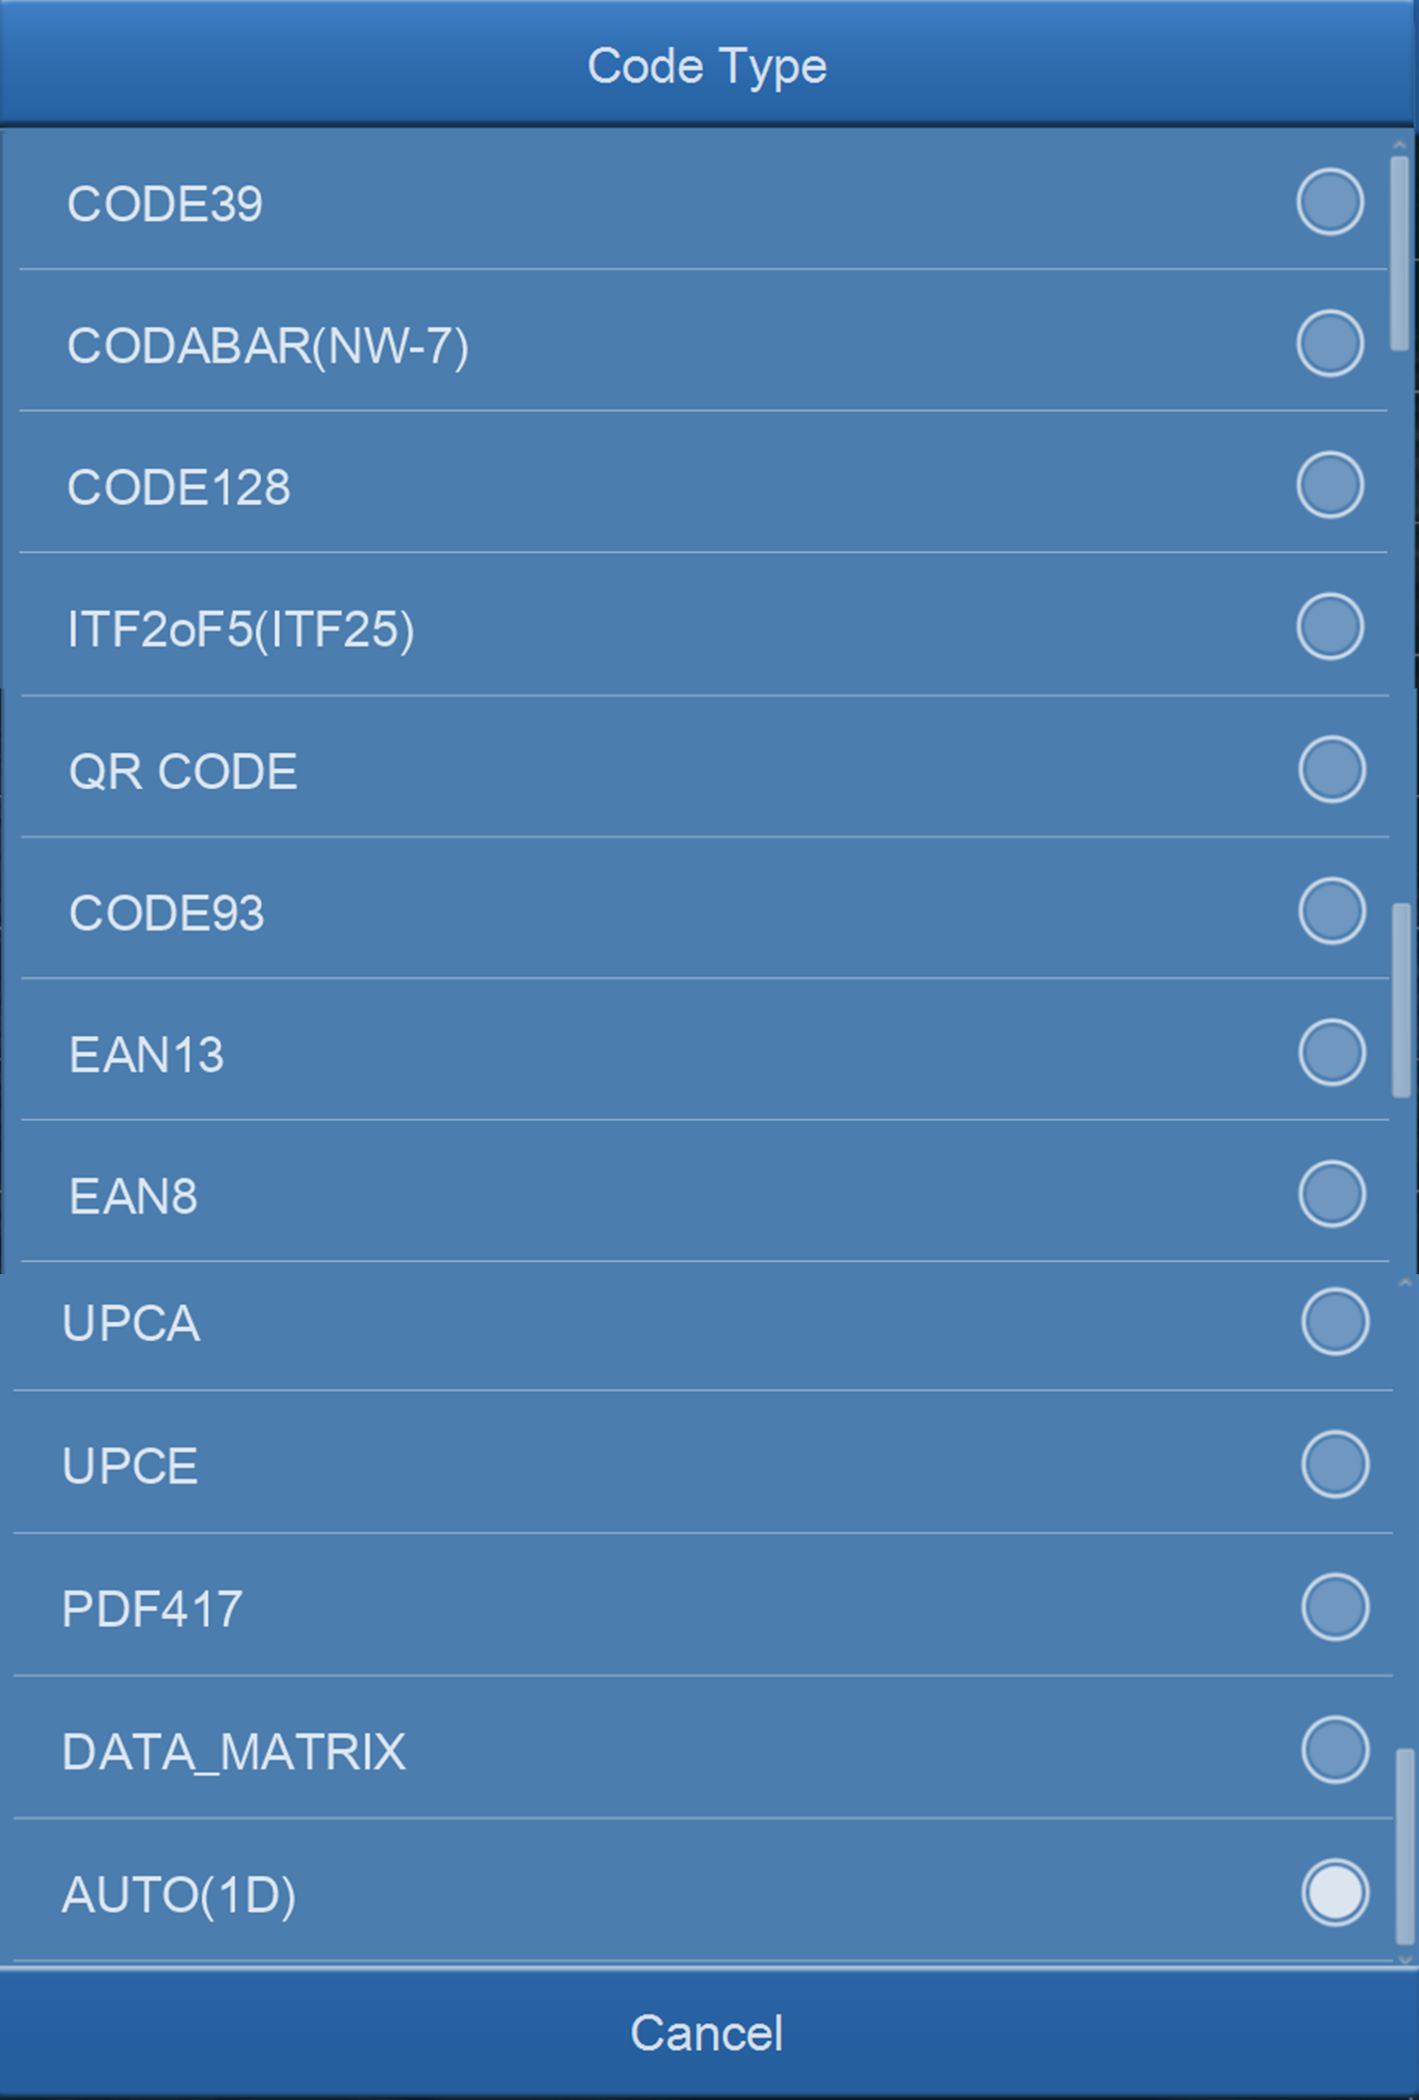
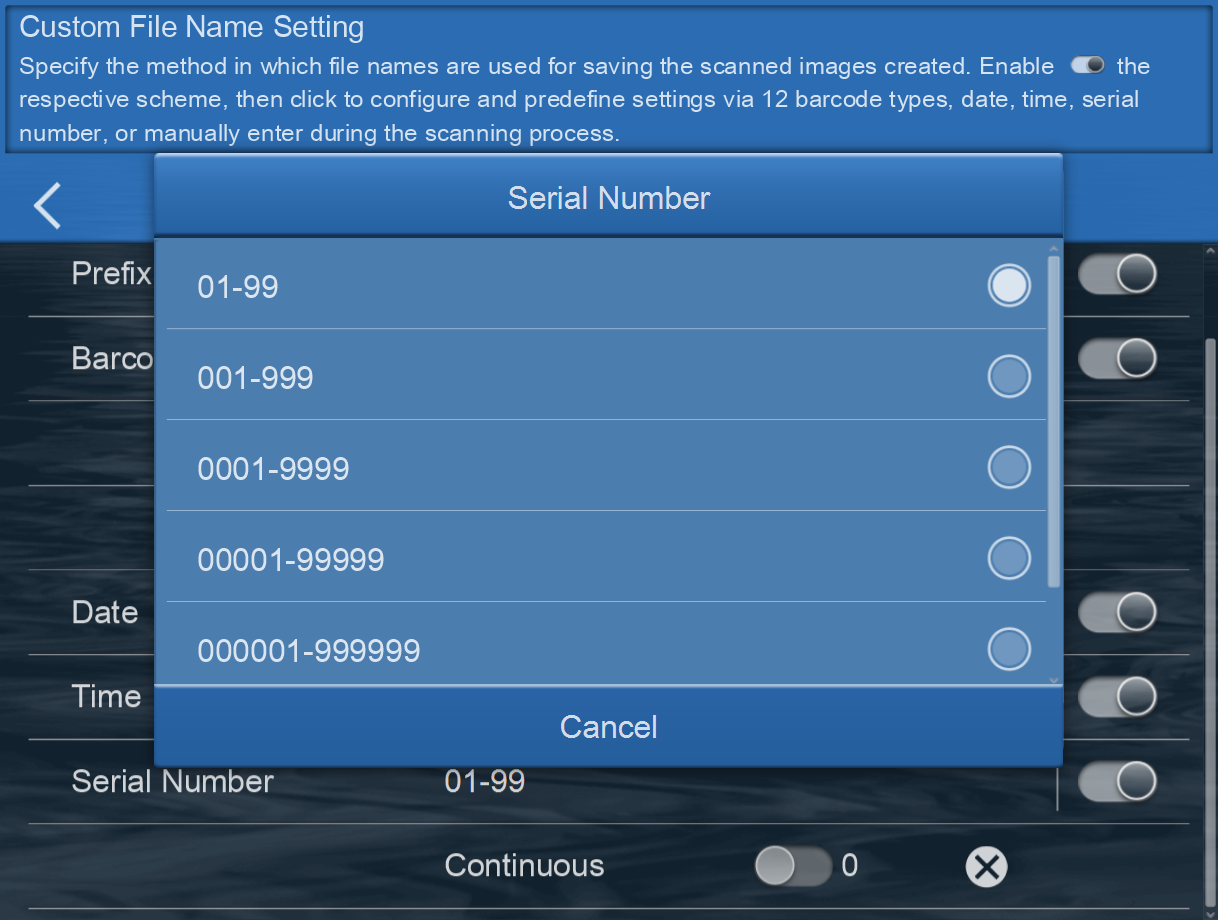
Each document can be named according to the predefine settings via 12 barcode types, date, time, serial number, or manually enter during the scanning process.
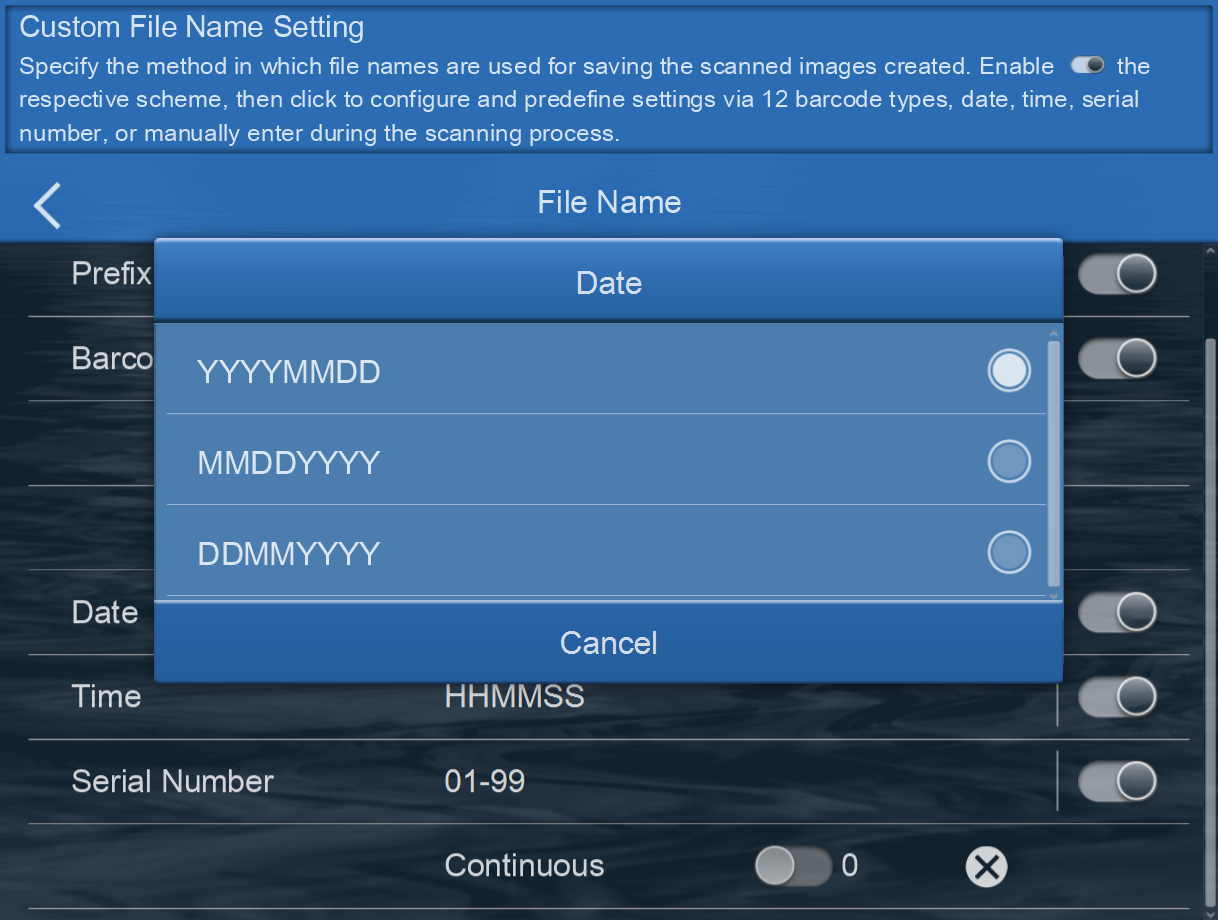
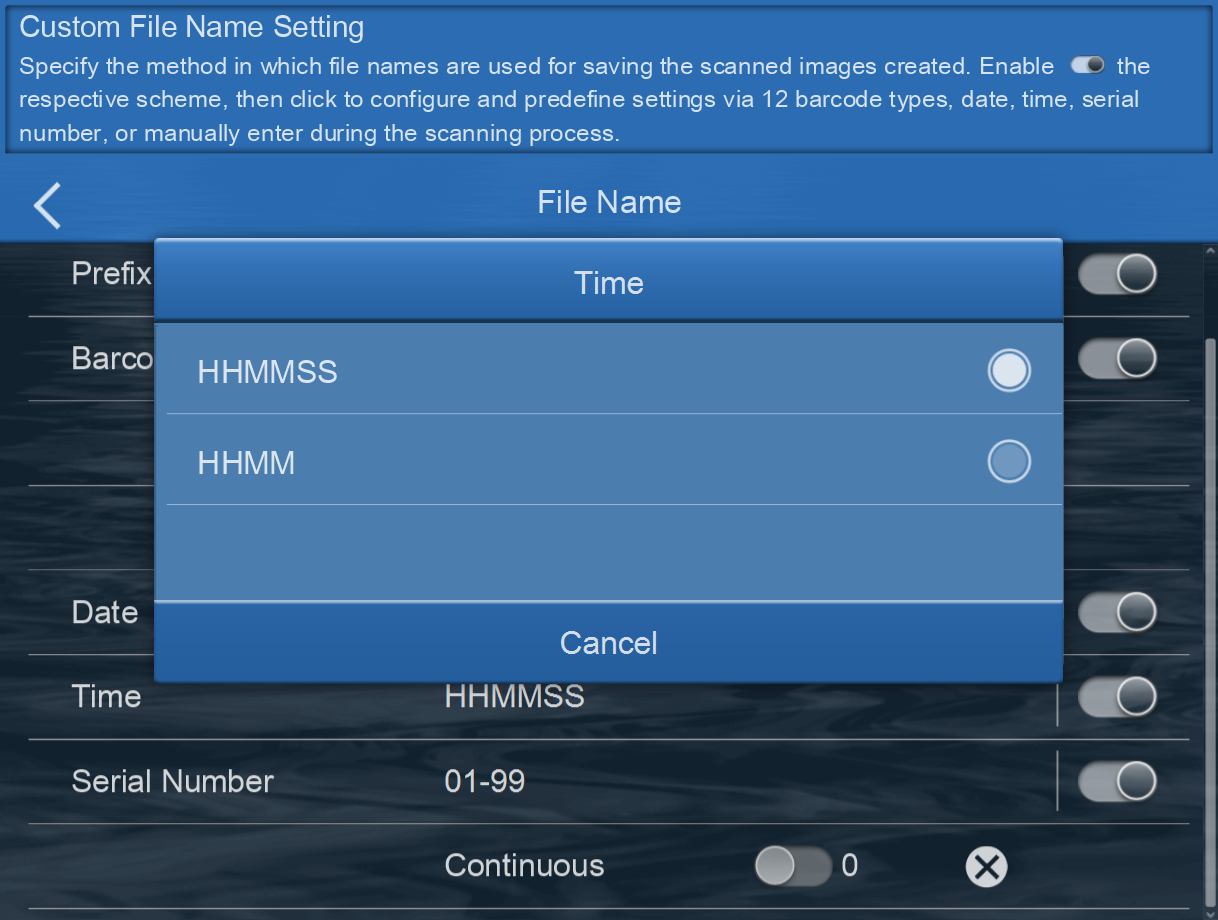
Enable Date / Time/ Serial Number to display the date in the file name. Select the desired format of Date / Time/ Serial Number in the following dialog. Note:b>Please make sure there is an active internet connection before you power on the scanner. The scanner requires access to the internet to set the device date and time.
Scan Mode
Click to switch between Simplex (scanning one side of the document) /Duplex (scanning both front and back side of the document).

Color Mode
Switch Color Mode in the popup dialog. Available color modes: Color, Gray and Black & White. Click the OK button to confirm the settings and to exit this dialog.
Select Color to scan color documents. Color scan produces the largest file size.
Select Gray to scan documents containing line graphs or black and white texts. This scanning produces an image of up to 256 shades of gray.
Select Black & White to scan document containing purely text, pencil, or ink sketch. This scan mode produces the smallest file size.
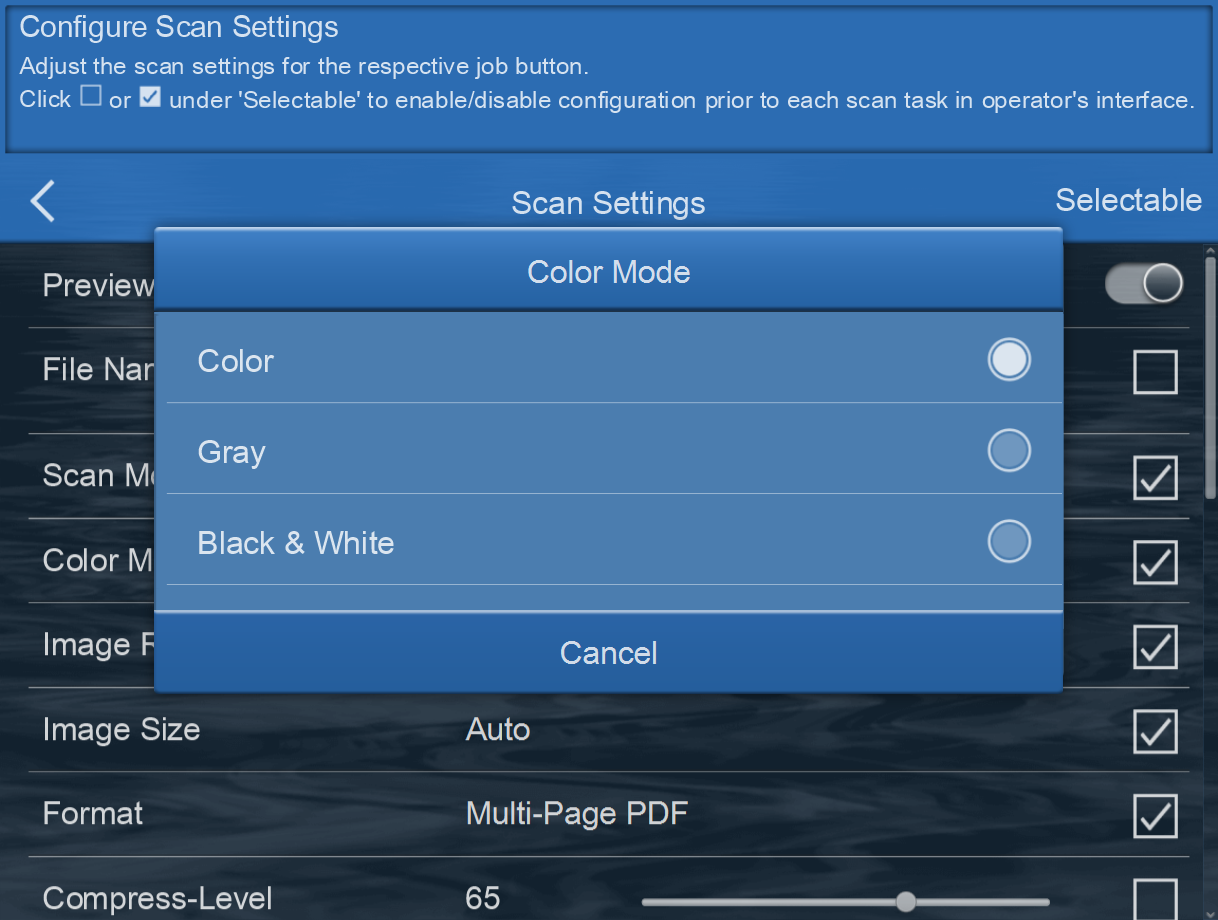
Image Resolution
Image Resolution is measured in pixels-per-inch, dpi, refers to resolution. The higher resolutions result in more detail in the scan and greater file sizes. Select the desired QUALITY in the popup dialog. Available dpi: 100dpi (Lower), 200dpi (Standard), 300dpi (Good), 400dpi (Better), and 600dpi (Best).
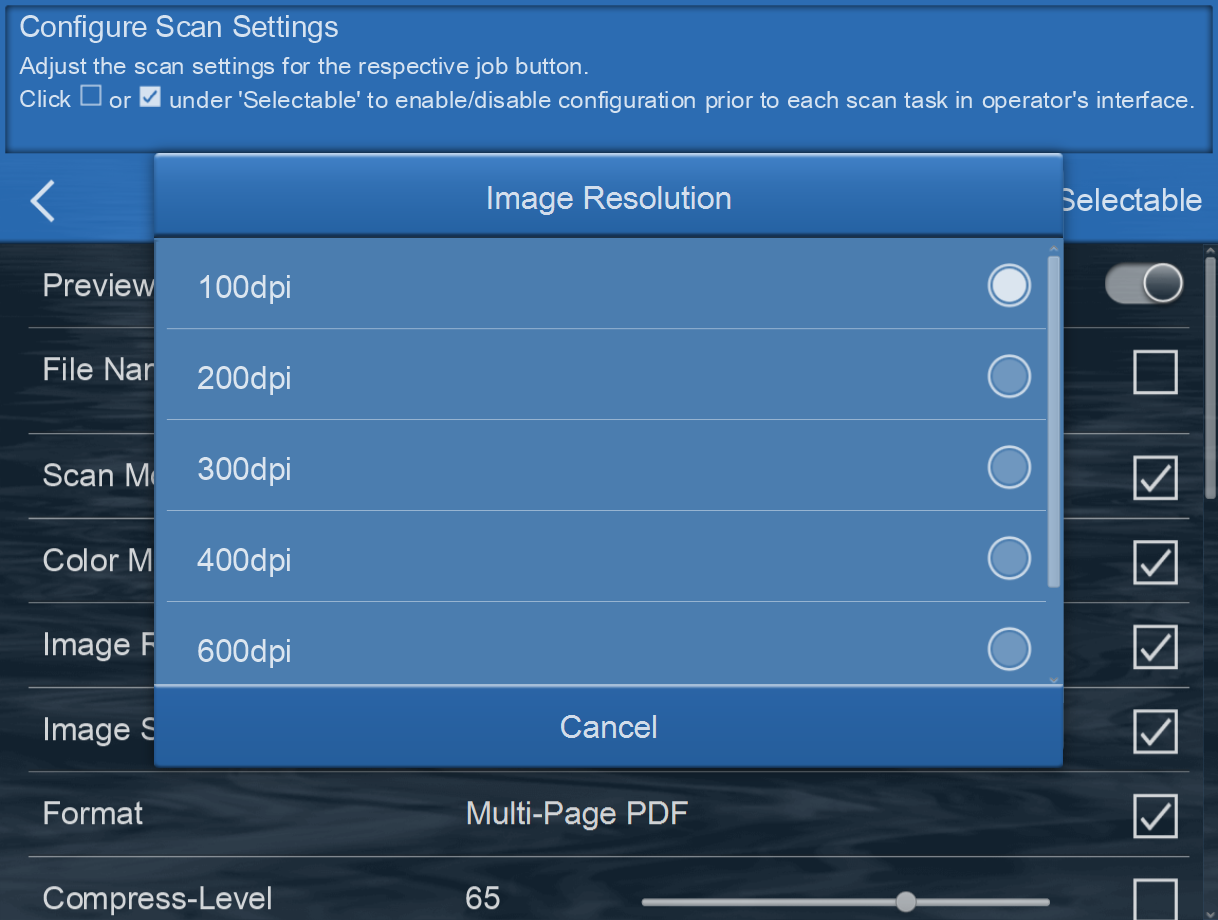
Image Size
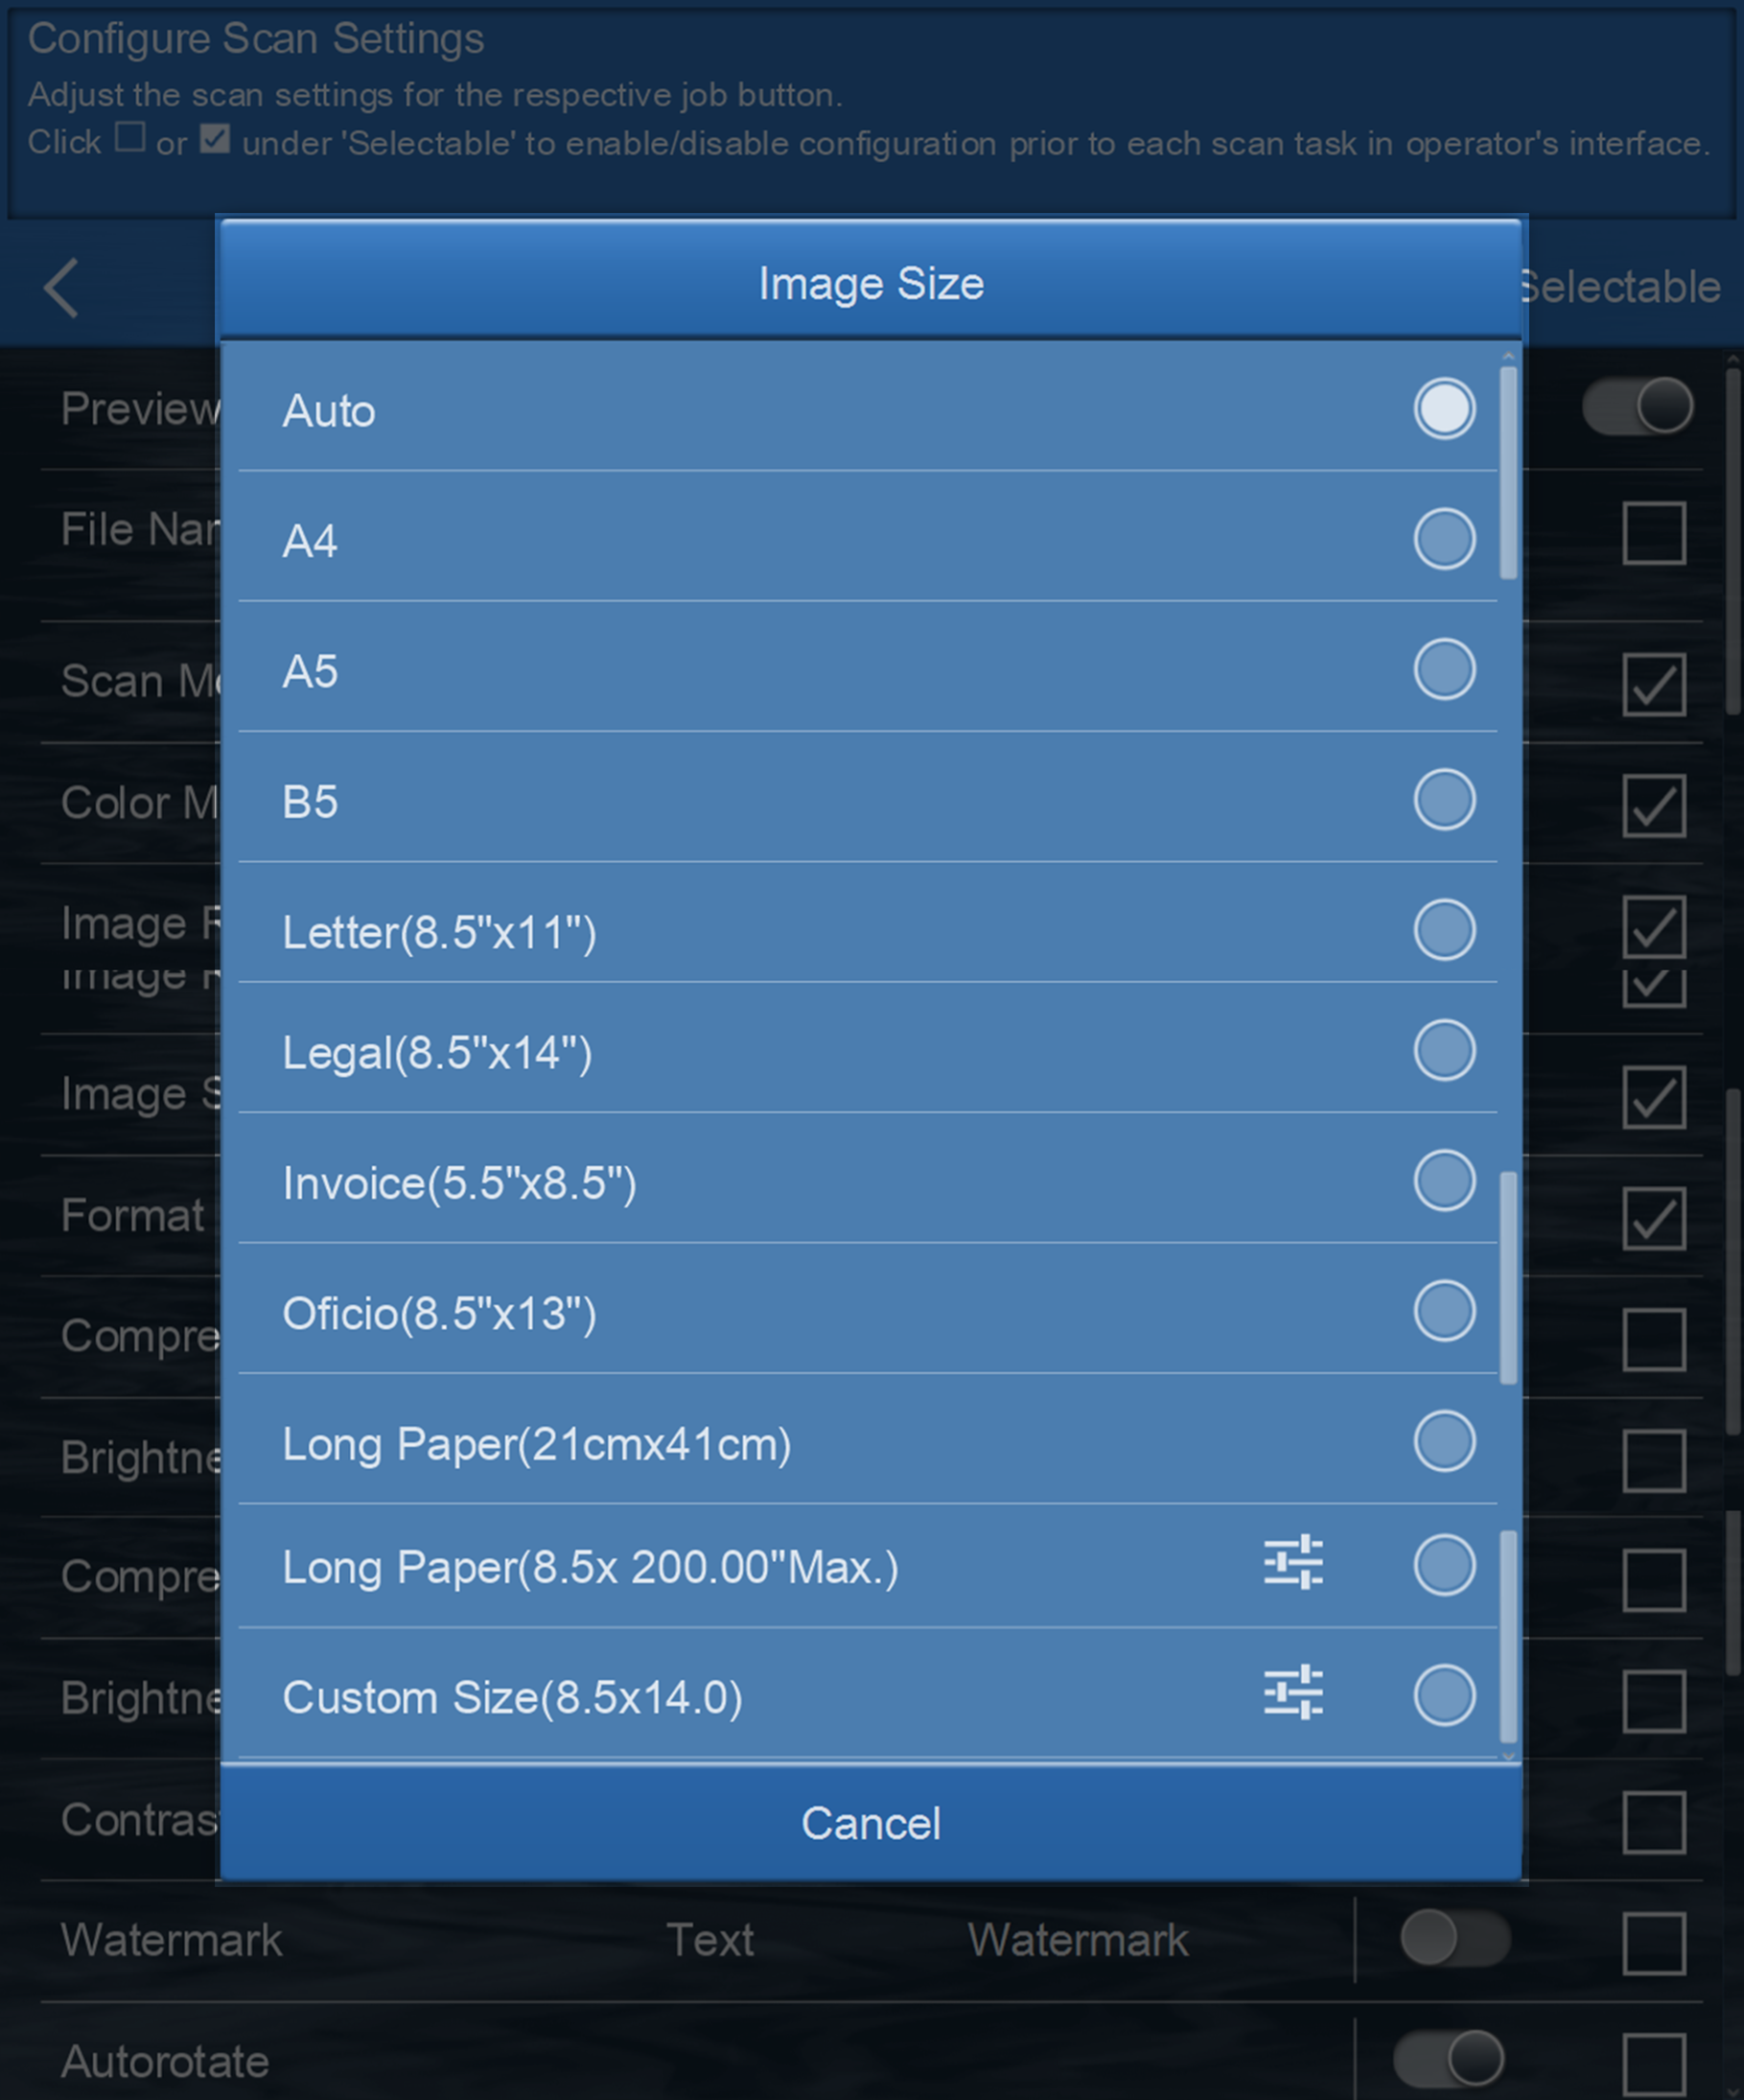
Click to select a suitable document size from the list for the scan task. The available document sizes are within the scanner's range of minimum and maximum item size. Select Long Paper to enable support of paper sizes up to the scanner maximum (200”). When select Auto, the scanner will automatically crop within (8.5” x 12.5”) range.
Format
Select the file saving format in the popup dialog. Available file formats: JPG, PDF, TIFF, PNG, Multi-Page PDF and Multi-Page TIFF.
Click the OK button to confirm the settings or click Cancel to exit this dialog.
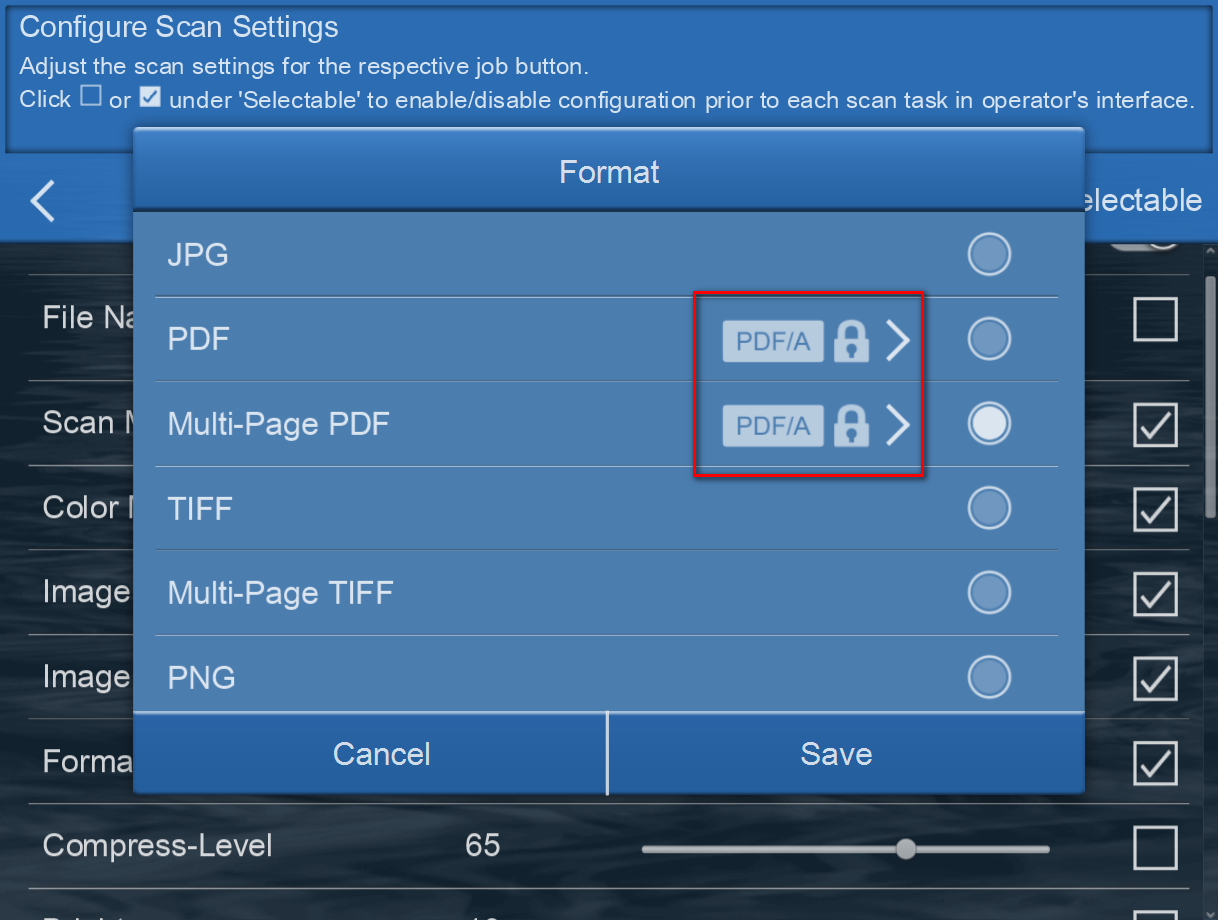
Enable PDF/A function to preserve the static visual appearance of electronic documents over time, which are self-contained, self-describing, and more device-independent. To ensure that the digital PDF documents remain readable and accessible for long -term.
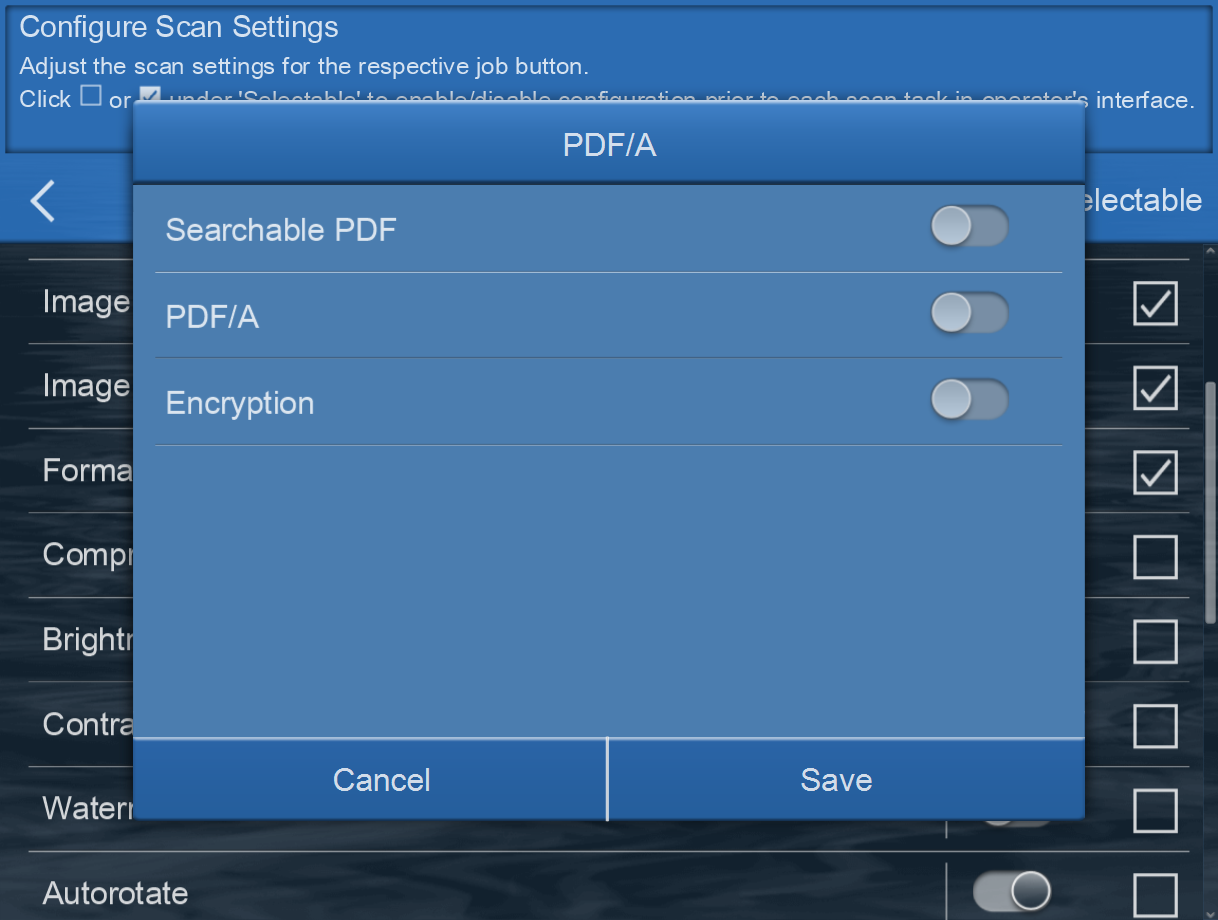
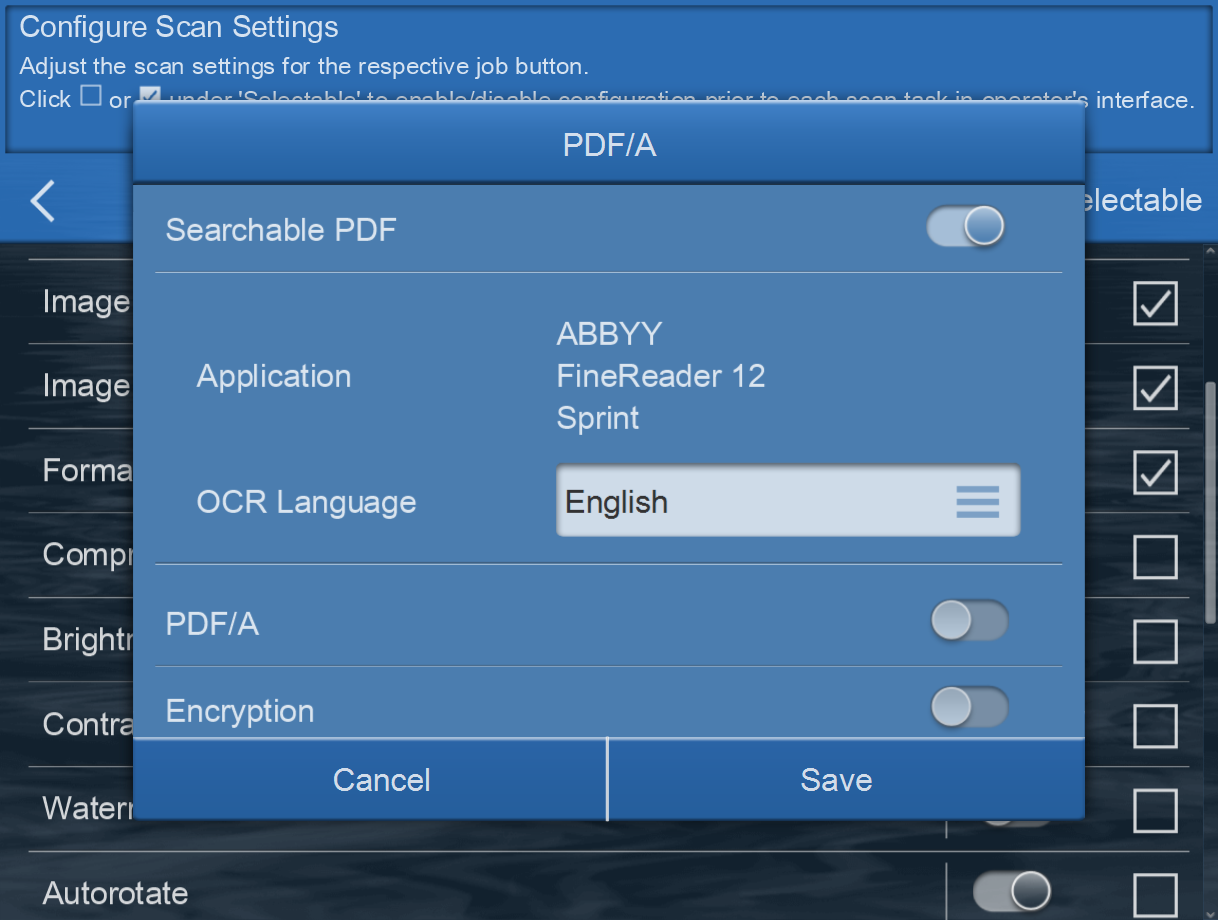
Enable Searchable PDF function to perform OCR (optical character recognition) for the text within the scanned document function by ABBYY FineReader 12 Sprint® by selecting the language to turn computer readable and editable text.
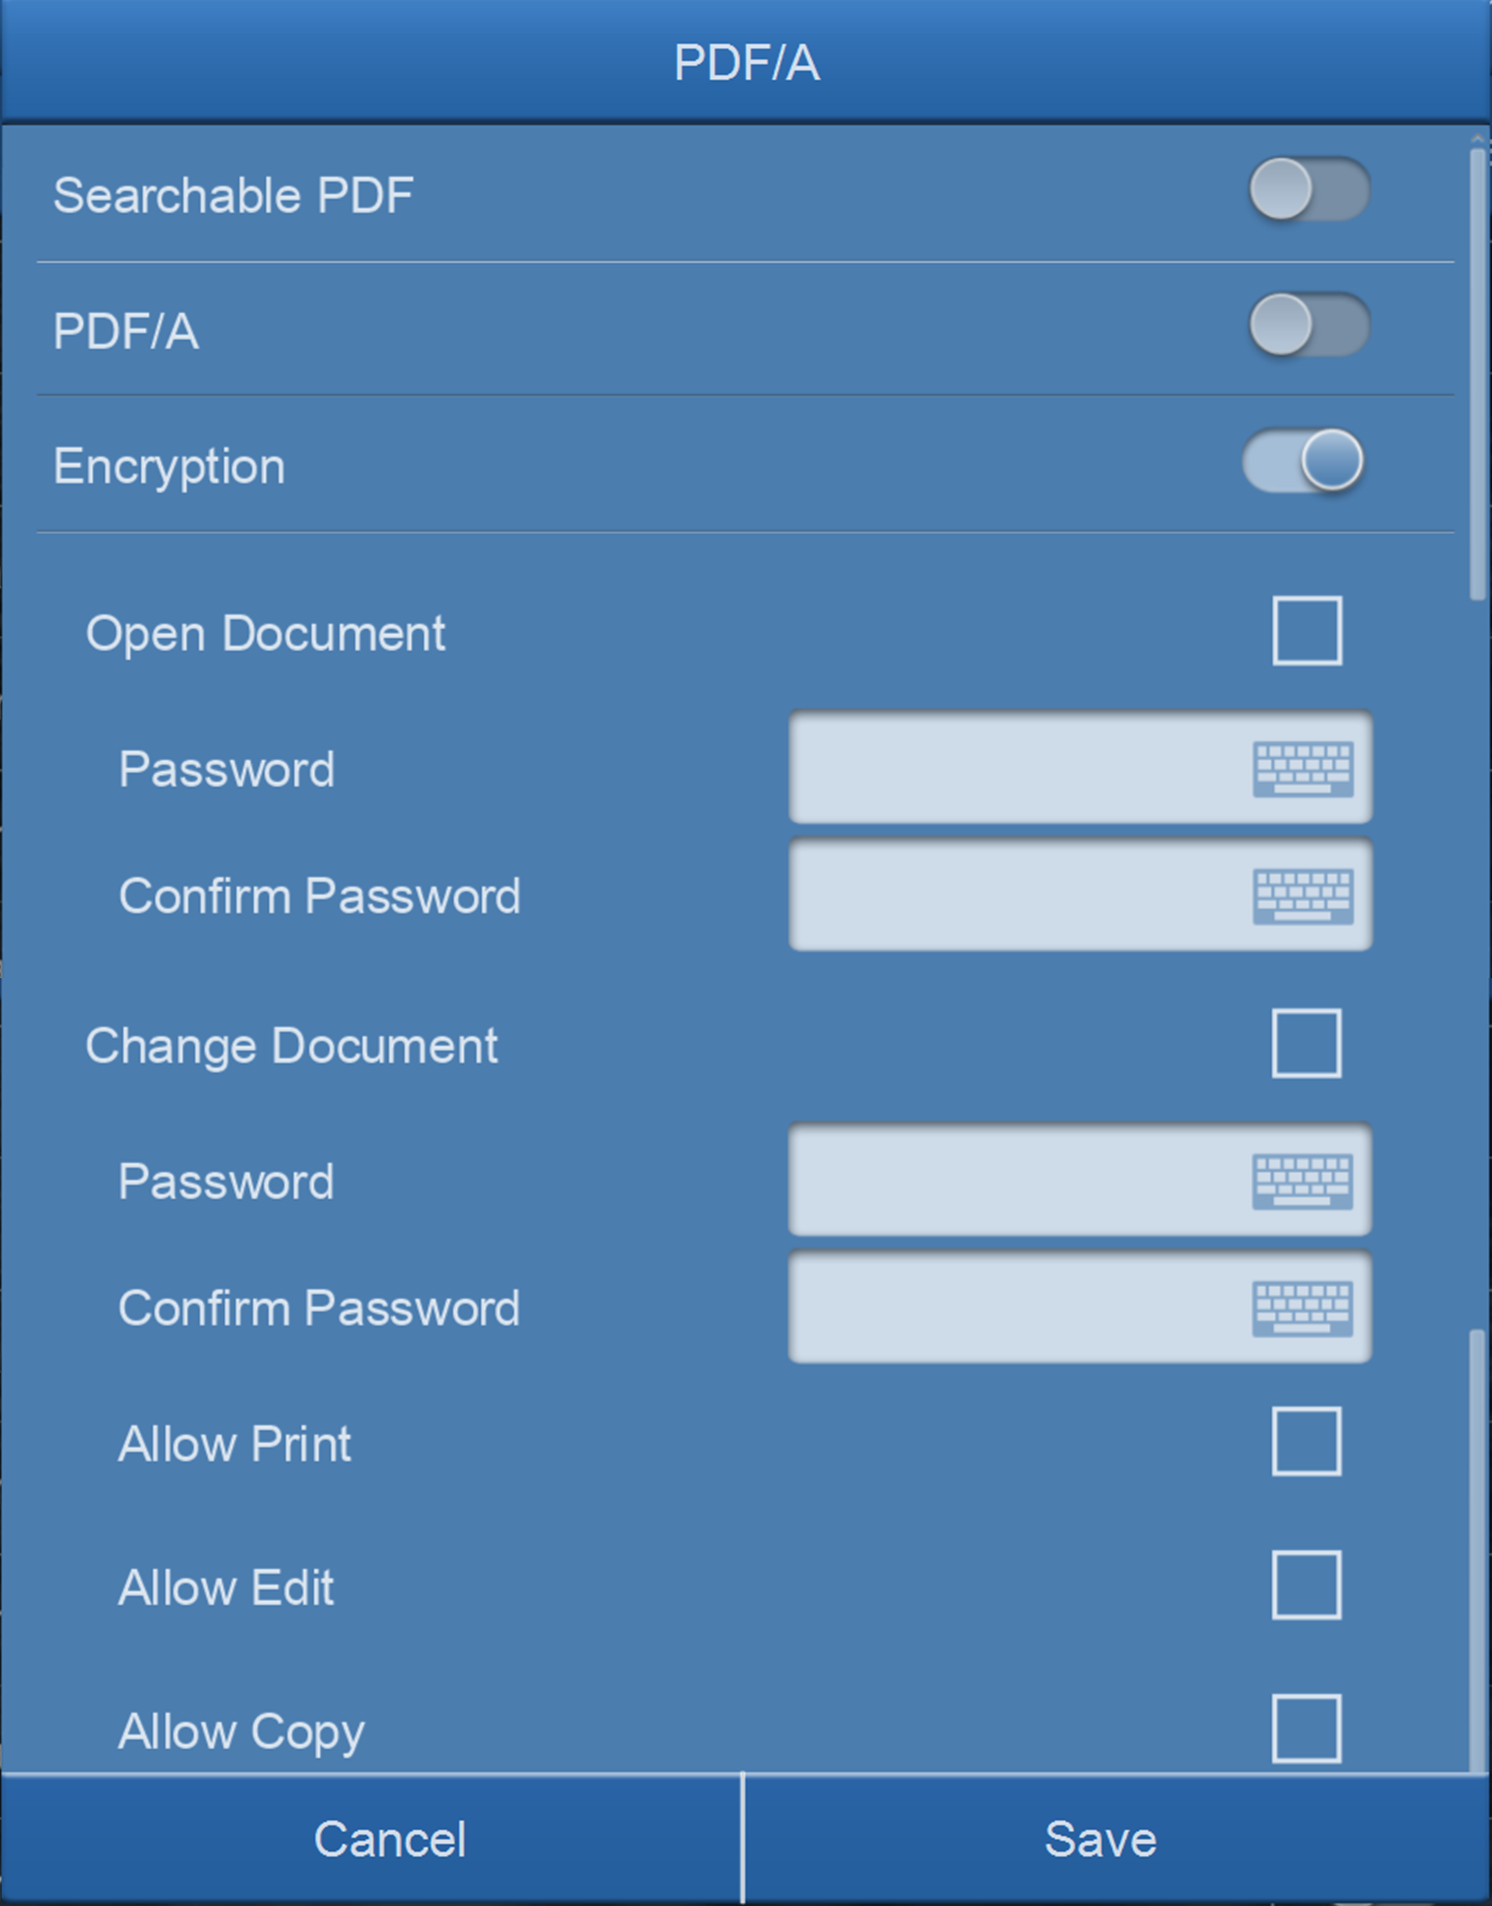
For extra protection, enable 'Encryption' can be configure on the same interface as well.
Providing optional features to View/ Allow Print/ Edit/ or Copy of the scanned document.
Compress-Level
The lower the compression rate, the higher quality of the scan, resulting to a larger file. Move the Compression quality slider left (low) or right (high) to adjust.
Brightness
Brightness is the overall lightness of the image. Move the slider left or right to darken or lighten the image. Adjusting the brightness level adjusts the tone of the pixels, without changing the true color of the pixels.
Contrast
Contrast refers to the differences between the light and dark portions in the image. Move the slider left or right to decrease or increase the contrast levels. Increasing the contrast level emphasizes the difference between the lighter and darker portions of the image, decreasing the contrast de-emphasizes that difference.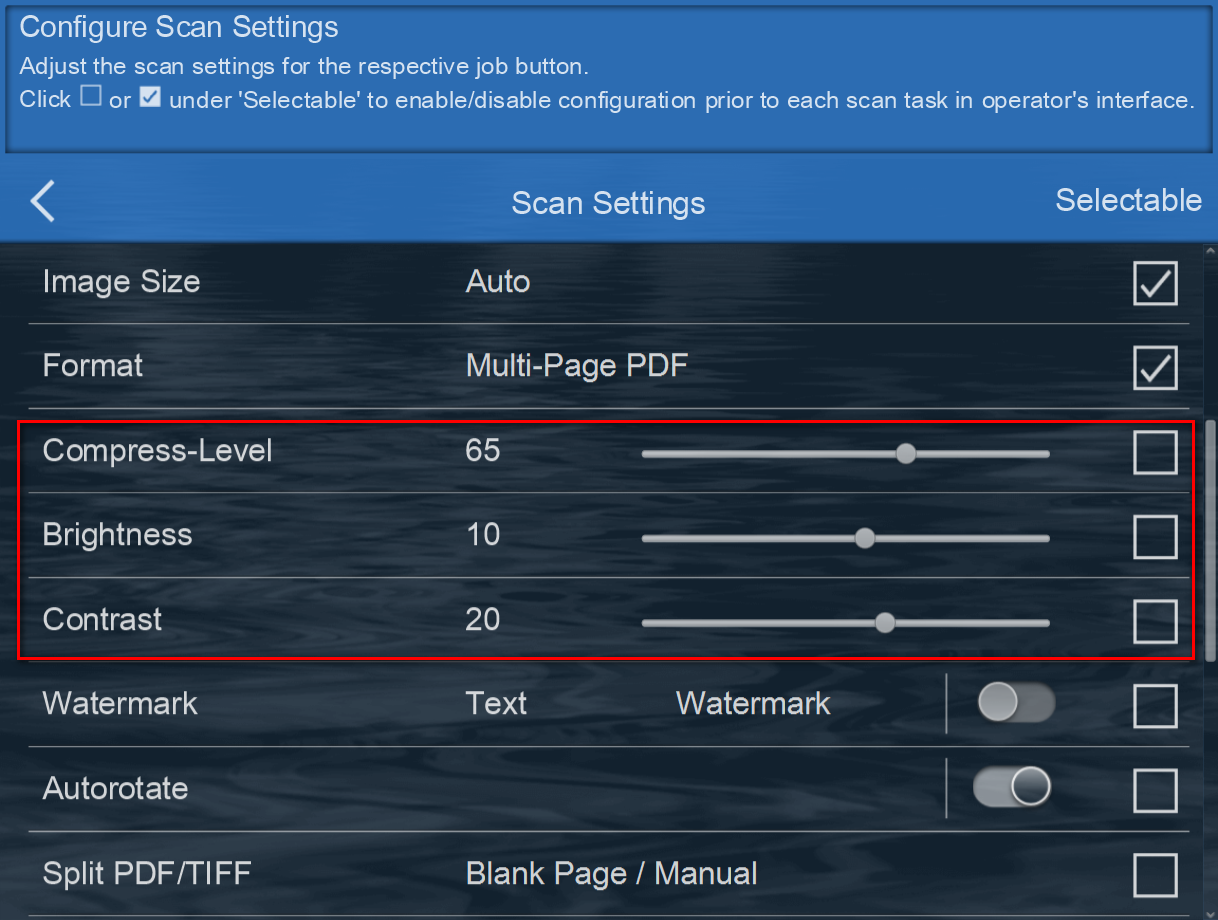
Watermark
Enable the use of Watermark to add a visible mark on the scan documents. The eConnector utility application allows Text or Image/Picture configuration for such function.
Select Use Picture to upload a desired image.
Please note, when using Image file for your watermark overlay, we strongly recommend that the image be no bigger than 800x800 pixels. [Recommend size and format: 600x200pixels; PNG]
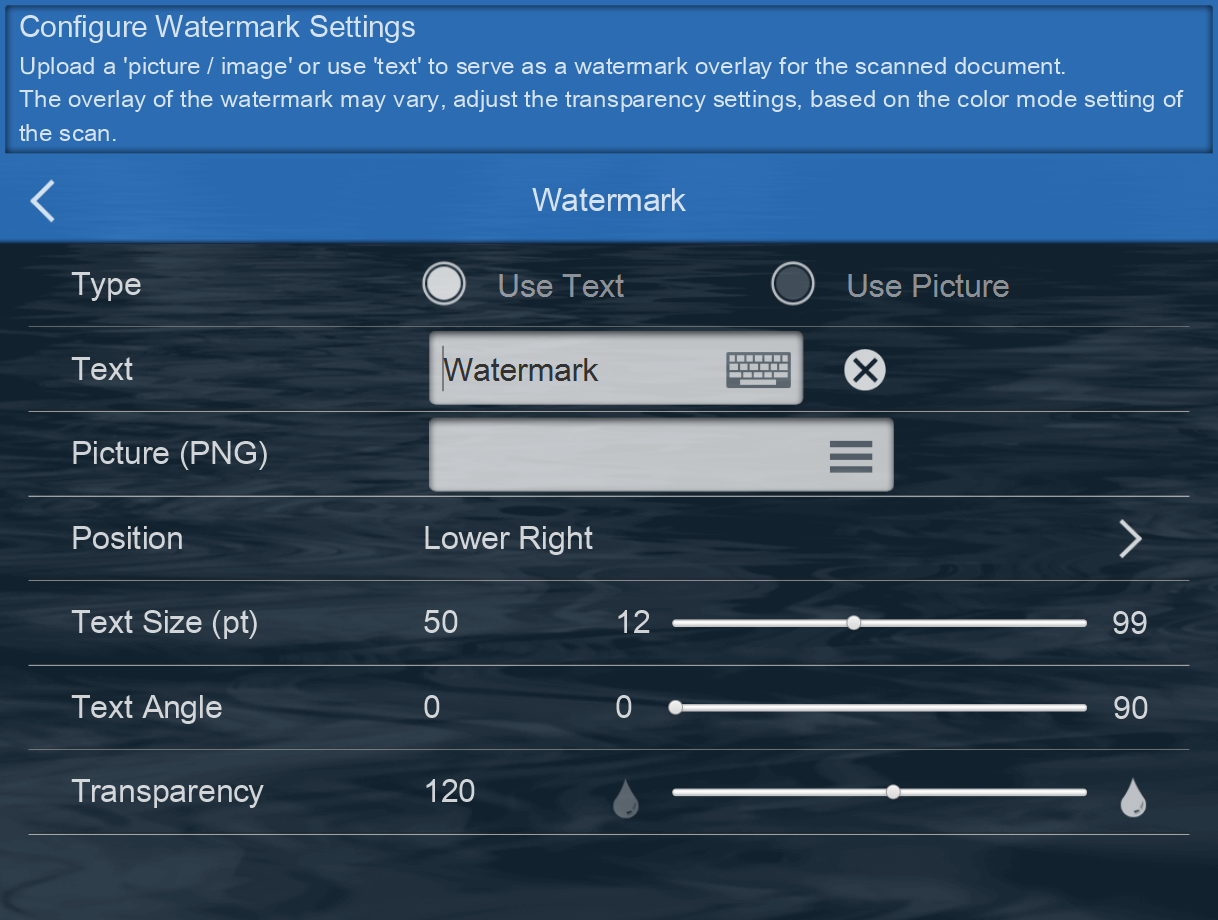
Click on Position to select the desired position. There are 9 positions to choose from. Select Use Text as the Watermark, enter the desired text, adjust the desired position, and adjust the Transparency, Text Size and Text Angle from the slider.
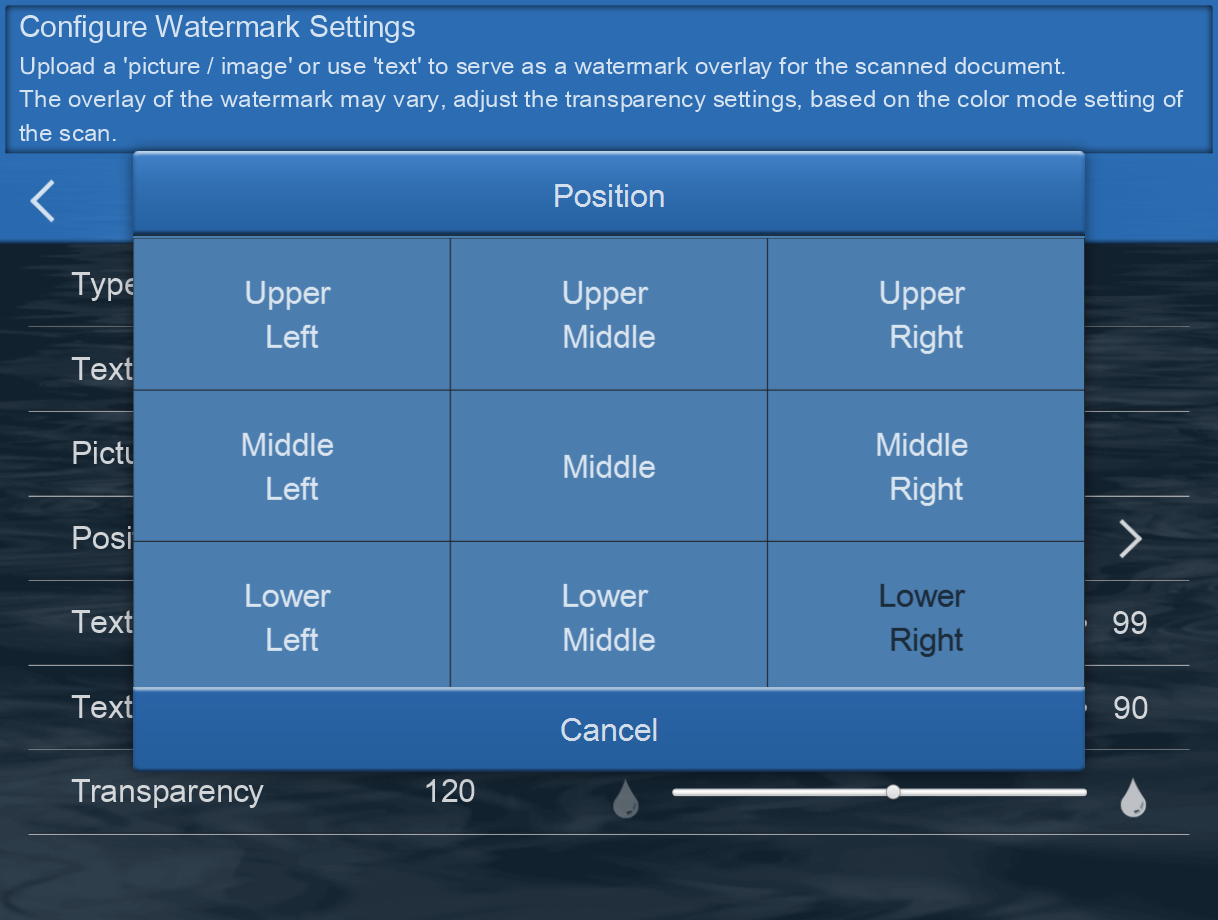
Note: When scanning Black & White we strongly recommend the transparency setting to be set at 150%. Color of the image overlay will correspond to your scanning color mode. Please adjust transparency of the image accordingly.
Autorotate
When enabled, scan images are automatically adjusted by rotating in the direction based on the text orientation.
Note: The orientation of the scanned image is determined by the character strings and text orientation printed on the document. Scanned images for the following types of documents may not perform correctly, it is highly suggested to sort the scan batch for higher efficiency and accurancy.
Manual rotation can be perform during 'Preview' by clicking on the  icon.
icon.
Scan images with many extremely large or small characters
Scan images on which pitches between lines or characters are extremely narrow, or characters are overlapped
Scan images with many characters contacting underlines or borders
Scan images with many images (such as photographs and figures) and few characters
Scan images with characters on an unevenly colored background (e.g. shaded characters)
Scan images with many decorated characters (e.g. embossed and/or outlined)
Scan images with characters on a patterned background (e.g. overlapping with illustration and diagrams)
Scan images with characters printed in various directions such as drawings
Scan images written using only capital letters
Scan images including handwritten characters
Scan images not written in the supporting languages list
Scan images with complex layouts
Scan images with a large amount of image noise
Scan images with faint characters
Scan images with faded characters
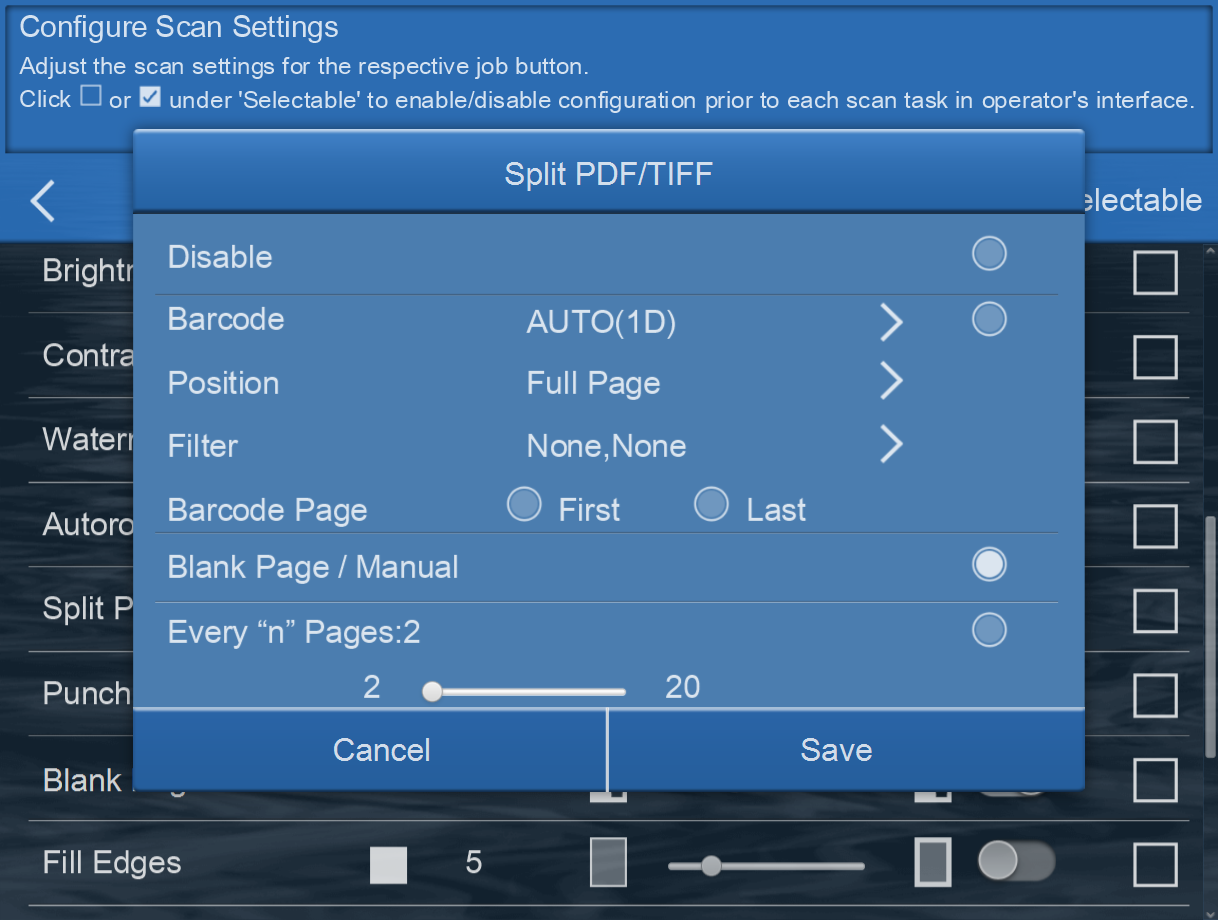
Split PDF/TIFF
Output file in Multi-PDF/Multi-TIFF can be split (divided) by enabling one of the following methods:
via Barcode
o By detecting the barcode on the scan documents
o Filters are available to include or exclude the specific barcodes
via Blank Page
o By inserting a blank page in between the batch of scans
o Every blank page scanned, the scanner will automatically filed it as a separate document.
via s specify number of pages
o By specifying a number, the scans will be split into a different file with the determined number.
o Adjust the number to the right or left using the slider.
This feature allows a scanning task be divided into multiple documents without stopping the scanning process.
Punch Hole Removal
Enable this feature to remove punch holes in the margins. This option will fill these holes with the detected background color in the final scan.
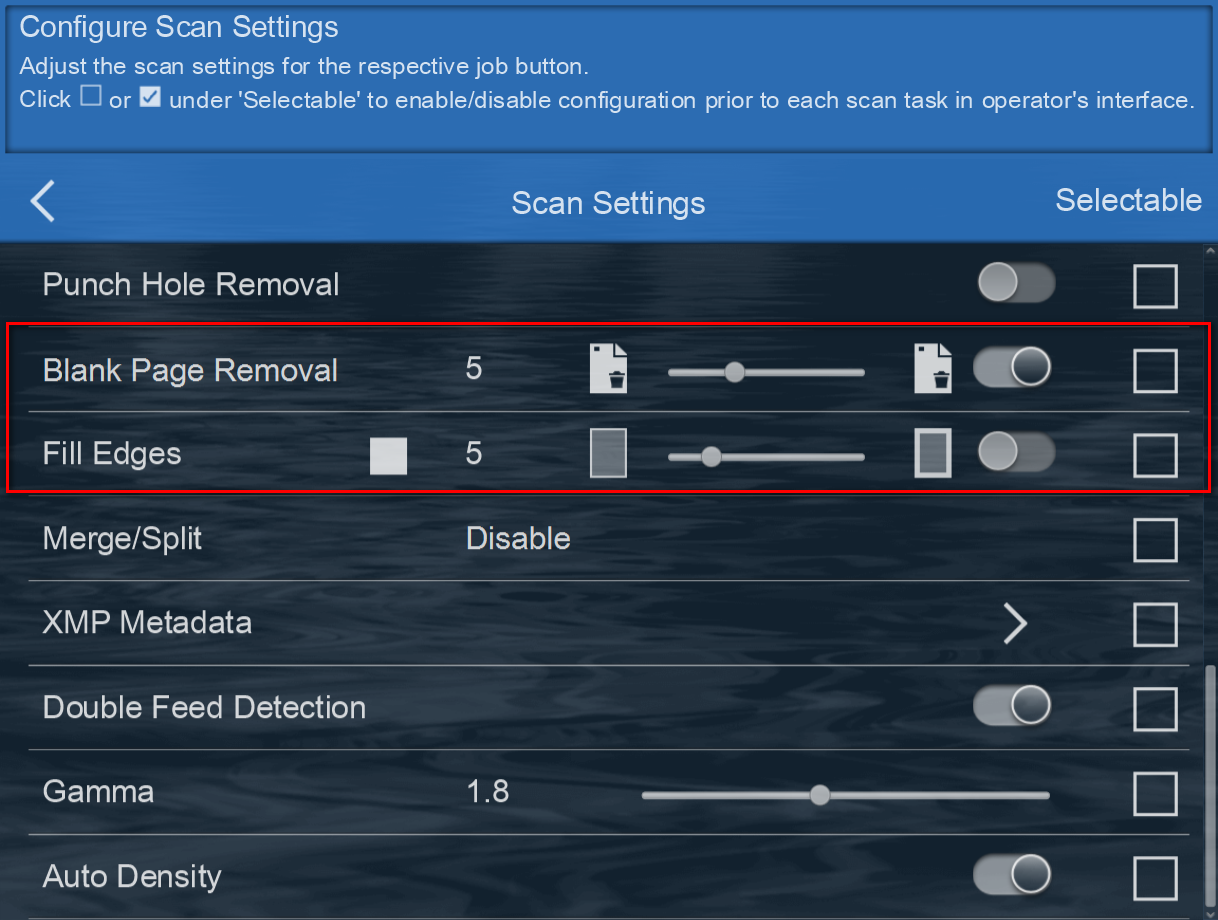
Blank Page Removal
Switch on this function to remove blank pages after the document is scanned. Adjust the Sensitivity level left or right from the slider. The higher the sensitivity, the more scanned pages will be treated as blank pages and removed.
Fill Edges
Enable Fill Edges (aka, edge filler), to automatically fill the shadow or streaks around the edge of the scanned image. Depending on the condition of the documents, dark/black edges might occur during the scan. Adjust the filled in area by moving the slider right or left.
Note: If the specify fill in area is too wide, partial characters on the document near the edges may not be visible.
Merge/Split
When scanning in duplex mode, you can enable this option to have both sides of a scanned item Merge and appear on one page in the final image file. The options in the list allow you to select where you want the front side image to appear in relation to the back side image in the final file.
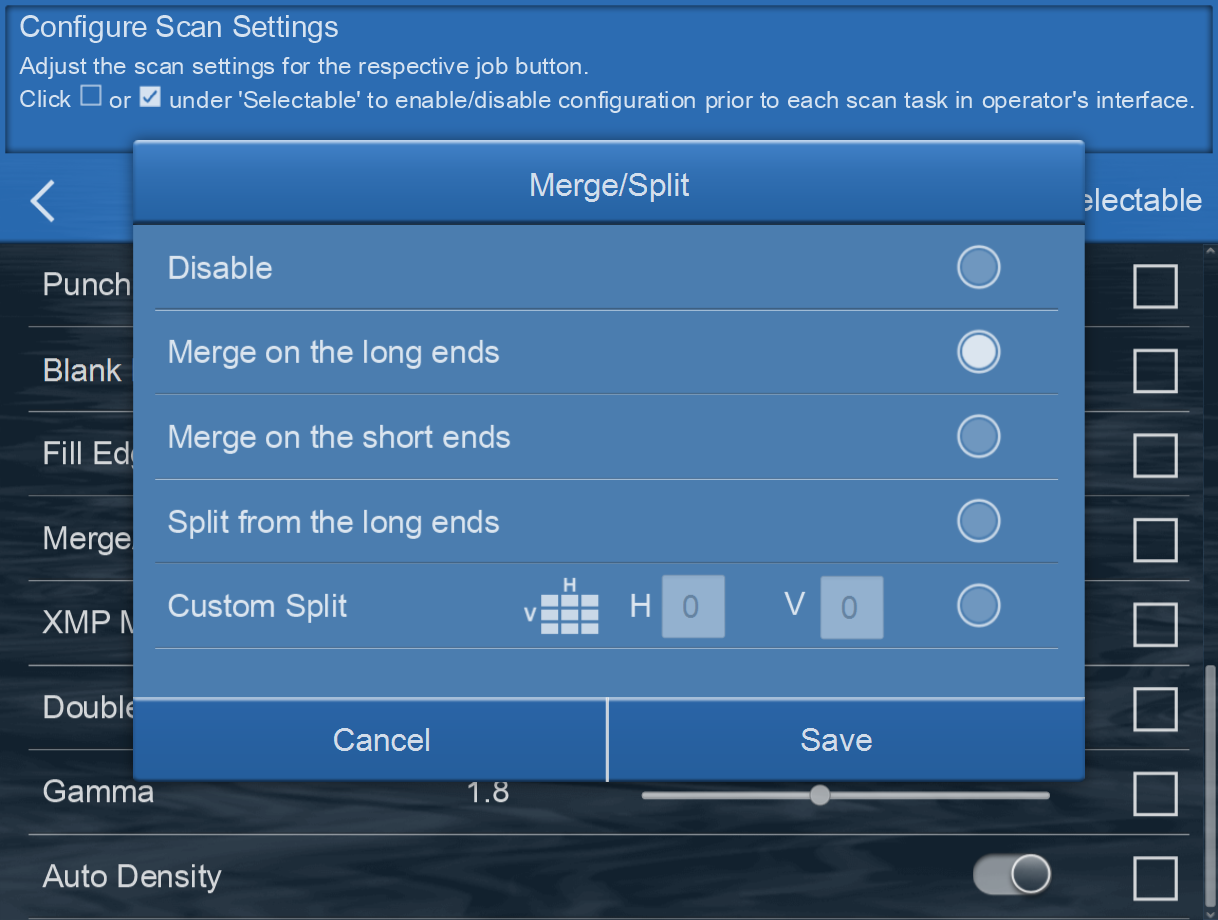
When scanning in simplex mode, you can enable this option to have the scanned document Split in half or multiple (Custom Split) and appear on one page in the final image file. The options in the list allow you to select where you want the front side image to appear in relation to the back side image in the final file.
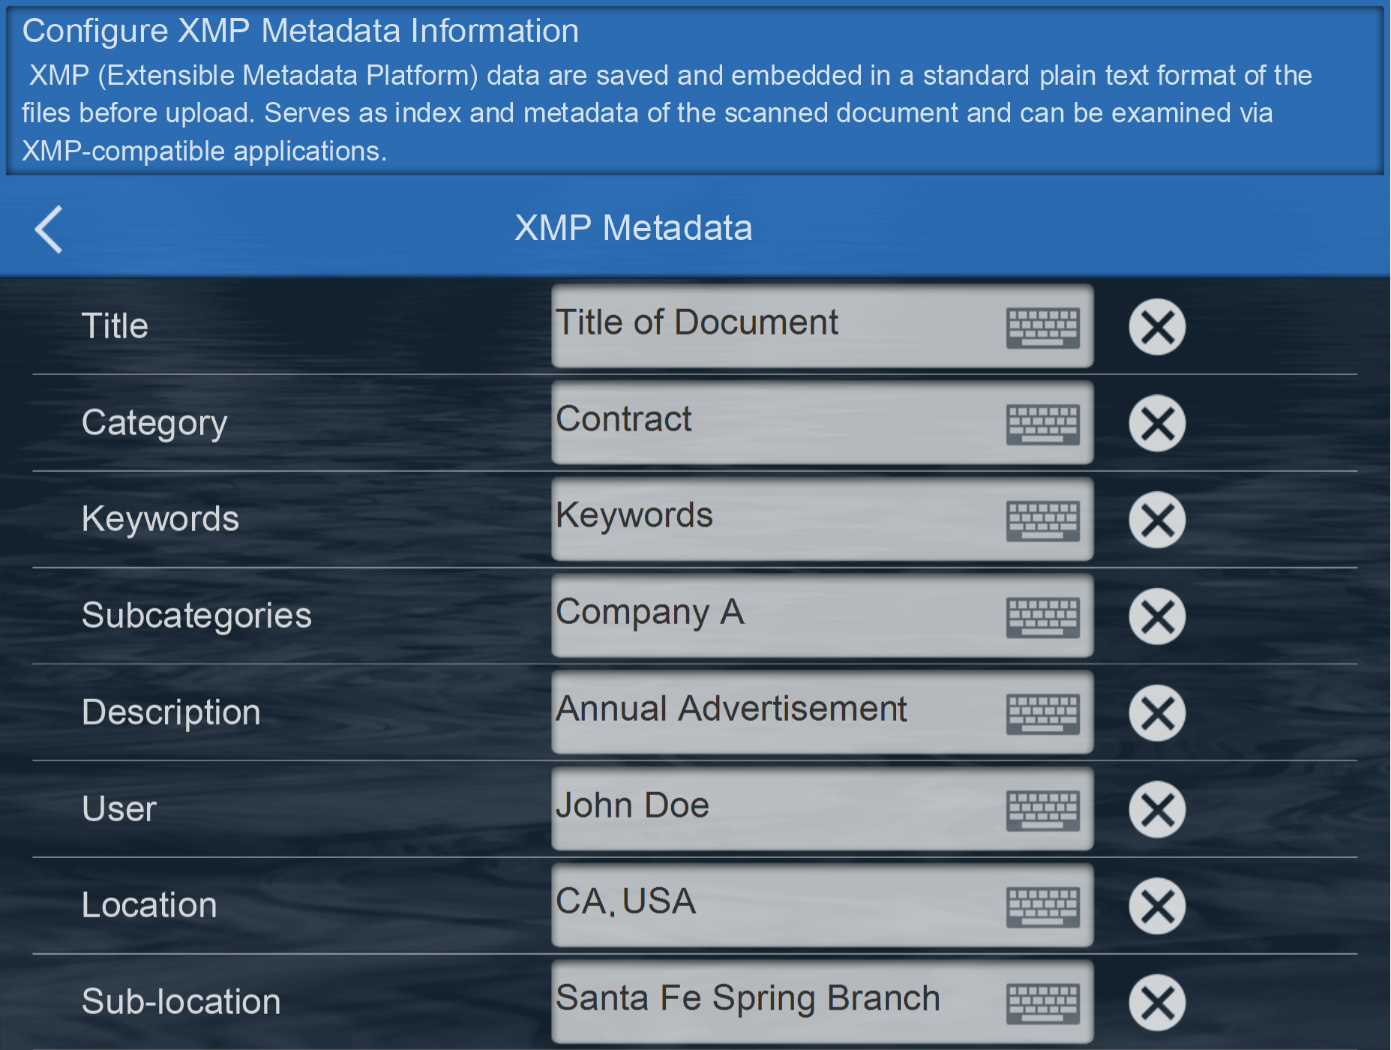
XMP Metadata
Enable XMP Metadata, aka Extensible Metadata Platform, allows user to embedded metadata properties with the document files. It provides additional information about the file such as: Title, Category, Subcategories, Descriptions, User, Date, Location, and Sub-location.
Preconfigure the fields, or mark it ‘Selectable’ to enable fill-in during each scanning process.
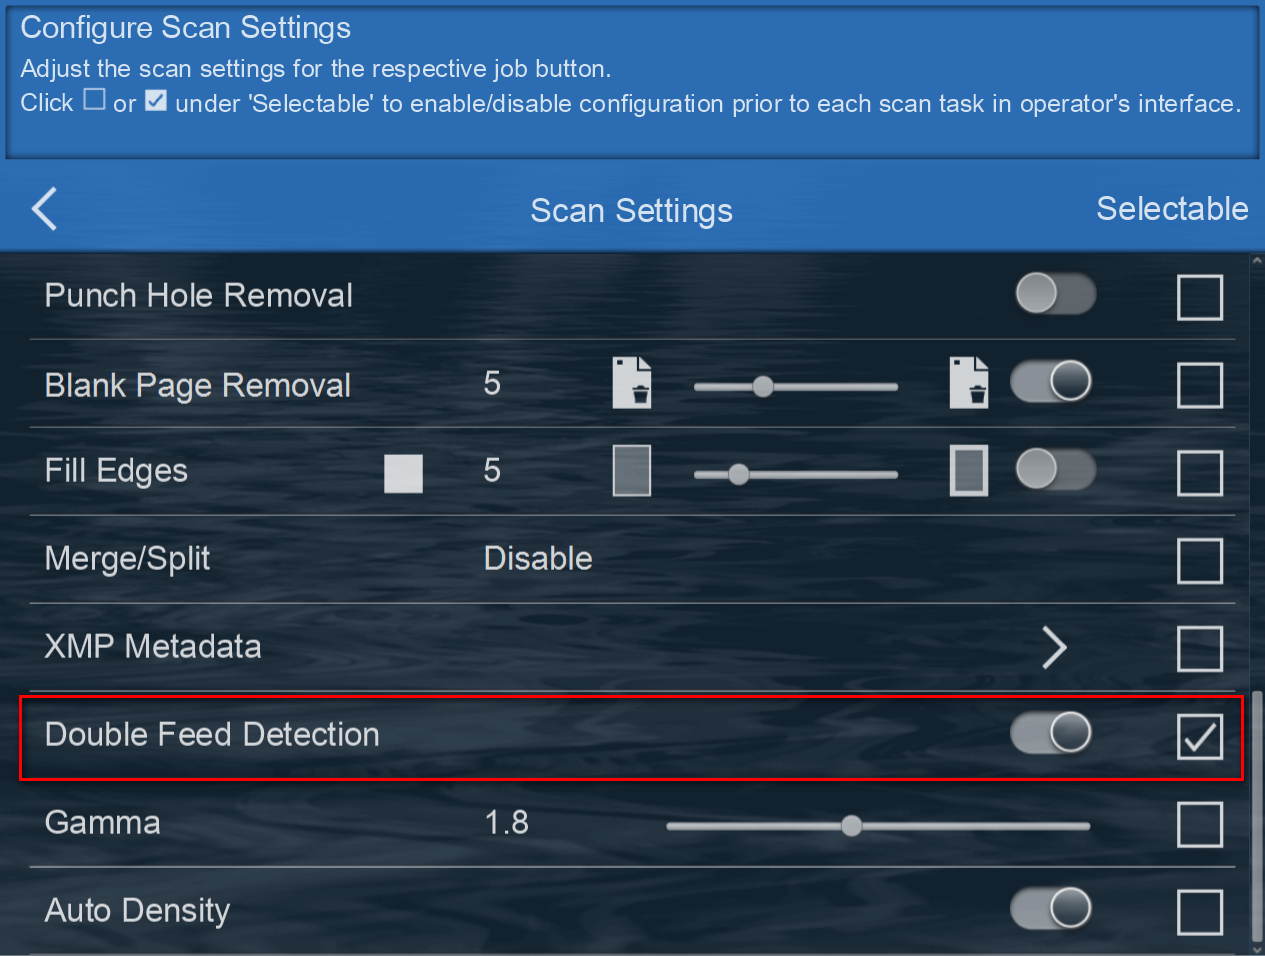
Double Feed Detection
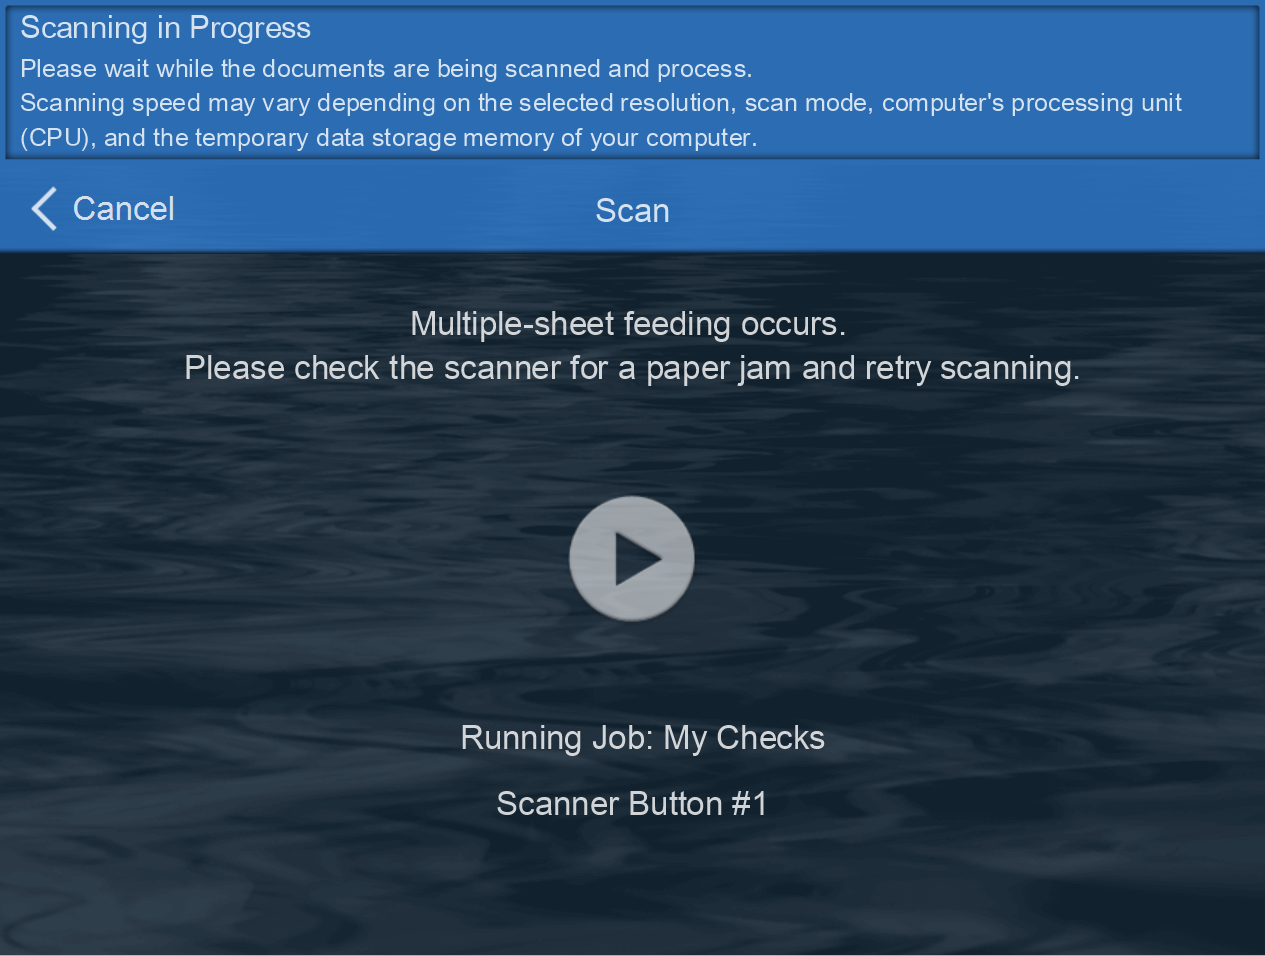
Enable Double Feed Detection, allows the scanner to automatically stop when it detects multiple documents have been fed through the scanning passage at the same time. User can continue scanning after resorting the documents or save the pages that have already been digitalized.
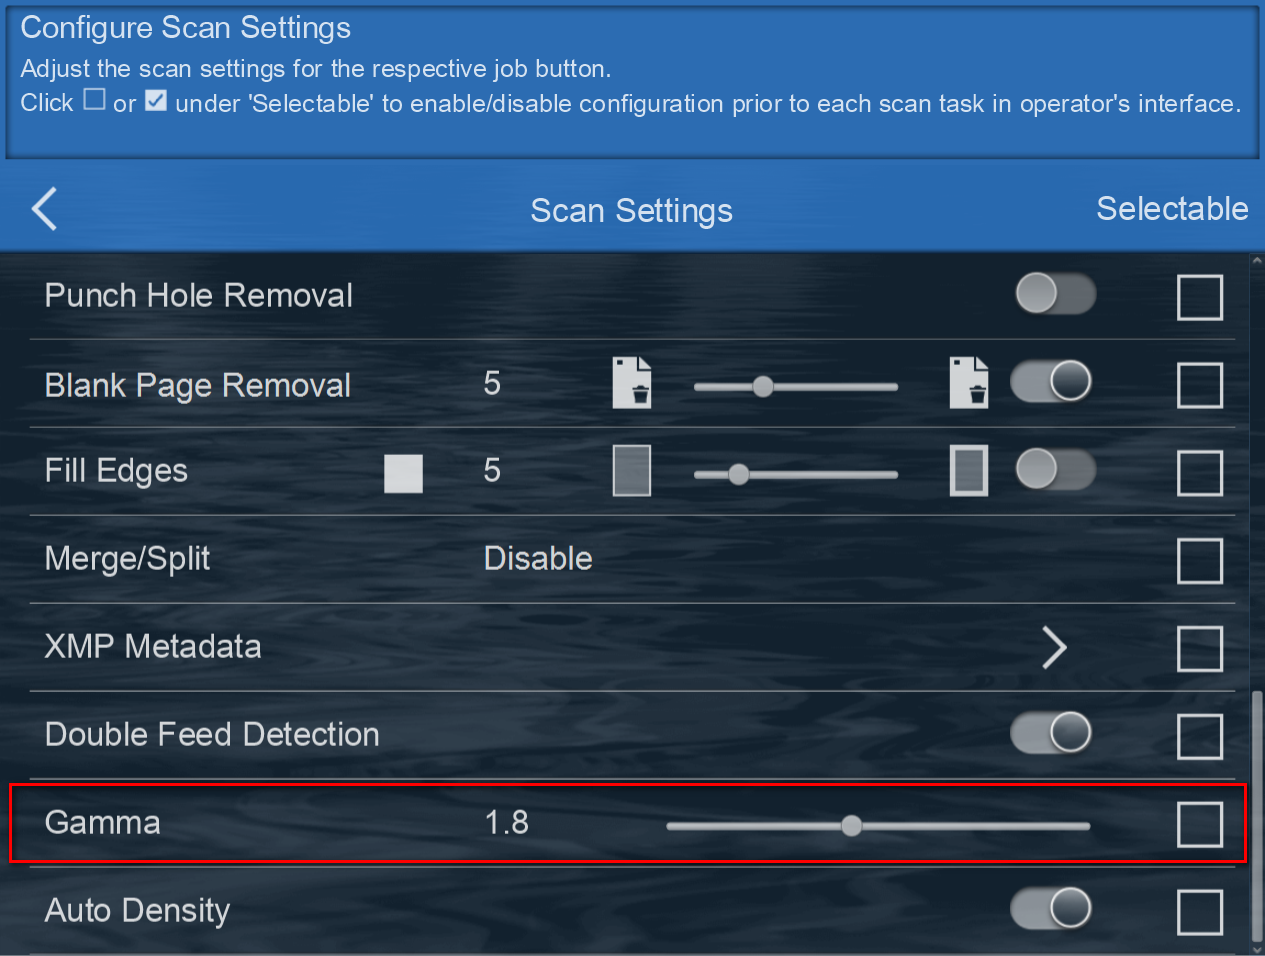
Gamma
Gamma is the tone curve and starting point for image enhancement. Move the slider left or right to darken or lighten the image. As the gamma value is adjusted lower, the tone curve begins to straighten and the shadows of the image are expanded, darkening the shadows without overall darkening the image with gray as seen with lowering the brightness level. As the gamma value is adjusted higher, the tone curve bends and the highlights of the image are expanded, lightening the highlights without overall lightening the image with white as seen with raising the brightness level.
Auto Density
Enable Auto Density, allows eConnector utility application to automatically adjust the image density to the optimal that best suited to the quality of the original. Dark texture originals (such as newspaper or recycled paper) will be copied so that background will not be reproduced.
System Settings
System settings allow you to configure, adjust, duplicate, import/export device settings, as well as enable adminstrator management rights. Alteration should be kept protected (for more info refer to Administrator Management section).
Scanner Button Settings
Synchronize the eConnector buttons to the scanner's hardware scanner button from this interface.
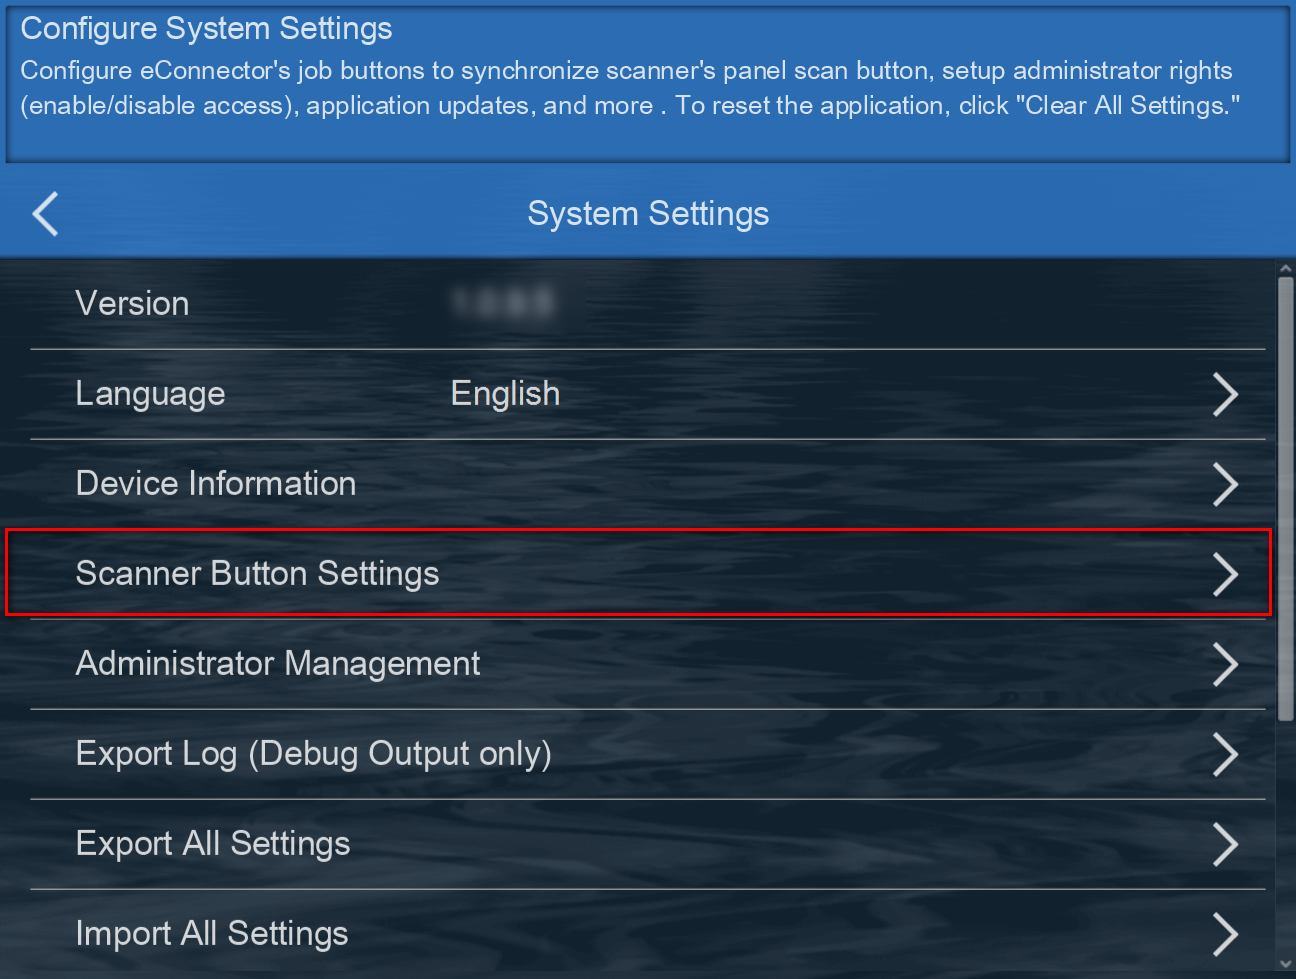
Simply click  to add or
  to configure an existing button.
Click  to delete the configuration. Note: Number of synchorization available varies on the scanner's capability.
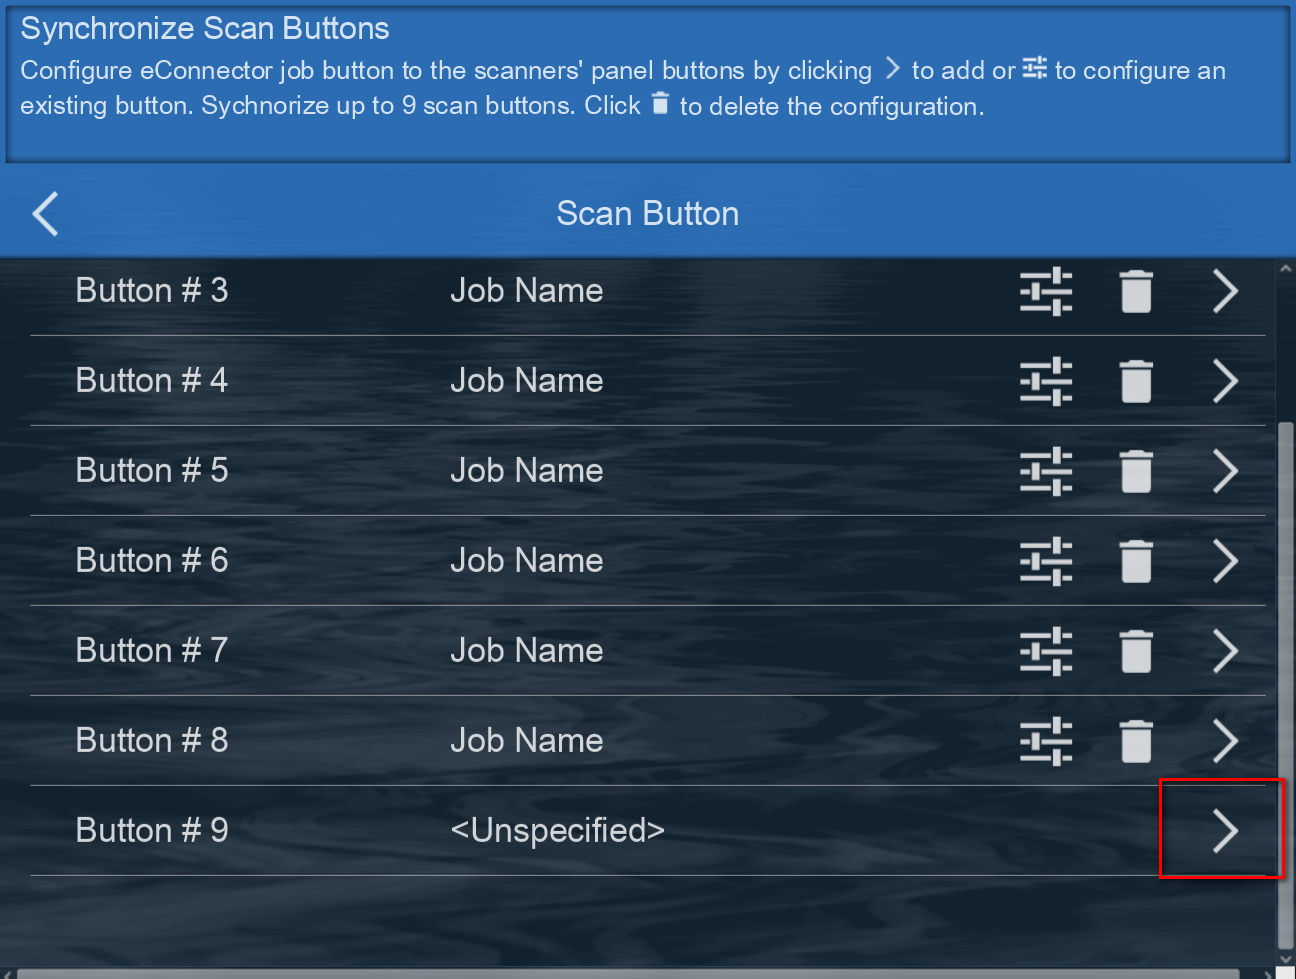
Select from the list (the list reflect the job button (profile) name(s).
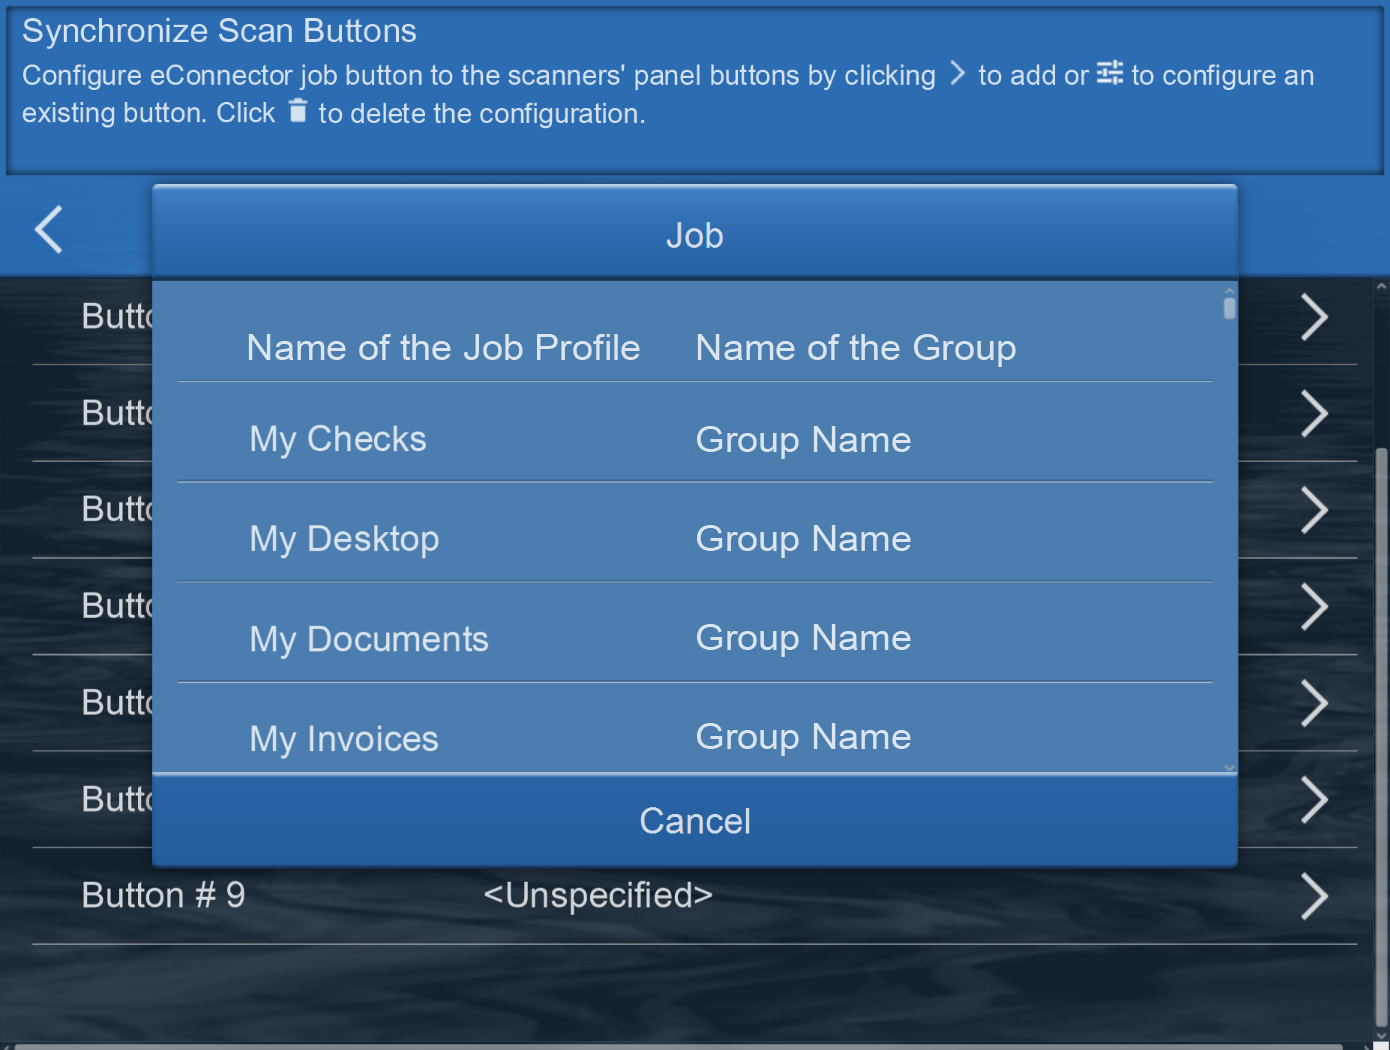
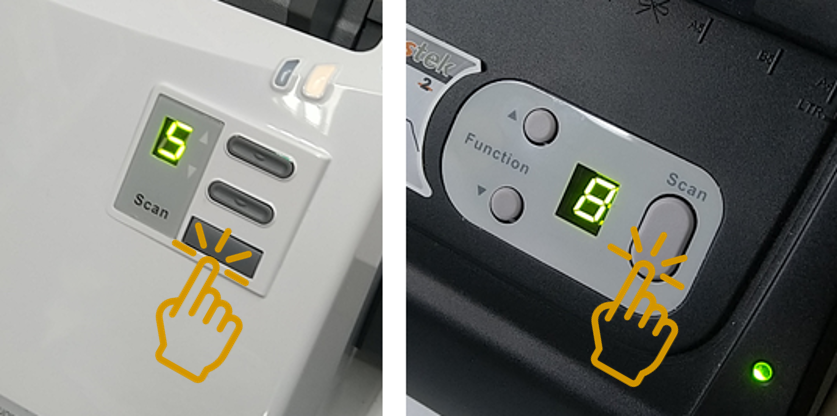
The function buttons on the scanner matches the eConnector's buttons associated above. Press up/down function button to select the which job profile to scan from. Once synchronization is complete, use the scanner scan button to 'Start Scanning' as well as 'Next' step function.
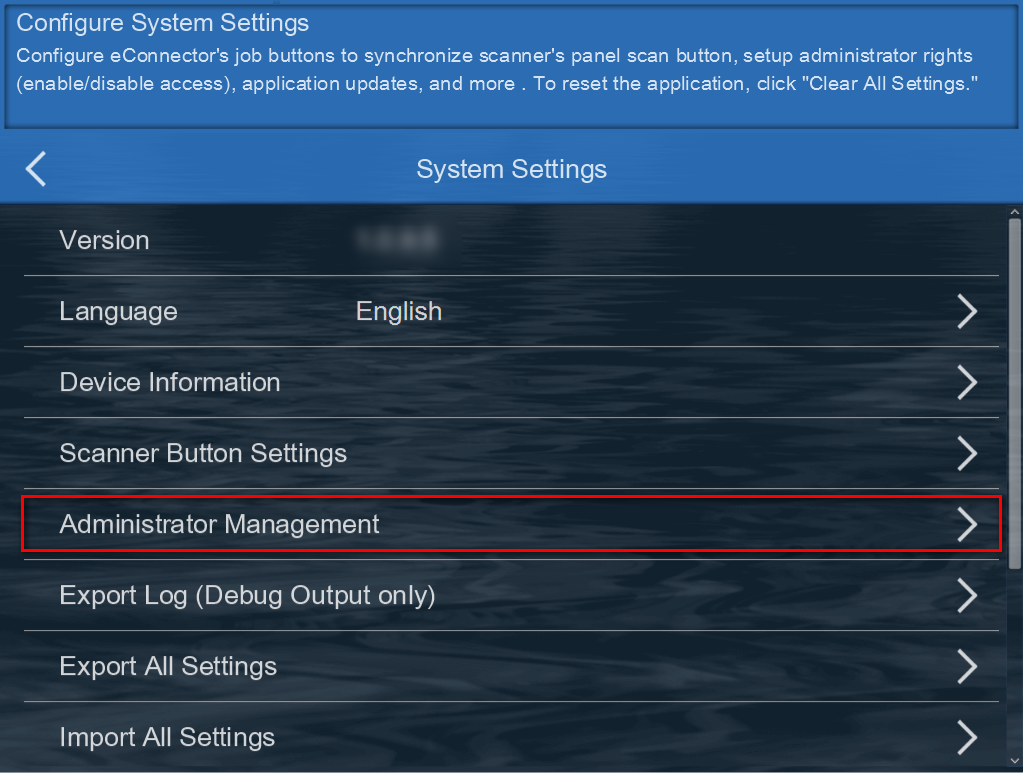
Administrator Management
Administrator can have more control on the scanner by activating password protection on the settings menu (Configuration/ System Settings/ Add Accounts)
To enable administrator management tap on 'Configuration' 'System Settings' 'Administrator Management.'
Configure the Password Protection settings if necessary. The Configurations is the highest level of management, you may setup password protection to protect your configurations being misadjusted by others. Enable and configure password protection settings accordingly. When enable, user must enter password before proceed to the respective menu.
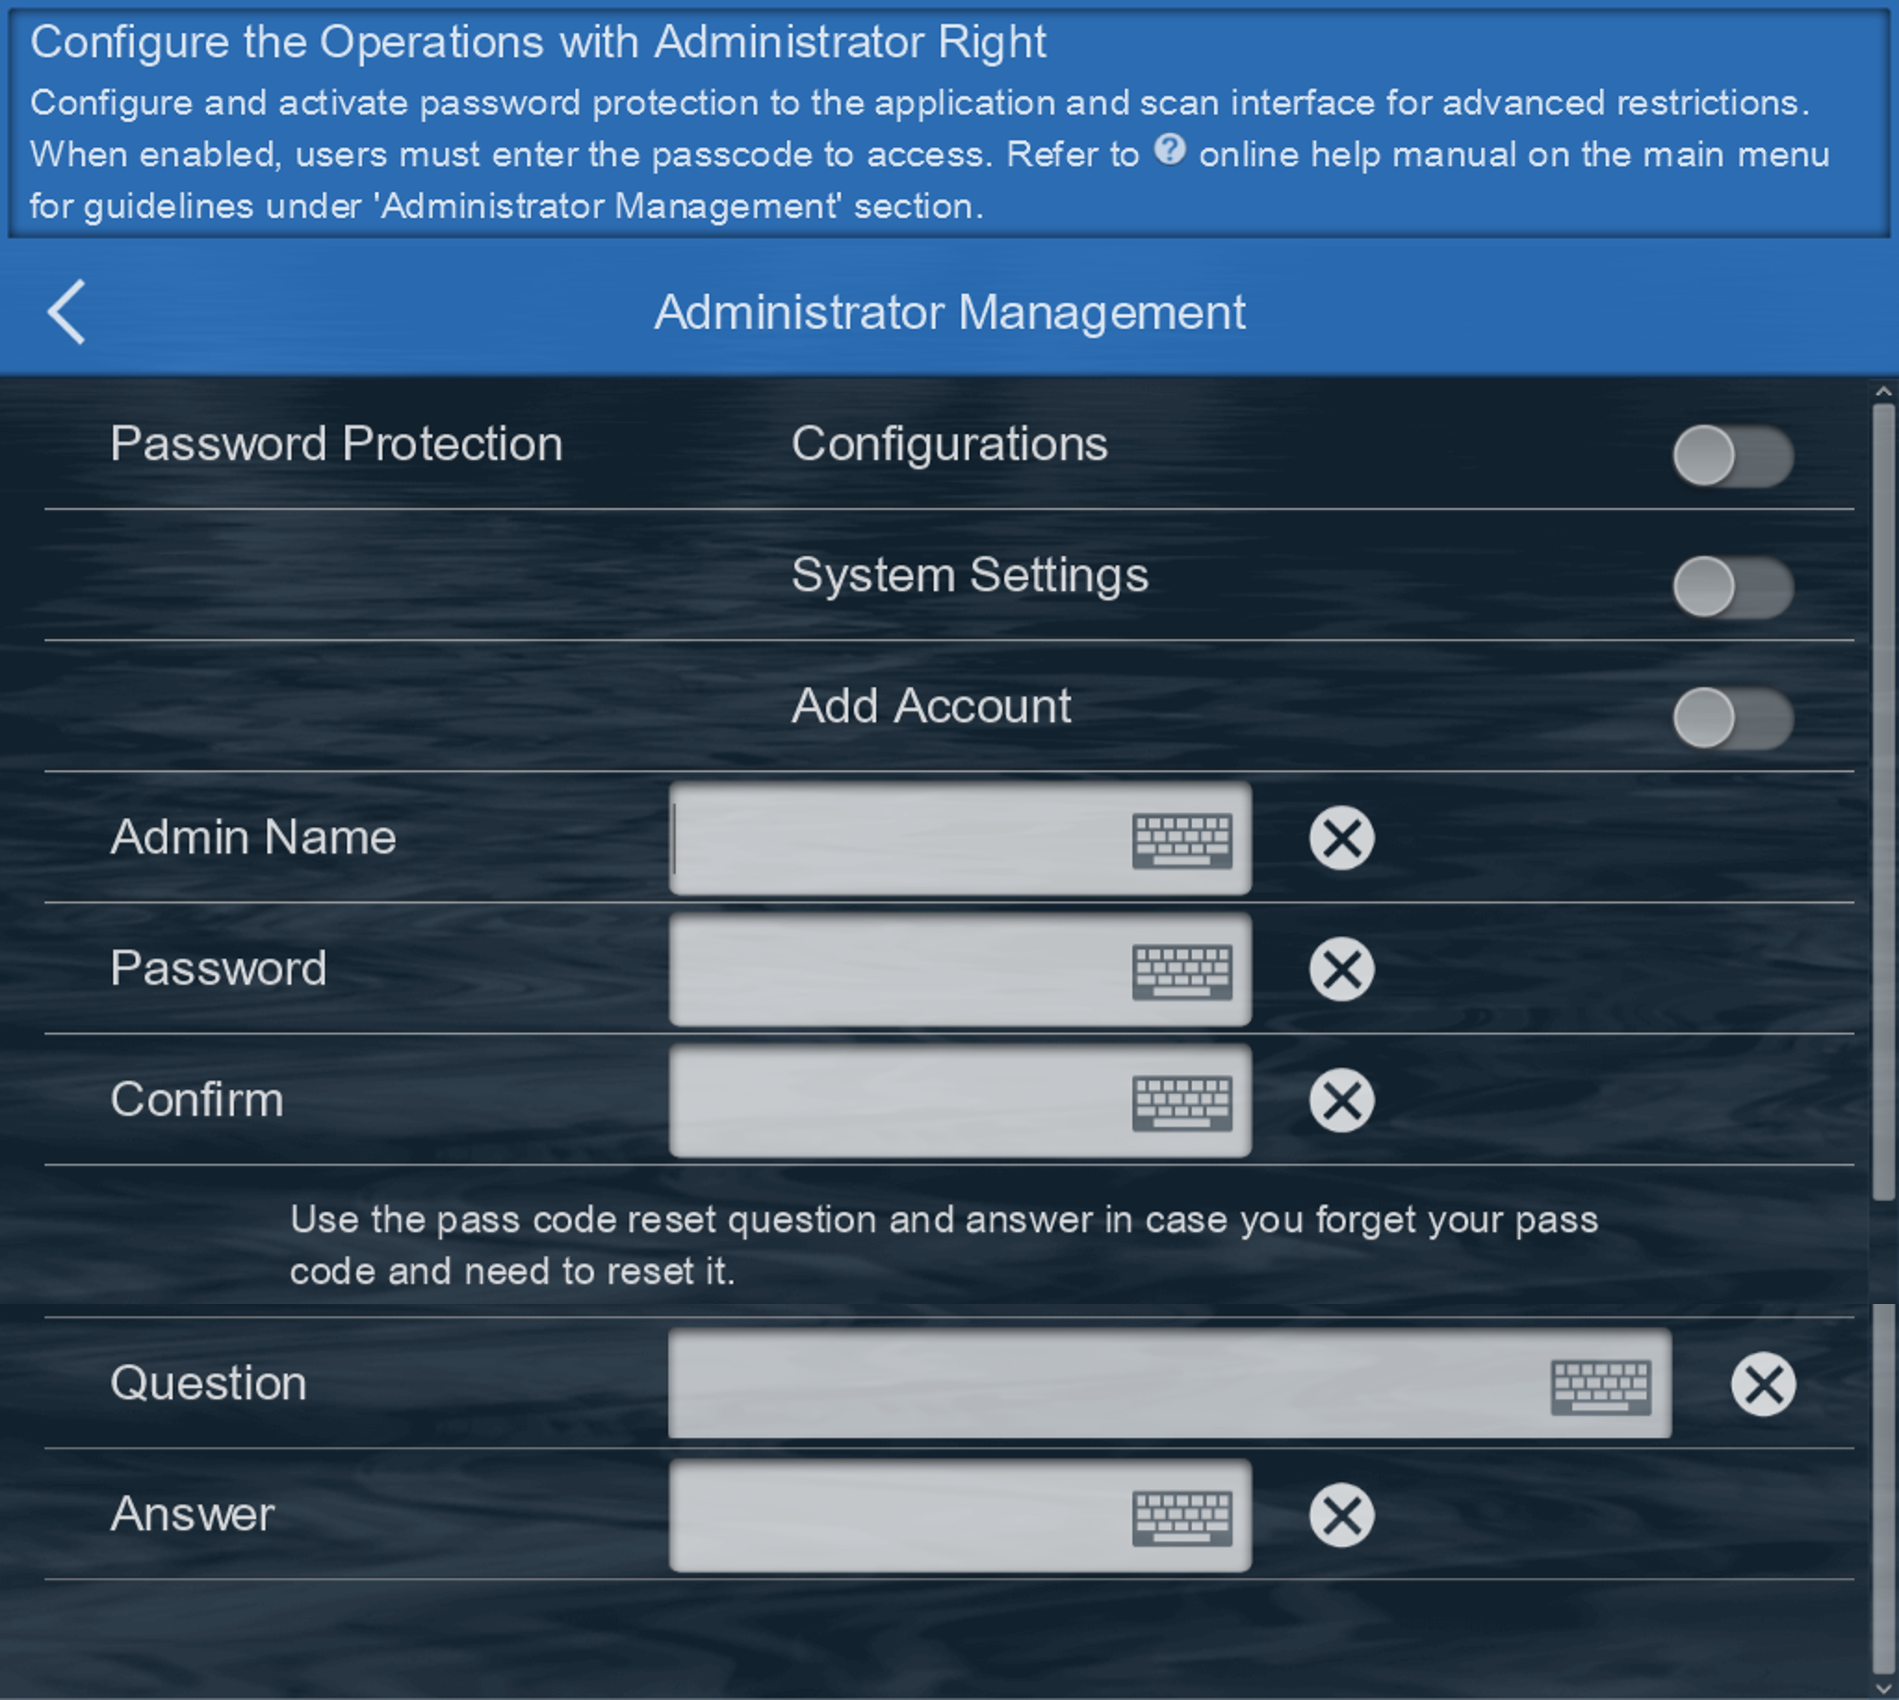
| Password Protection | Adminstrator | User/Operator | |
|---|---|---|---|
| Configurations | Enable | Disable | Users are restricted to access ALL system settings and add account/s. Only the administrator with the password can configure the device. |
| System Settings |  |
Enable/ Disable | Users are restricted to configure and alter the scanner button and relevant device settings. |
| Add Account |  |
Enable/ Disable | Users are restricted to add additional accounts to the eConnector utility application, but have access to deleting user accounts and system settings. |
Other System Settings
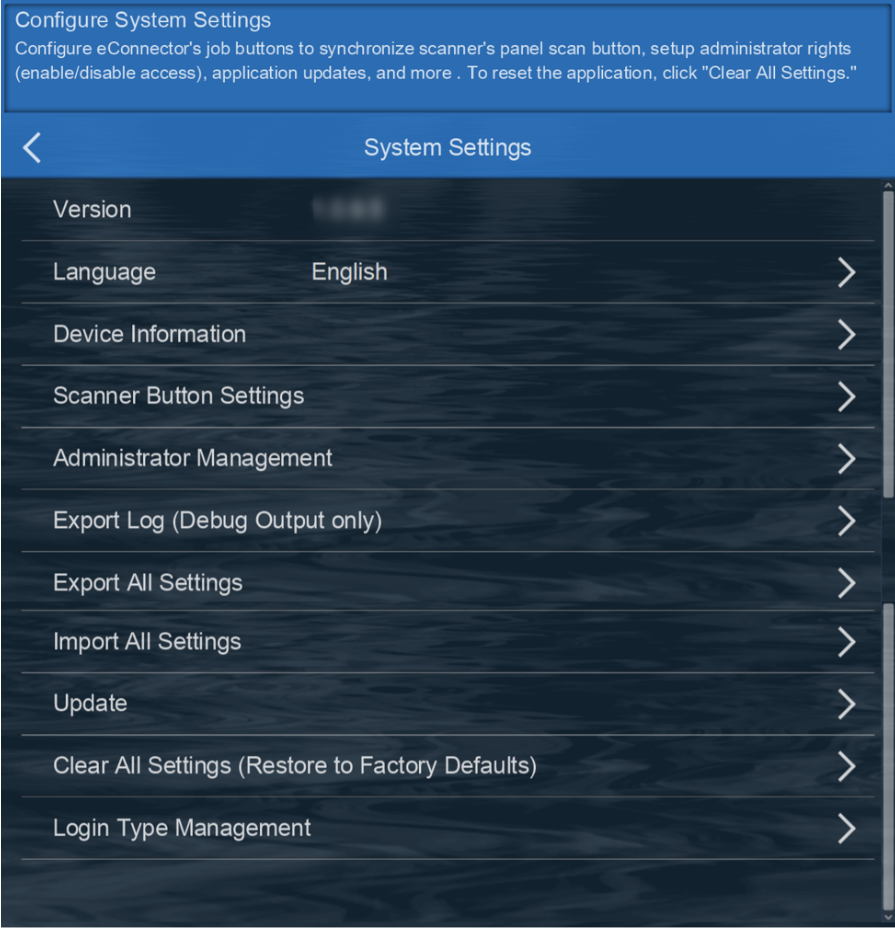
Version
Indicates the current eConnector utility application version number.
Language
Change the eConnector interface language display from this menu
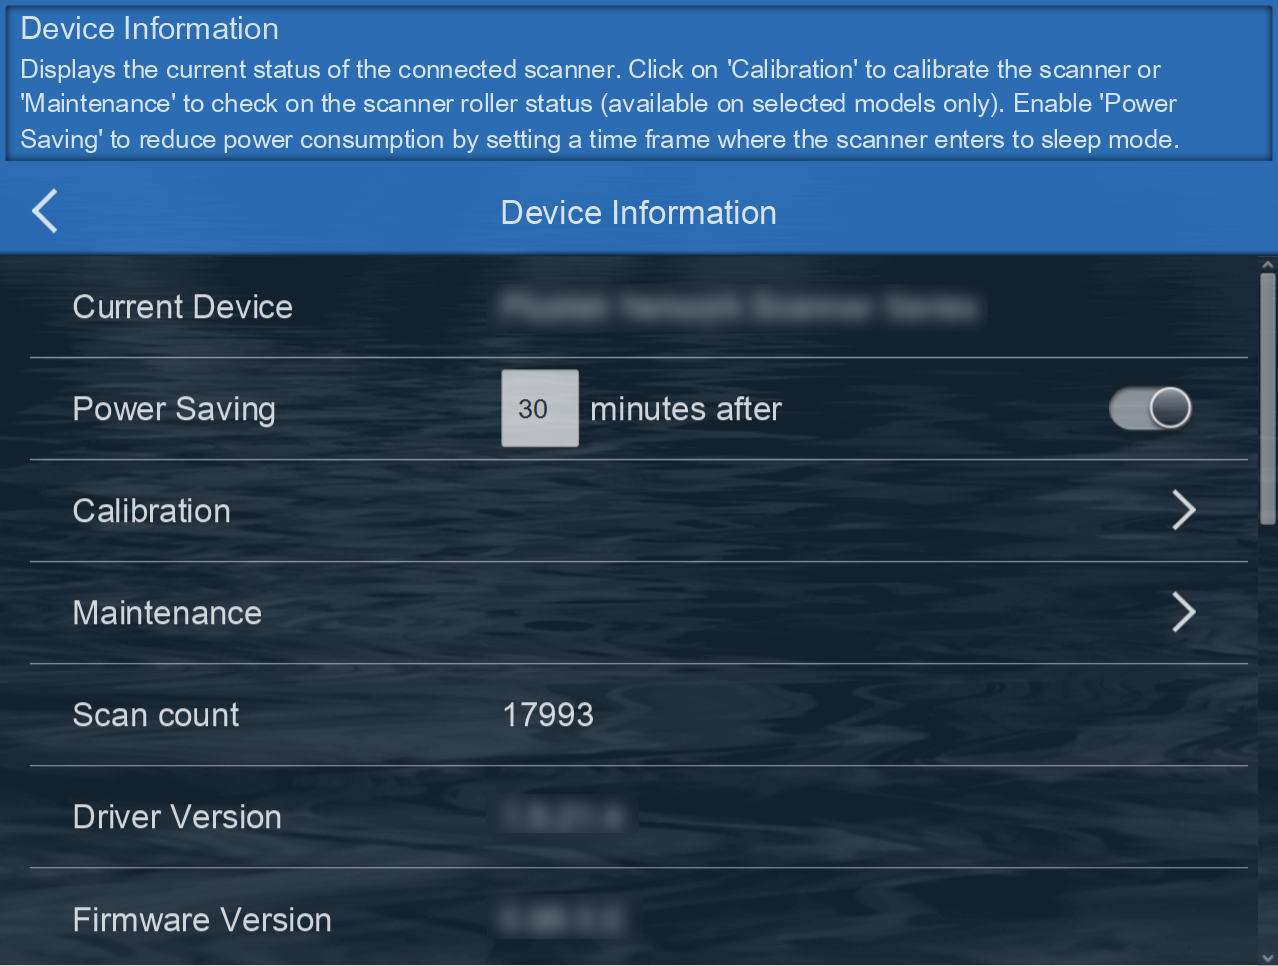
Device Information
Scanner Button Settings
Refer to Scanner Button Settings for more information.
Administrator Management
Refer to Administrator Management section) for more information.
Export Log (Debug Output Only)
This log is for debug purposes only. It is a system-generated log that allows developers to understand analyze any issues of occurrences.
Export All Settings
Administrator can export device settings, and replicate the settings to other devices. Click on ‘Export All Settings’ to export device settings.
Import All Settings
Administrator can import device settings from the USB drive. Click on ‘Import All Settings’ to import preconfigured device settings.
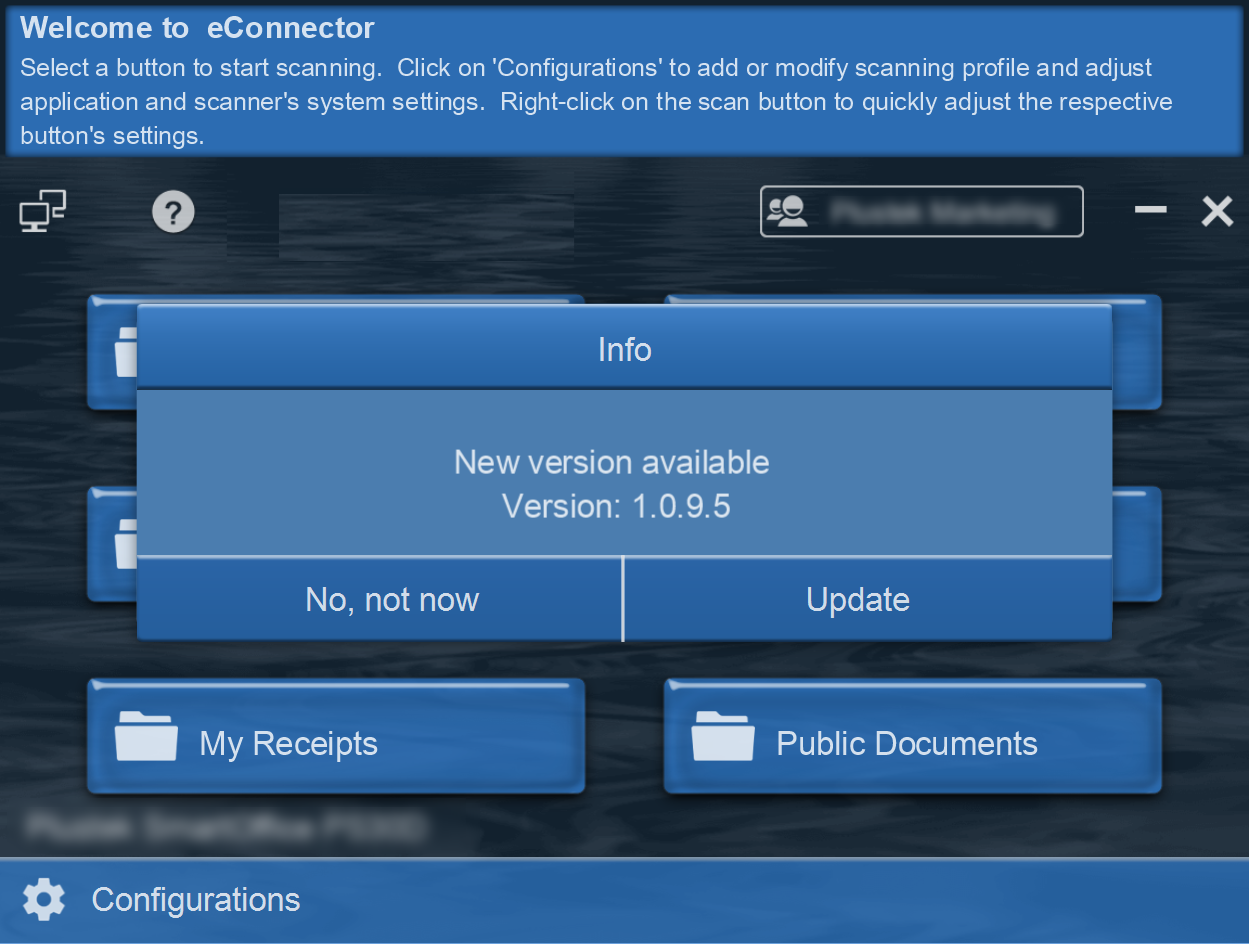
Update
Click on ‘Update’ to check if you are running on the latest software. eConnector will automatically download and guide you through, if connected to the Internet; if no updates are available, you’ll be prompt with a message as well.

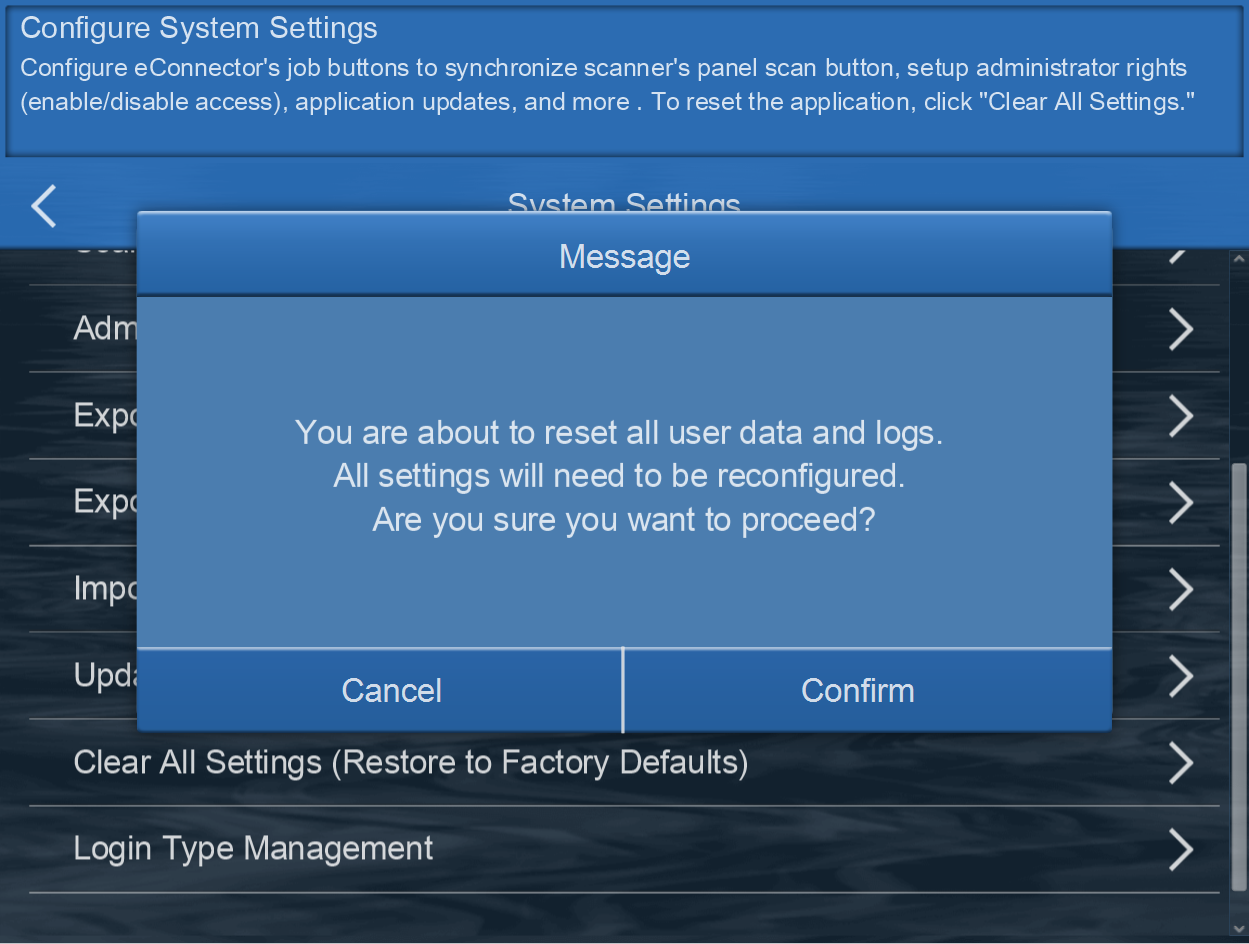
Clear All Settings (Restore to Factory Defaults)
Click on "Clear All Settings" to clear all user data and reset all settings to factory default.
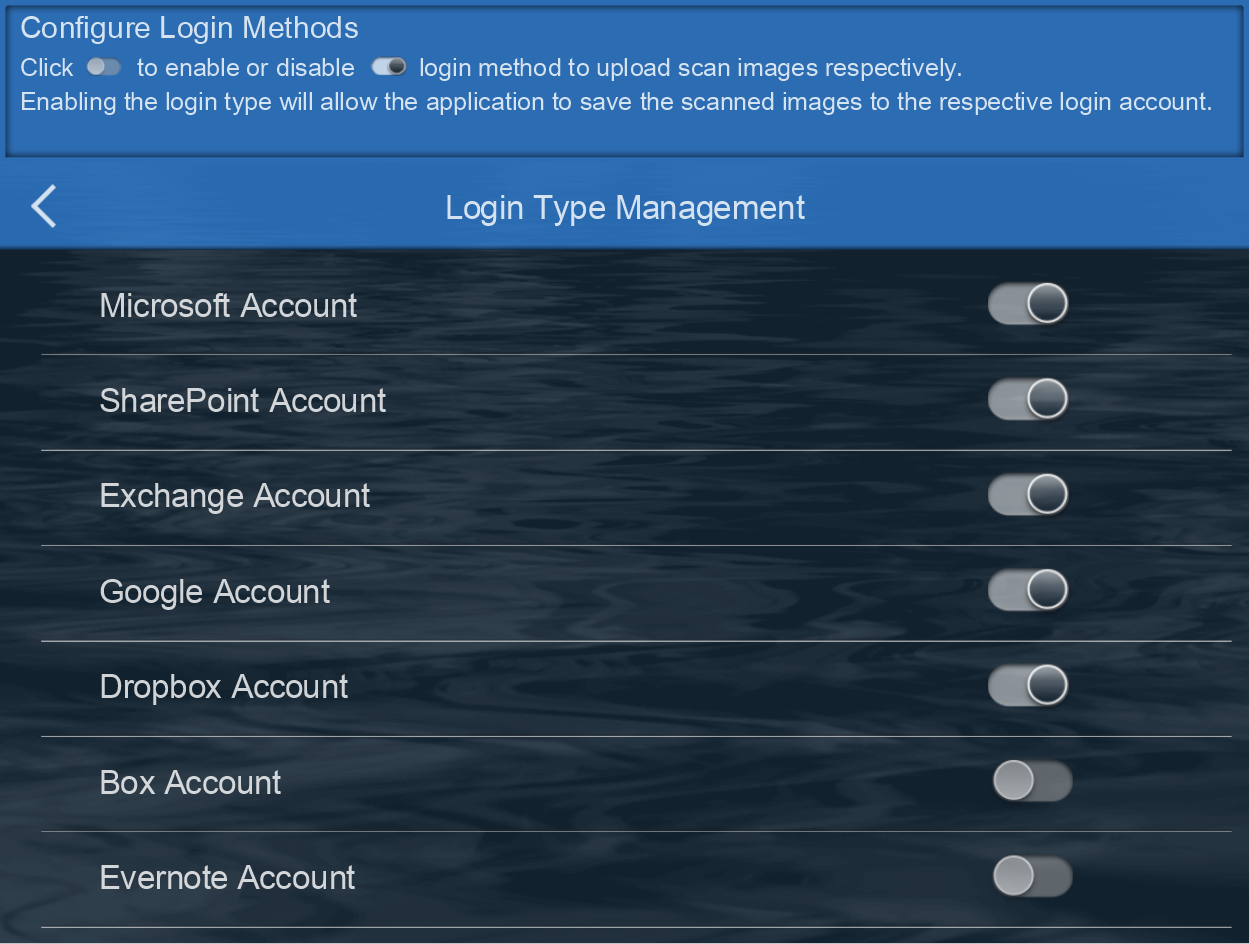
Login Type Management
This interface allows configuration for login methods. Enabling the respective "types" will allow the application to save the scanned images to the respective account.
Using ABBYY® FineReader®12 Sprint for OCR Scanned Images
Perform text recognition on the scanned images using OCR (Optical Character Recognition) to convert the image data (TIFF or JPEG) into Word, Excel, ePub, Text files that can be edited.
Using this complementary application enables organizations to work with scanned documents editable and searchable by:
Refer to scan to Searchable PDF for creating PDFs directly in searchable format.
Note: Converting from TIFF/TIF or JPEG images is only available when scanning to local folders.
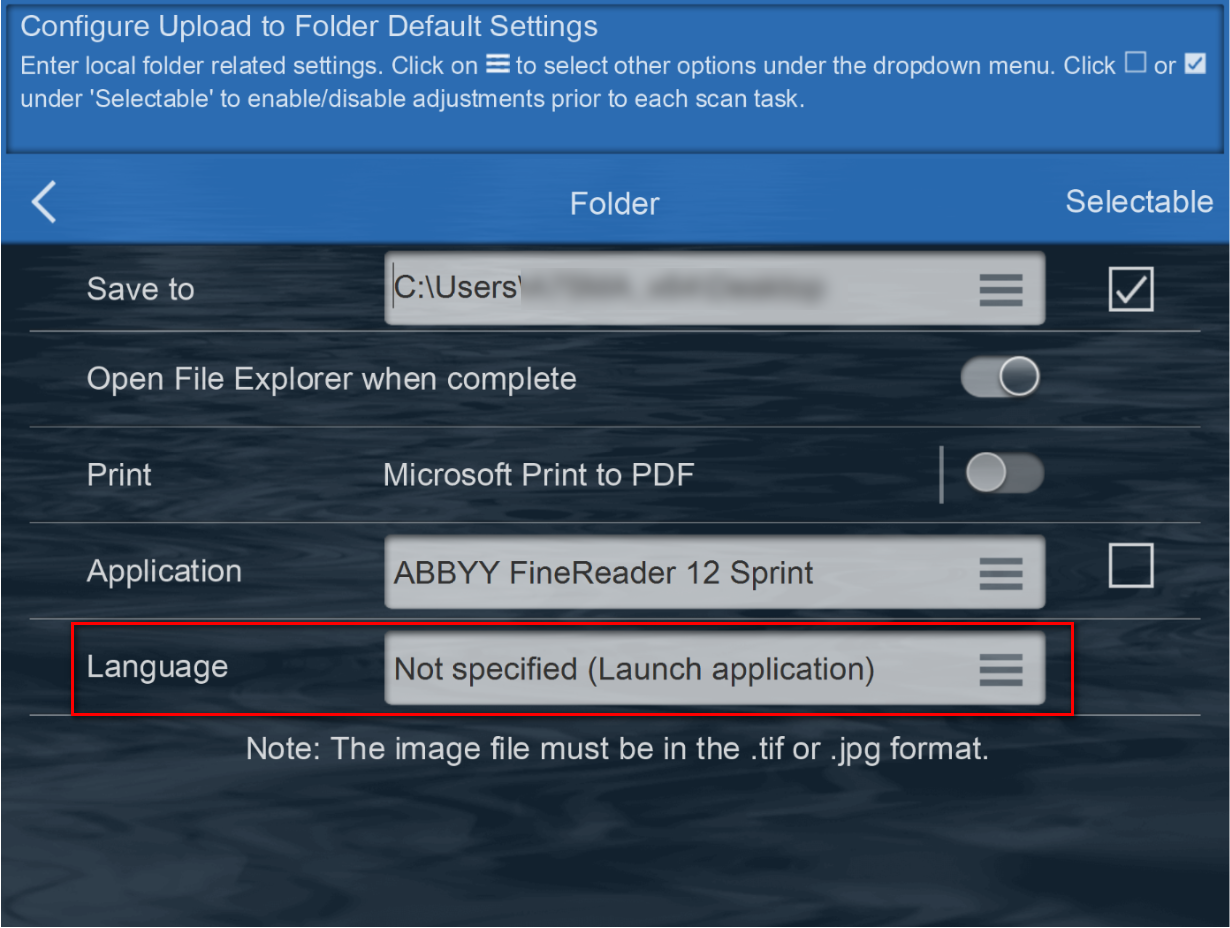
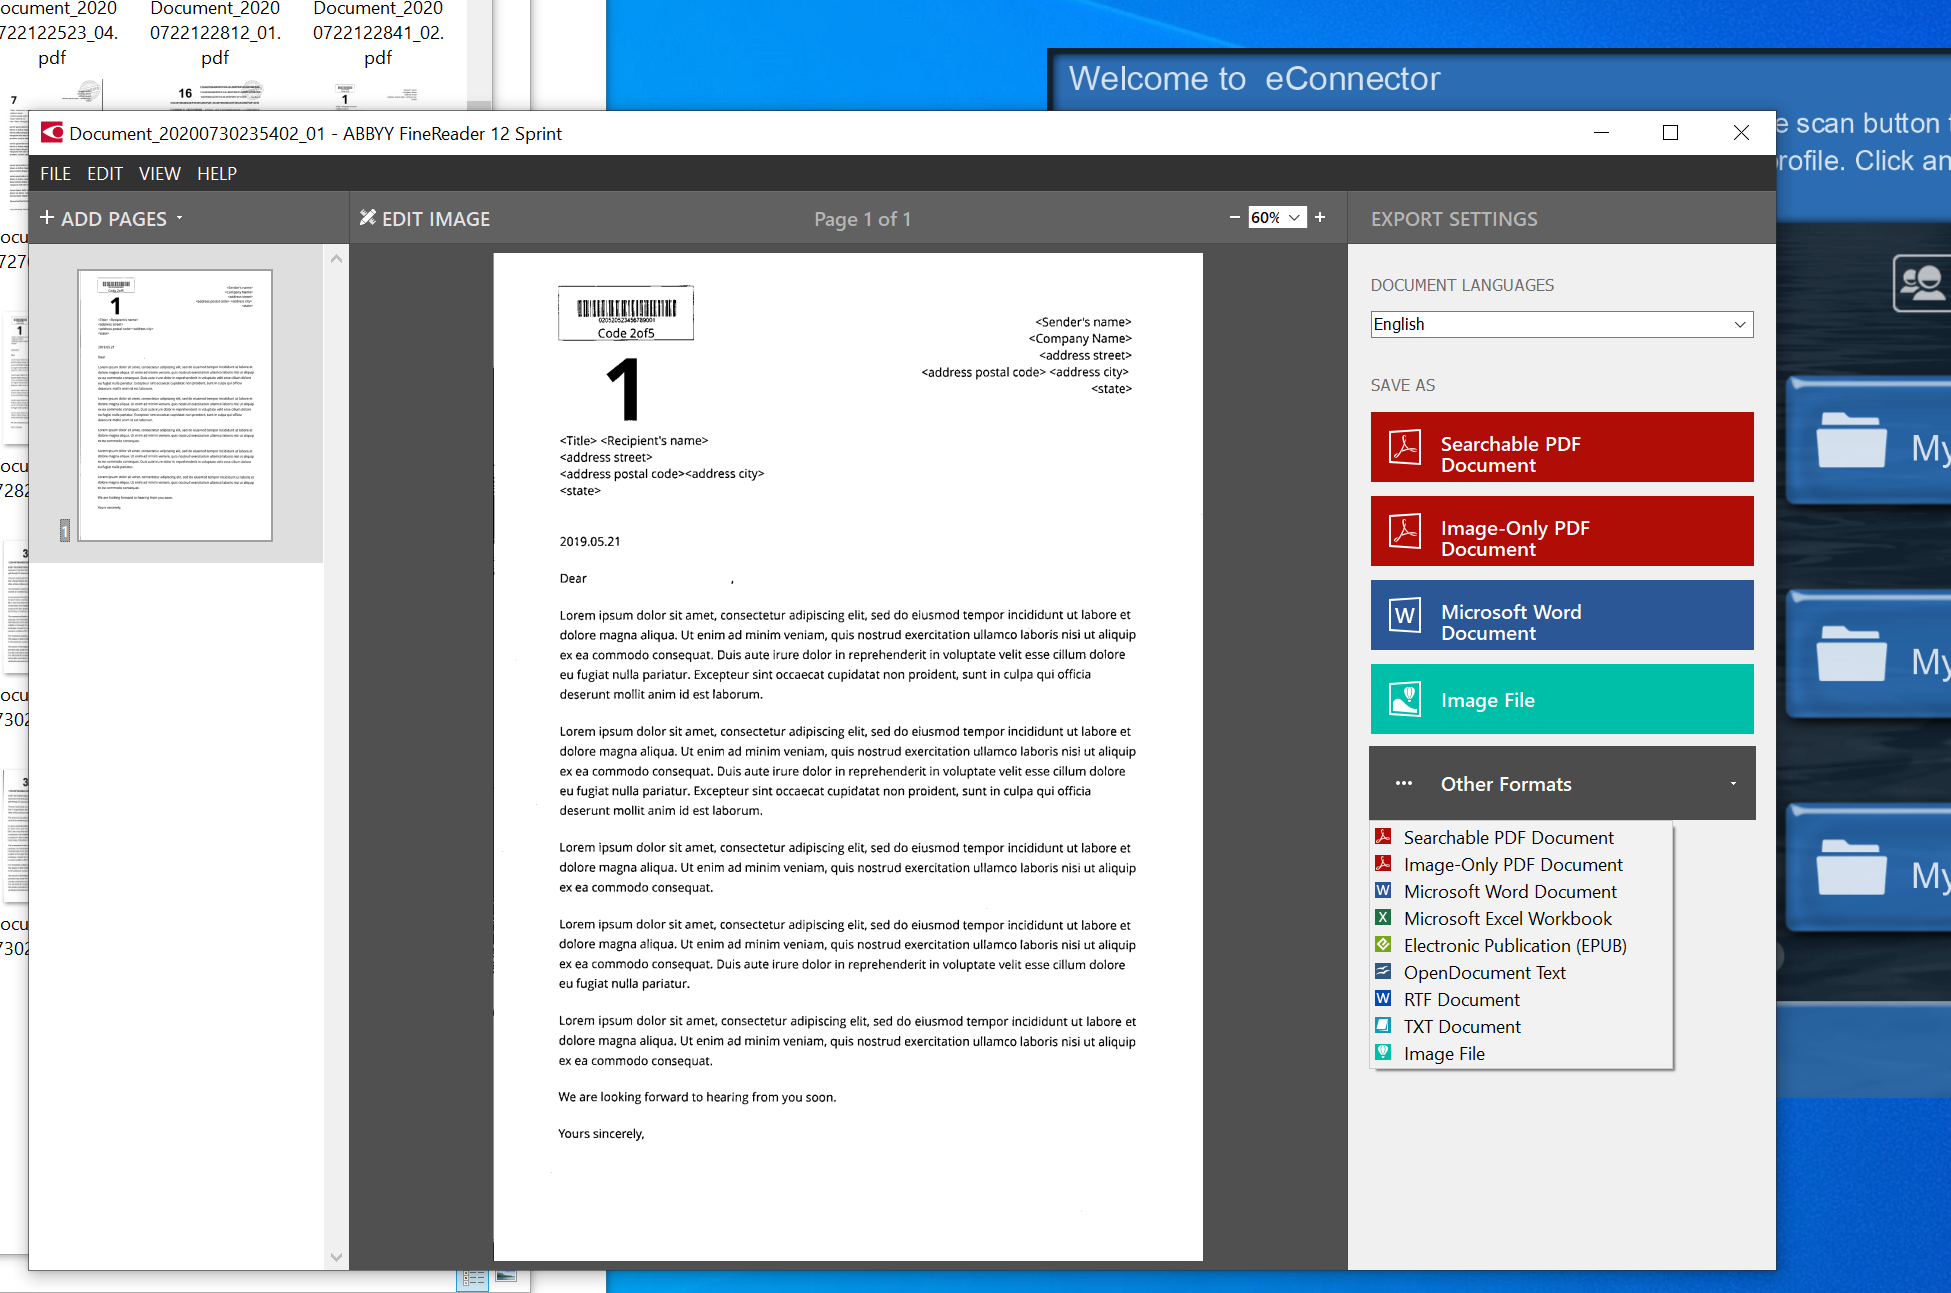
1. When no 'Language' is specified, eConnector will automatically launch ABBYY® FineReader® 12 Sprint after scanning and processing is completed. User will be able to select OCR and formats directly from ABBYY® FineReader's® interface.
Click  or
or  under 'Selectable' to enable/disable adjustments prior to each scan task.
Note: When no checkbox is selected. User/Operator will perform scan according to default settings.
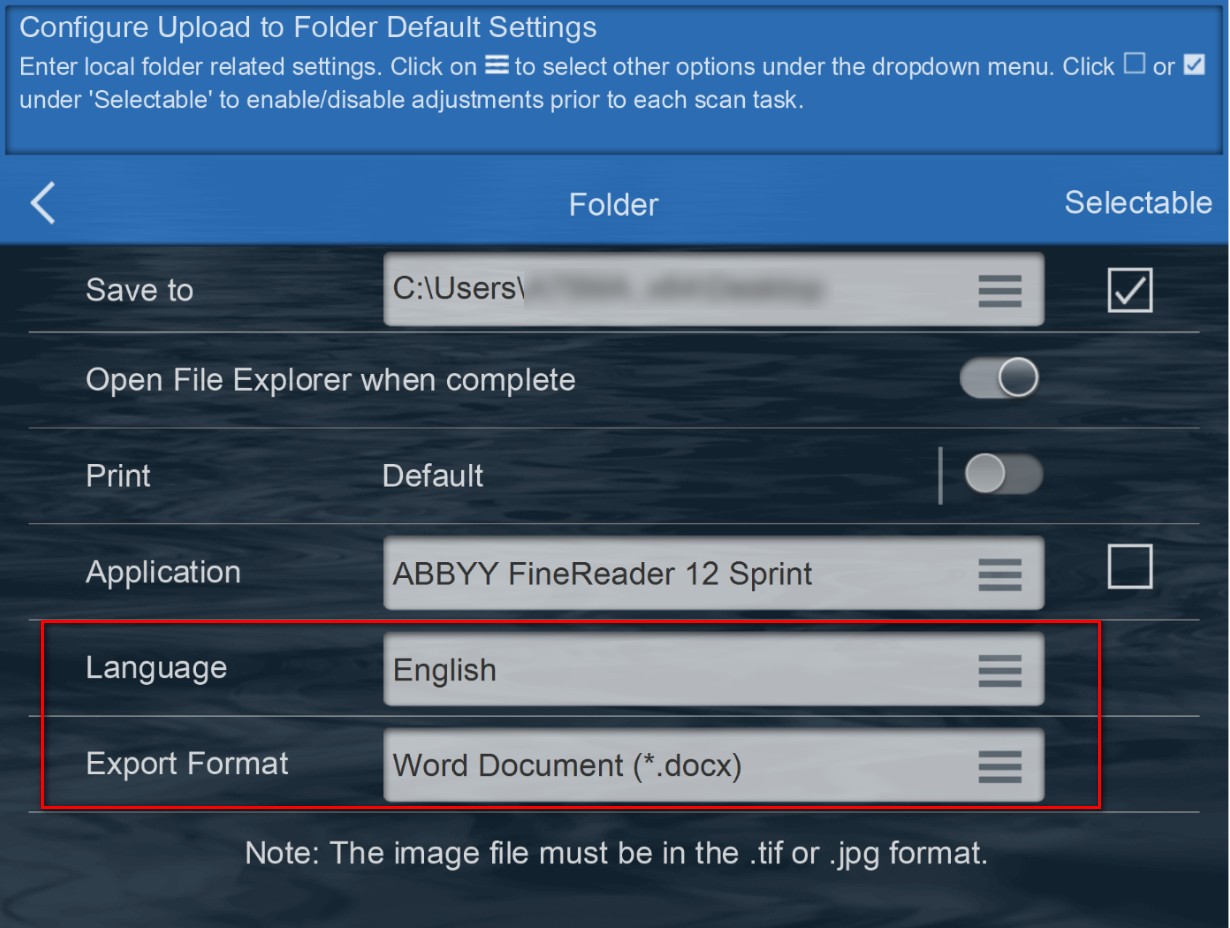
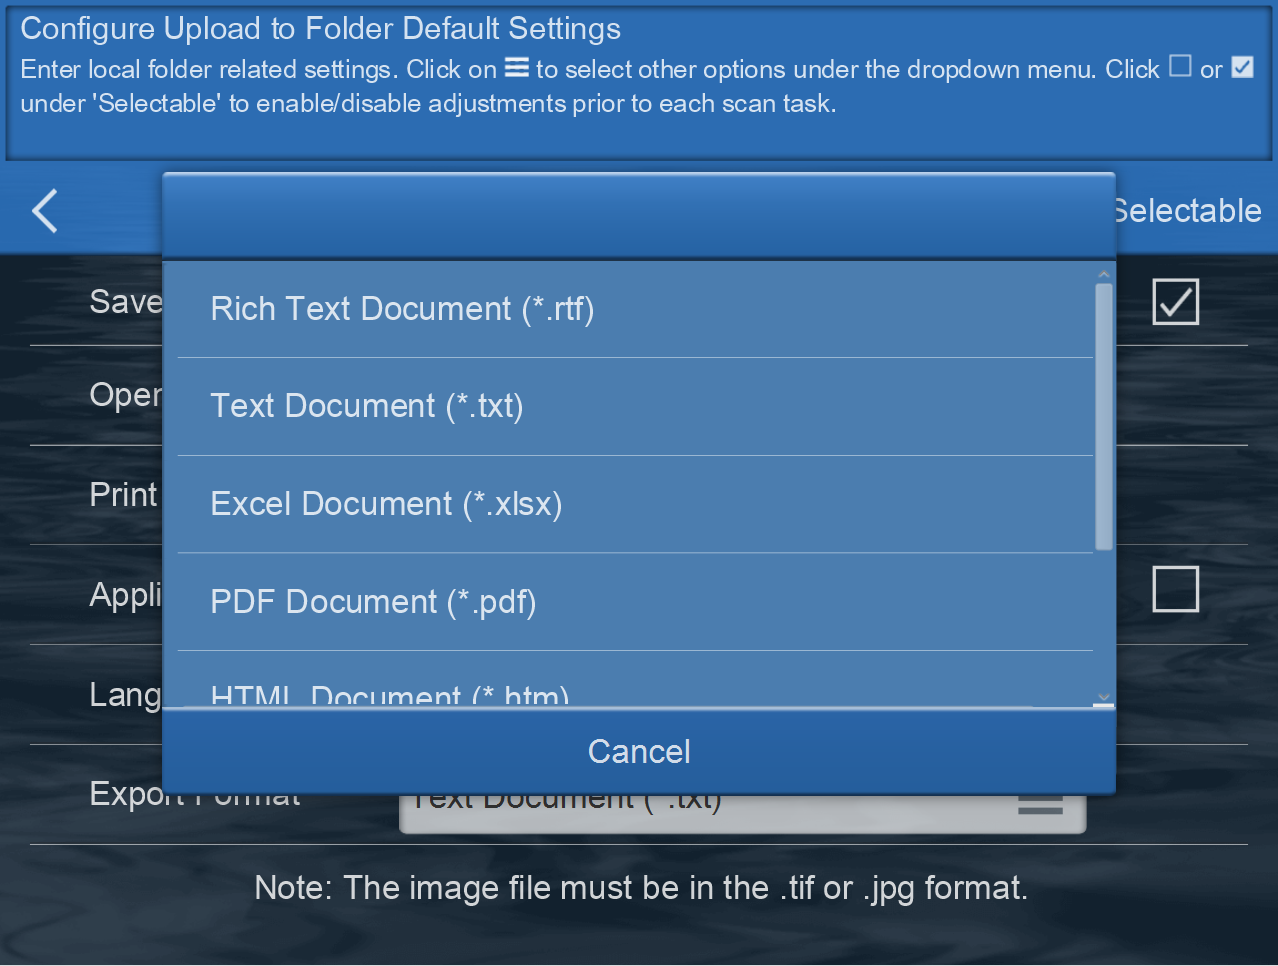
2. When Language is selected, user can specify specific export format from the list. eConnector will scanend the document and save the image in the original format and the indicated format.
Available Export Formats:
Calibration
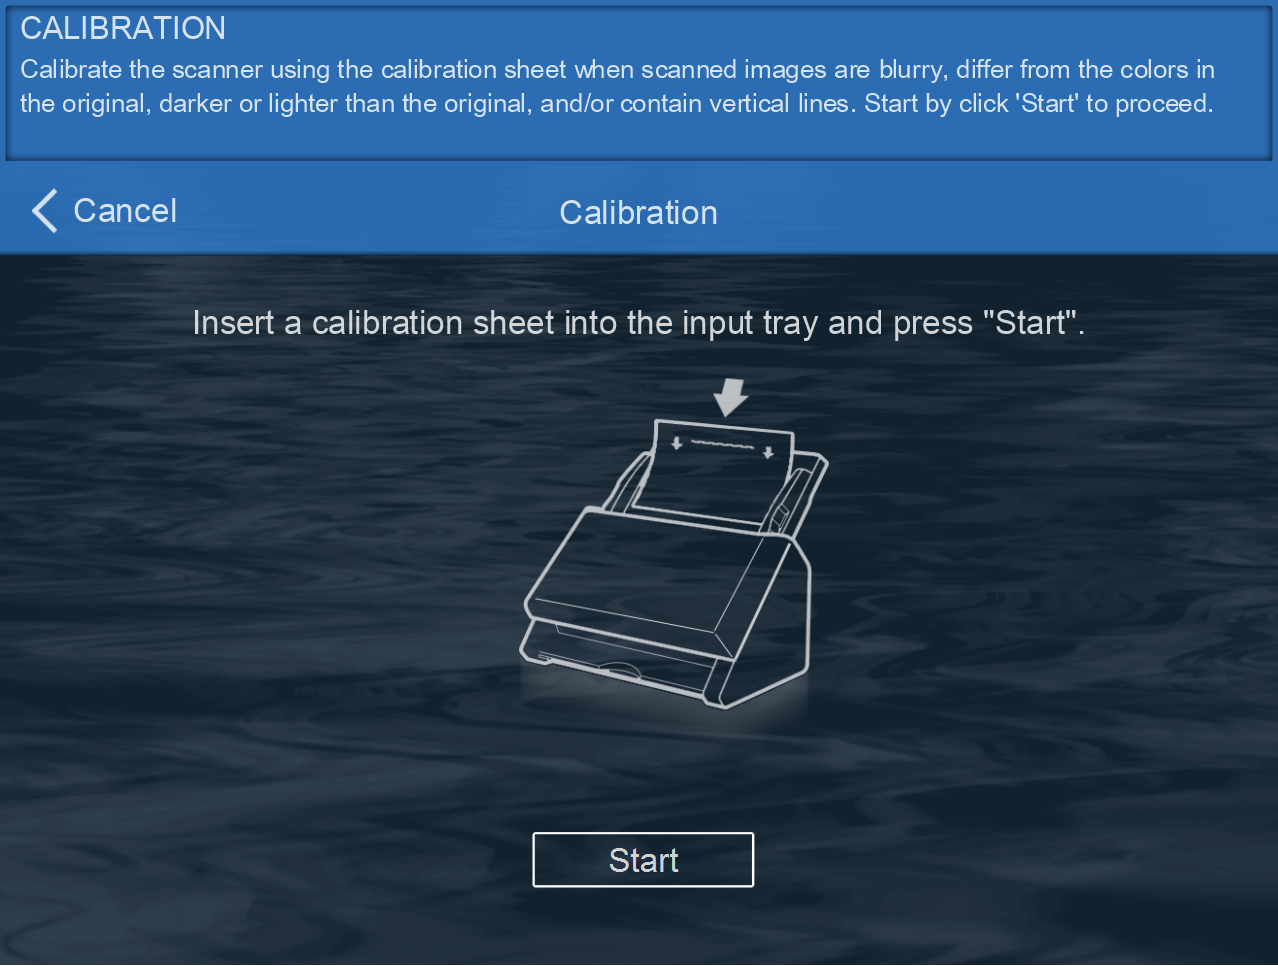
Calibrate the scanner if colors appear in areas that should be white or original document varies in color from the scanned image. By calibrating the scanner, it allows you to adjust and compensate for variation that can occur in the optical component over time by its nature. Insert the special calibration sheet into the ADF scanner, with an arrow toward the scanner buttons.
Calibration can be perform within the eConnector Utility Applicaton from the Device Information interface.
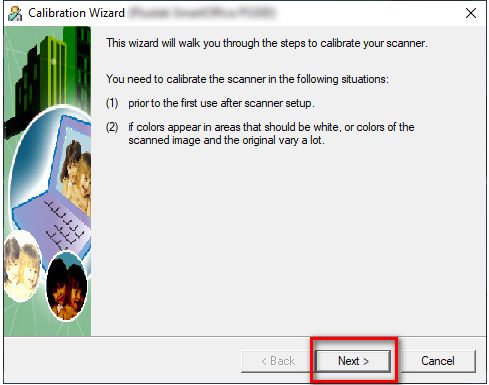
Or from the Start menu, locate 'Calibration Wizrd' to start the calibration process.
1. Click on Next > on the Calibration Wizard interface
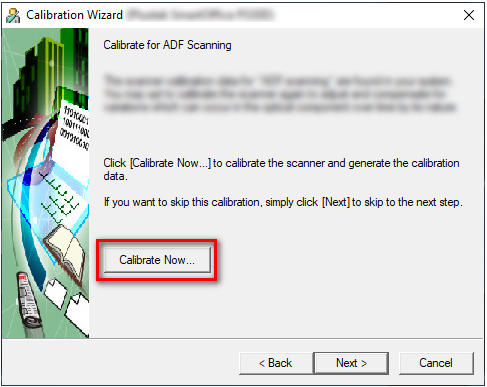
2. Click on Calibrate Now
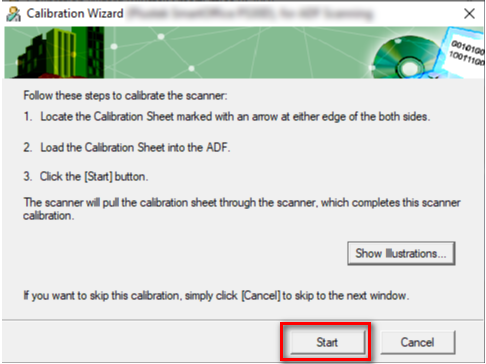
3. Be sure to load the calibration sheet into the input tray and click "Start." Click "Show Illustration, will bring up the help menu.
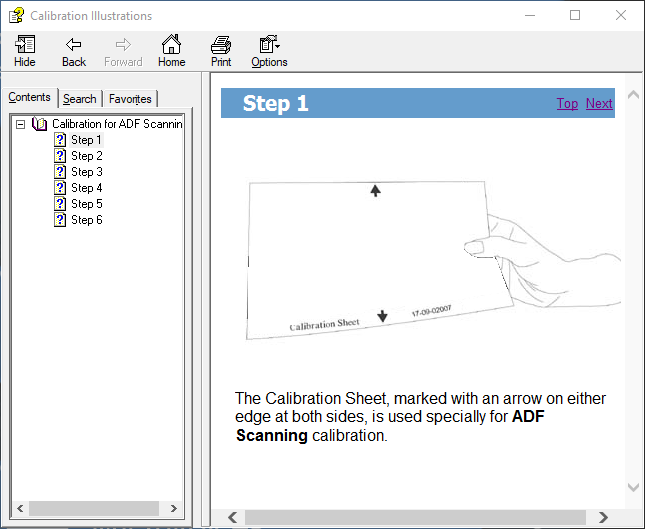
4. Calibration Illustration will guide you step by step process through the calibration process.
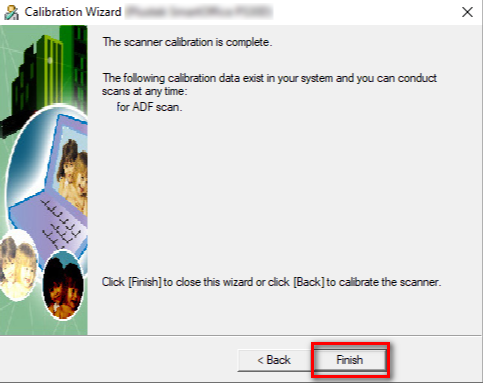
5. Click on "Finish" when calibration is complete
Scanner Utility
The 'Scanner Utility' feature provides configuration and information of the scanner device.
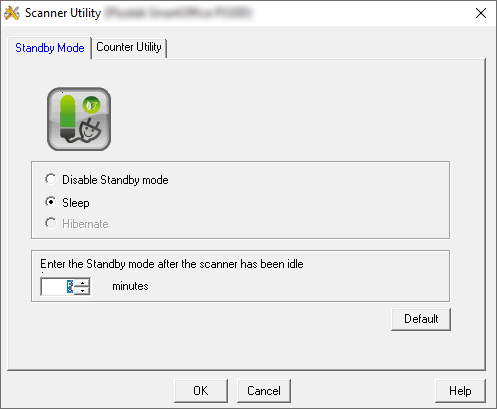
Standby Mode' can reduce power consumption. Set the peirod of time (between 5 minutes - 120 minutes) that the scanner will go in sleep mode. To turn the machine on, simply press any button on the scanner.
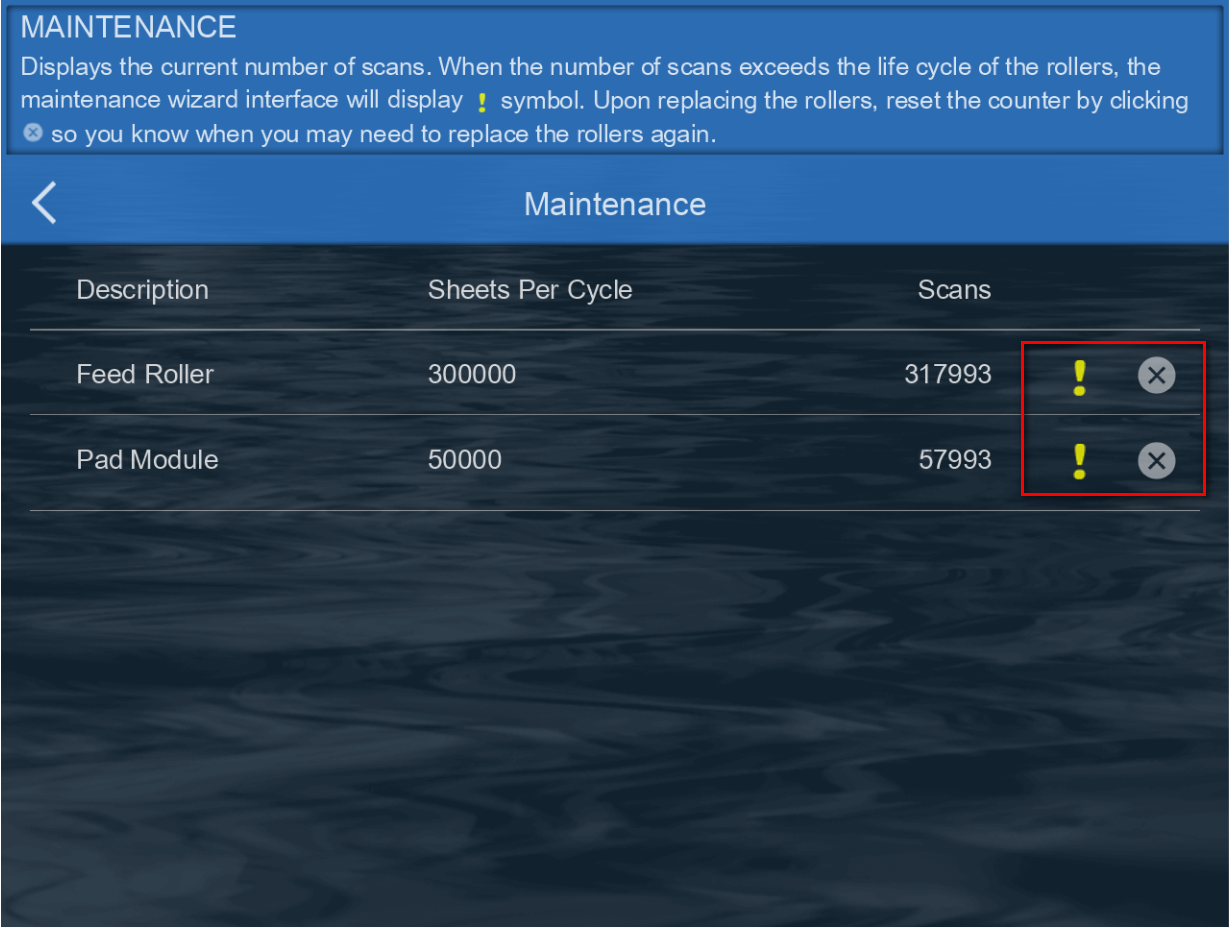
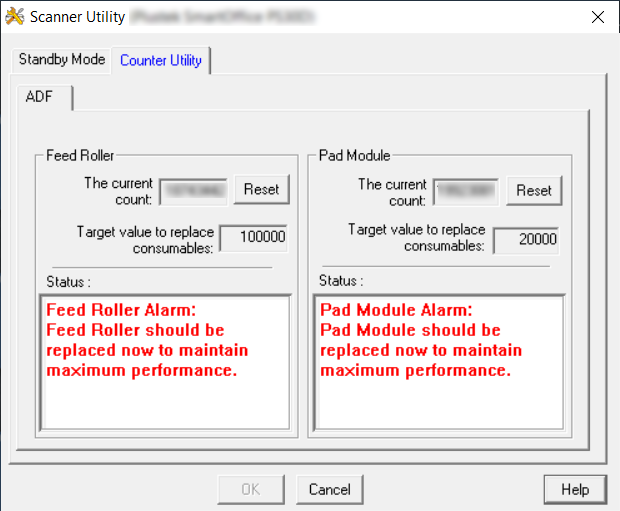
Counter Utility' automatically counts the number of sheets scanned by the scanner. Indicator will display and suggest to replace the consumerable parts for better scanning performance.
Configuring 'Standby Mode' and 'Counter Utility' are available within the eConnector Utility Applicaton from the Device Information interface.
Displays the current roller/pad status.
Sheets Per Cycle, indicates suggested maximum scans.
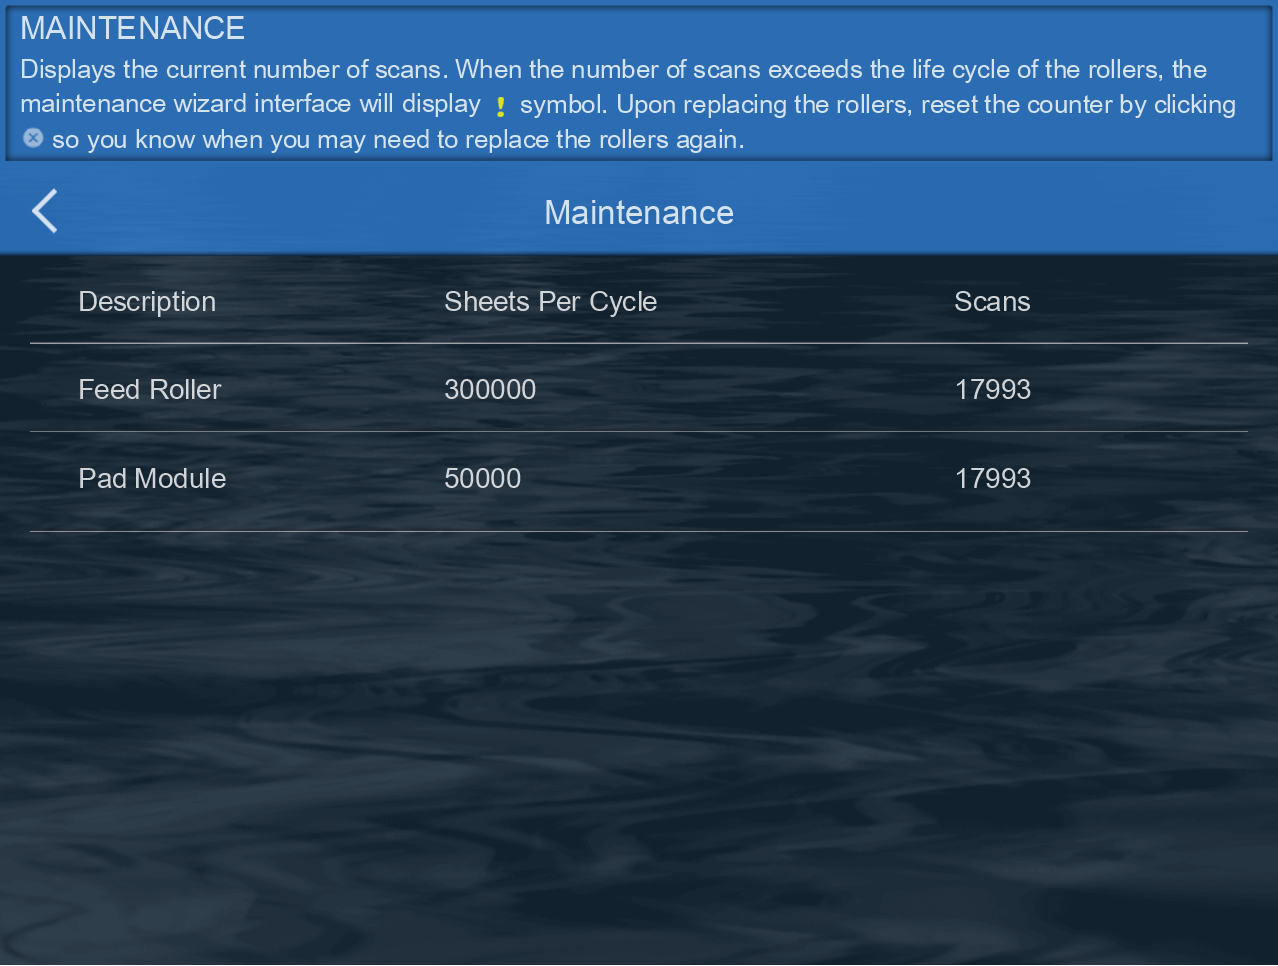
When scans exceeds roller/pad life time,  will appear.
After replacement, reset by clicking  .
.
Standby Mode Interface
Counter Utility Interface
Scanning
Scanning Documents- Click on any of the job button on the main menu to start scanning. If the respective job button have any ‘Selectable’ scan settings selected, the relevant interface will display on the panel for user to modify or make adjustments. Click on Next > to continue to the next step.
During Preview and Edit interface
When preview is enabled, scanned image will be displayed on screen in thumbnails.
 Rotate scan image by 180°
 Rotate scan image by 90° to the right
 Rotate scan image by 90° to the left
 Click to continue scanning
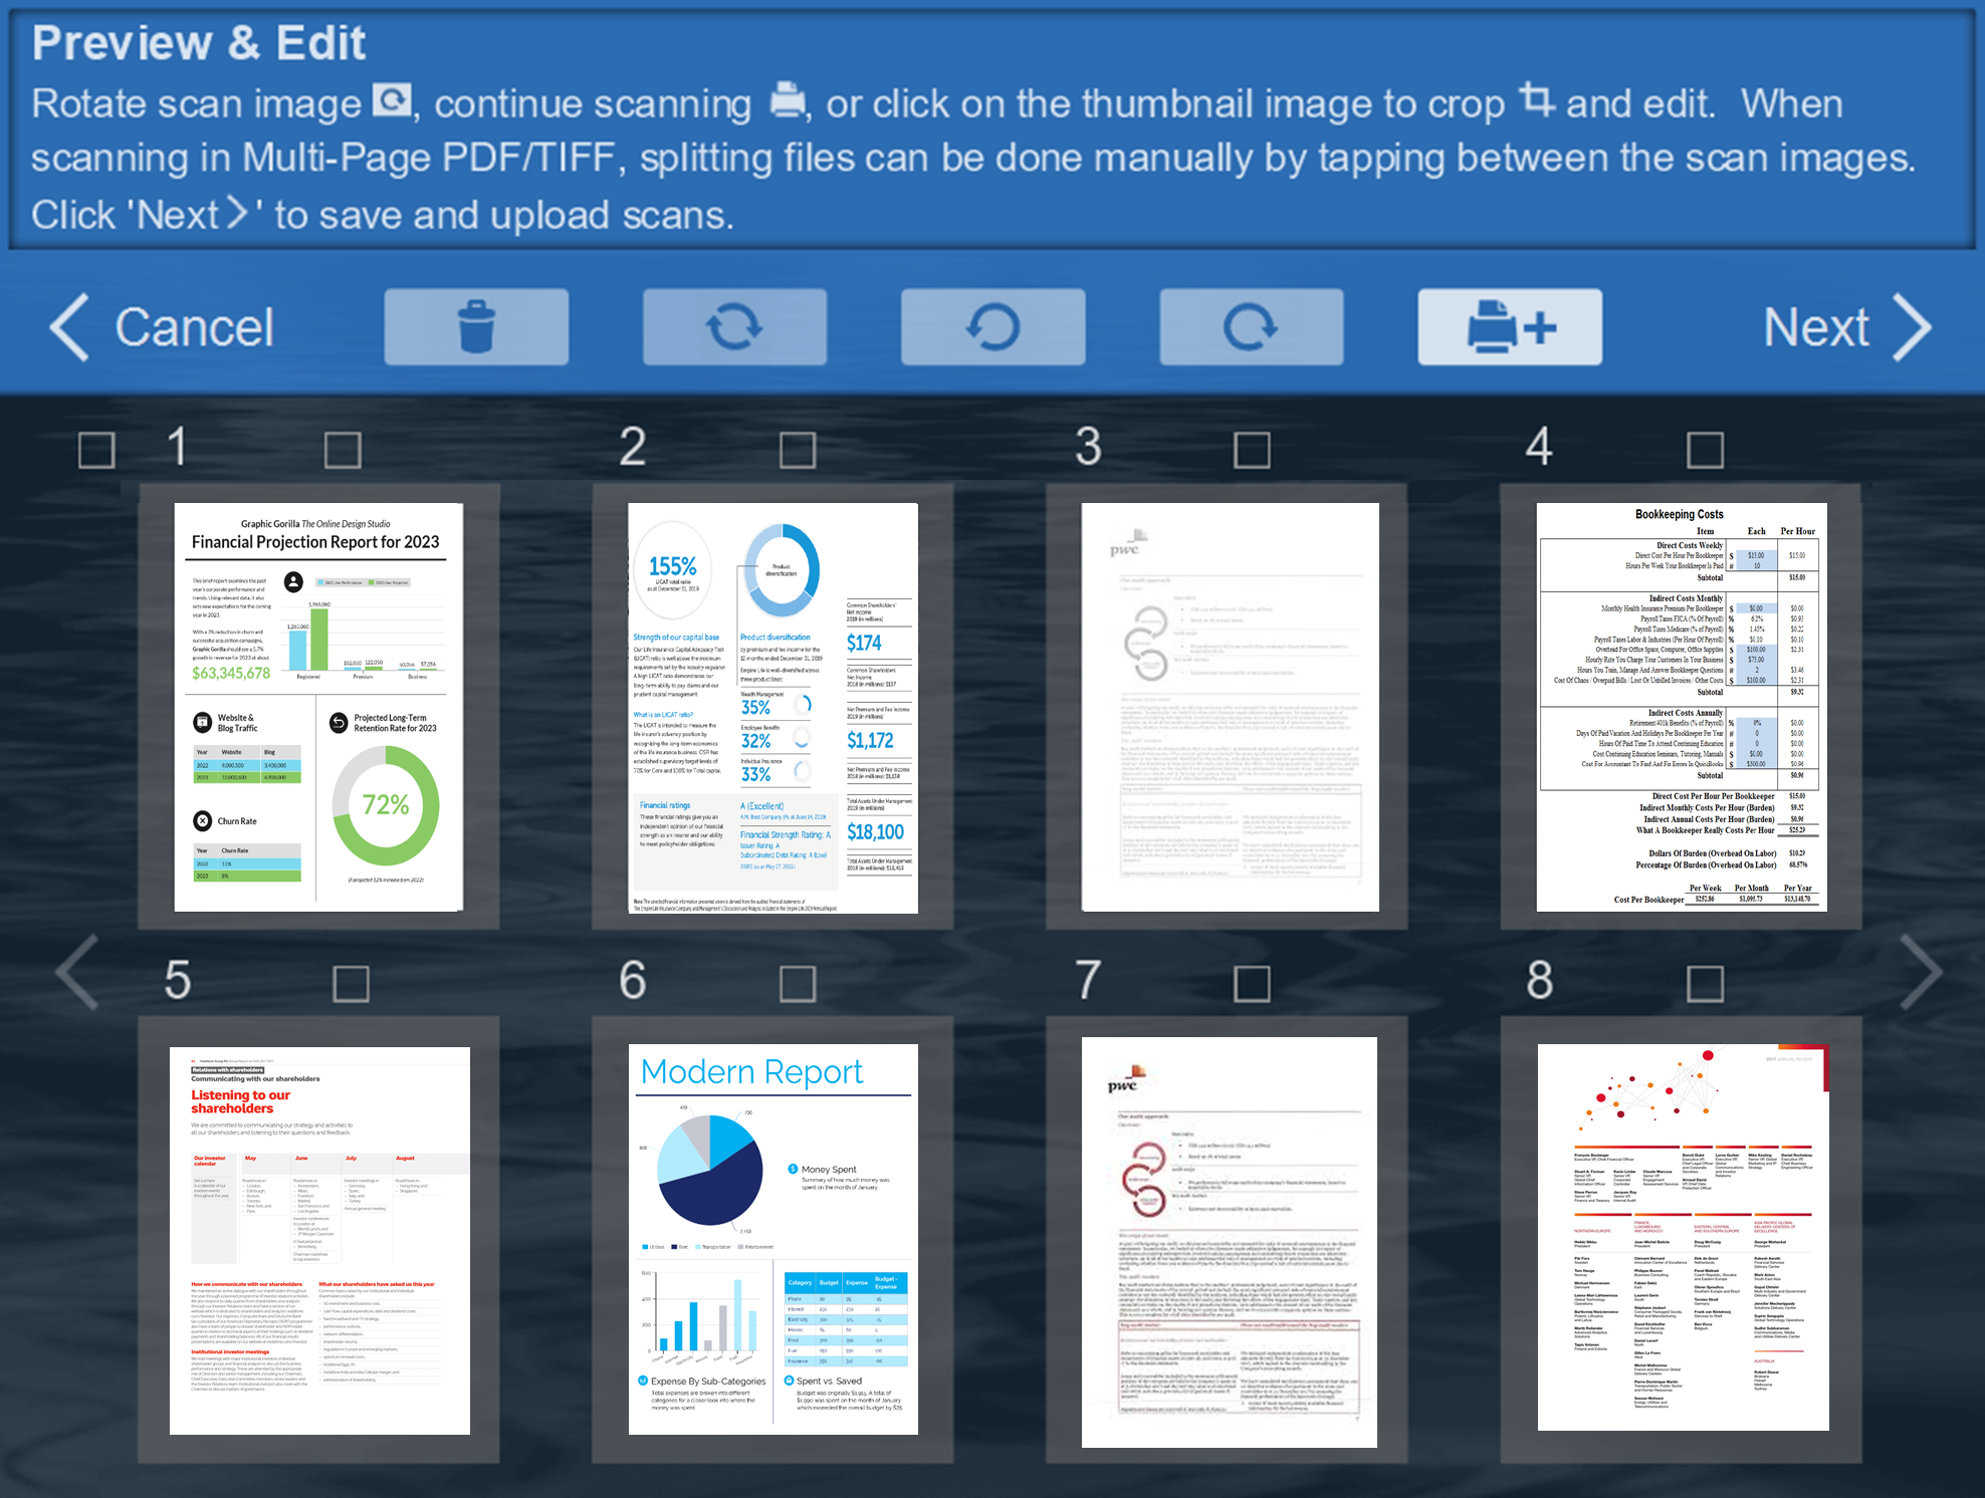
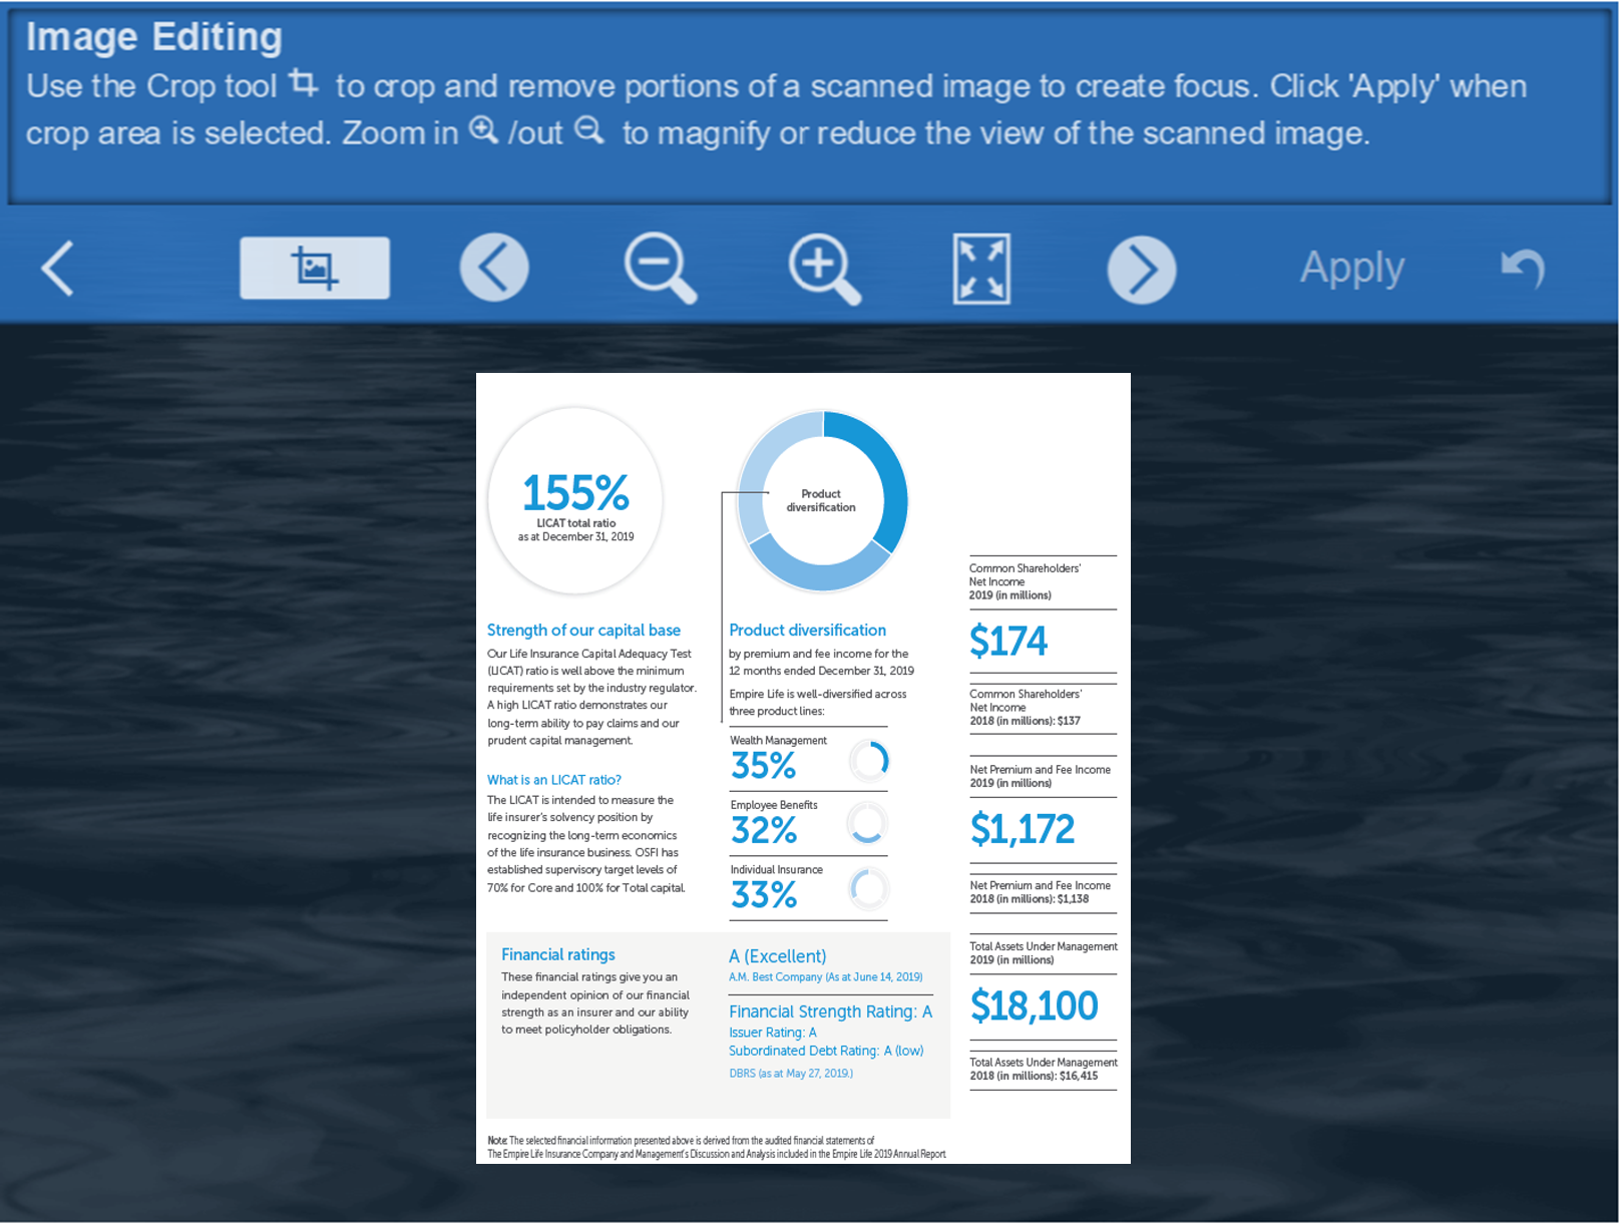
 Click on the thumbnail image to crop
Click on the thumbnail to zoom in/out and crop.
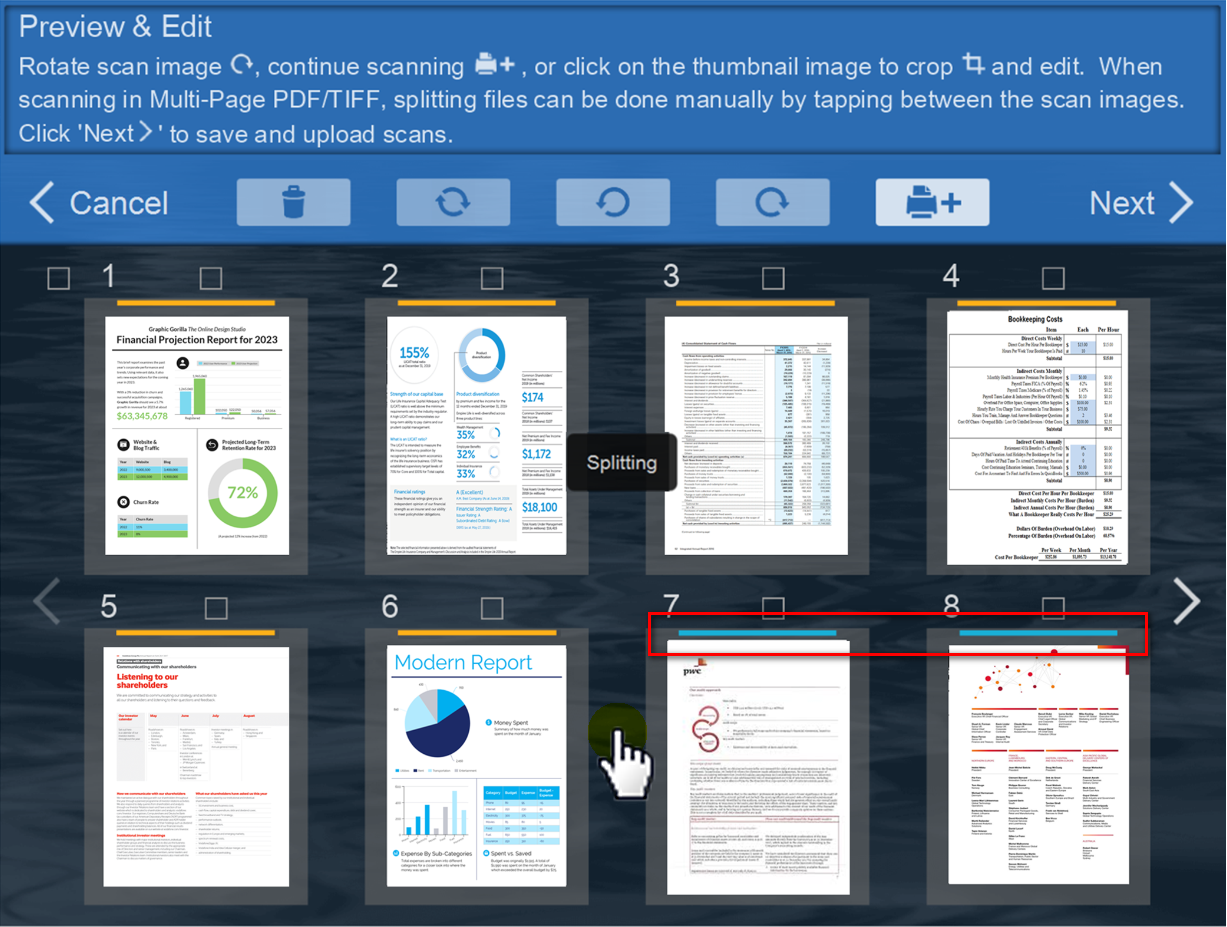
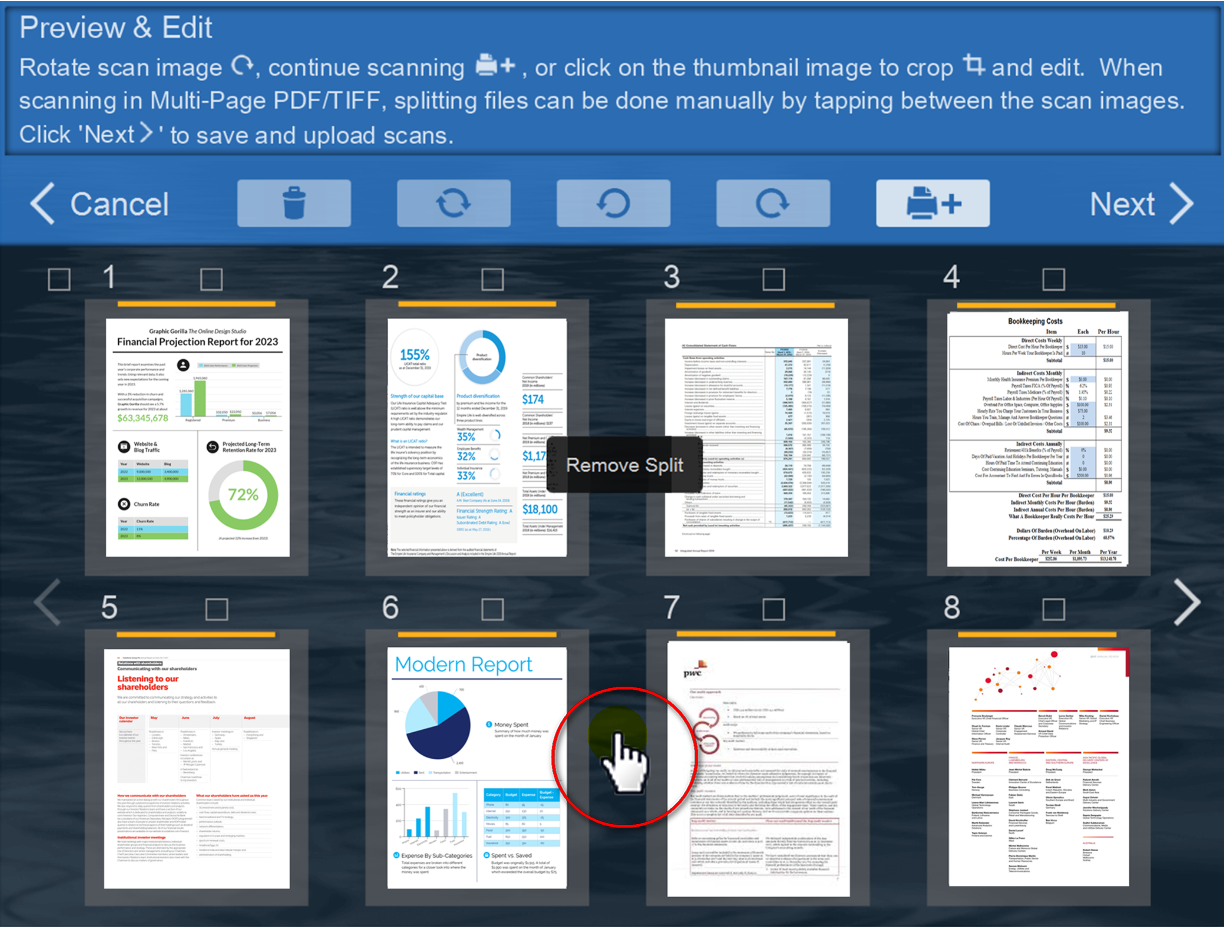
When scanning in multiple PDFs or TIFF files, separating can be done manually. A small color bar will appear on the top of the scan, simply click between the two images, to separate into a different file, for about a second, the color bar will change color, indicating separation is complete. To remove, simply click the area again.
Manual Splitting Documents
Manual Remove Splitting
After editing, Click on Next > to continue. You maybe prompt to enter information such as the database, archive folders, index, and metadata (xmp metadata) you wish to upload to, if it was made as ‘Selectable’ during configuration.

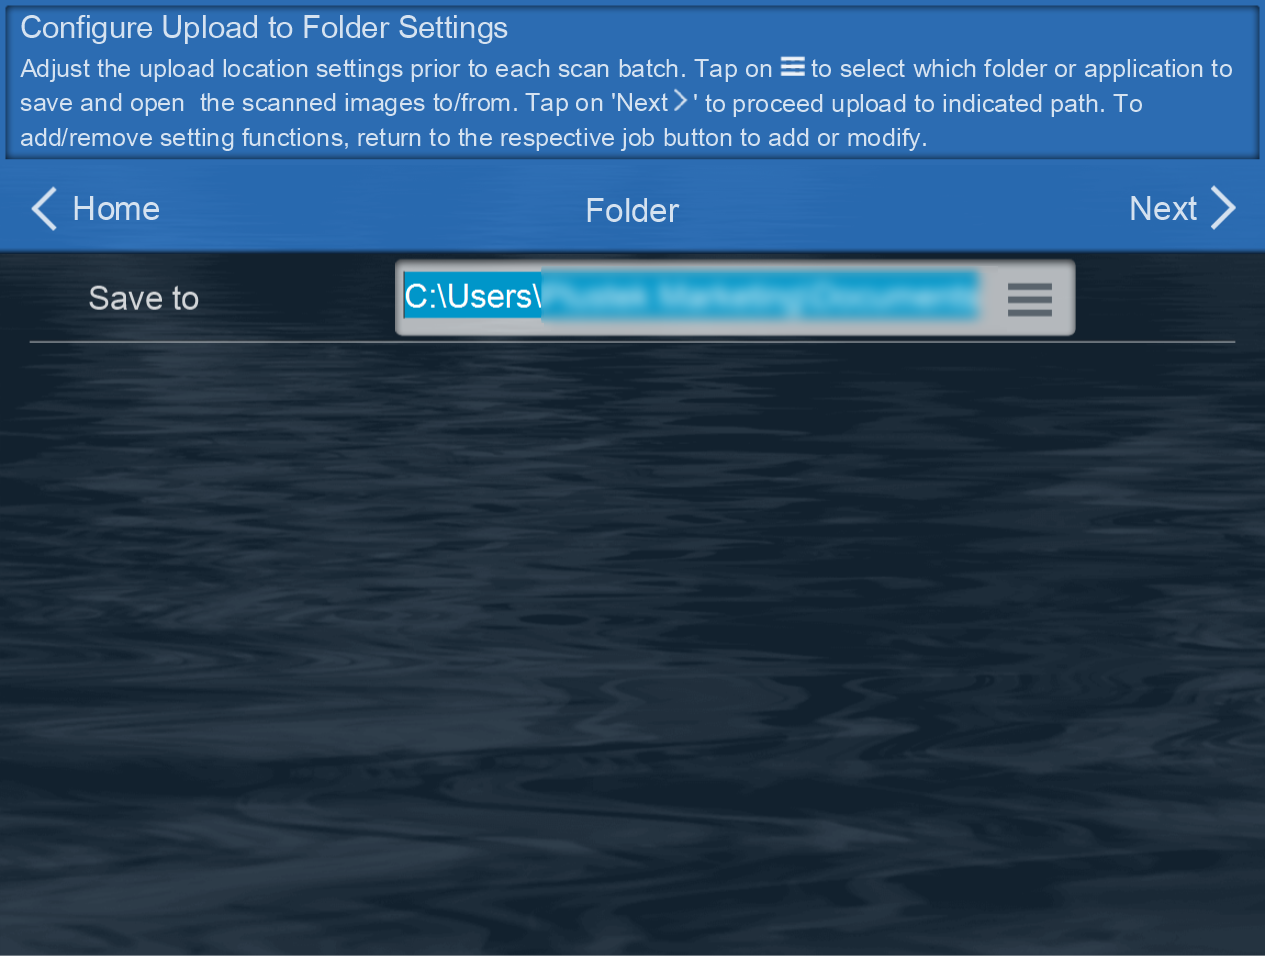
Click on Next > to continue upload data. Once upload completes, the interface will prompt message if indexing was successful and return to the main menu automatically.
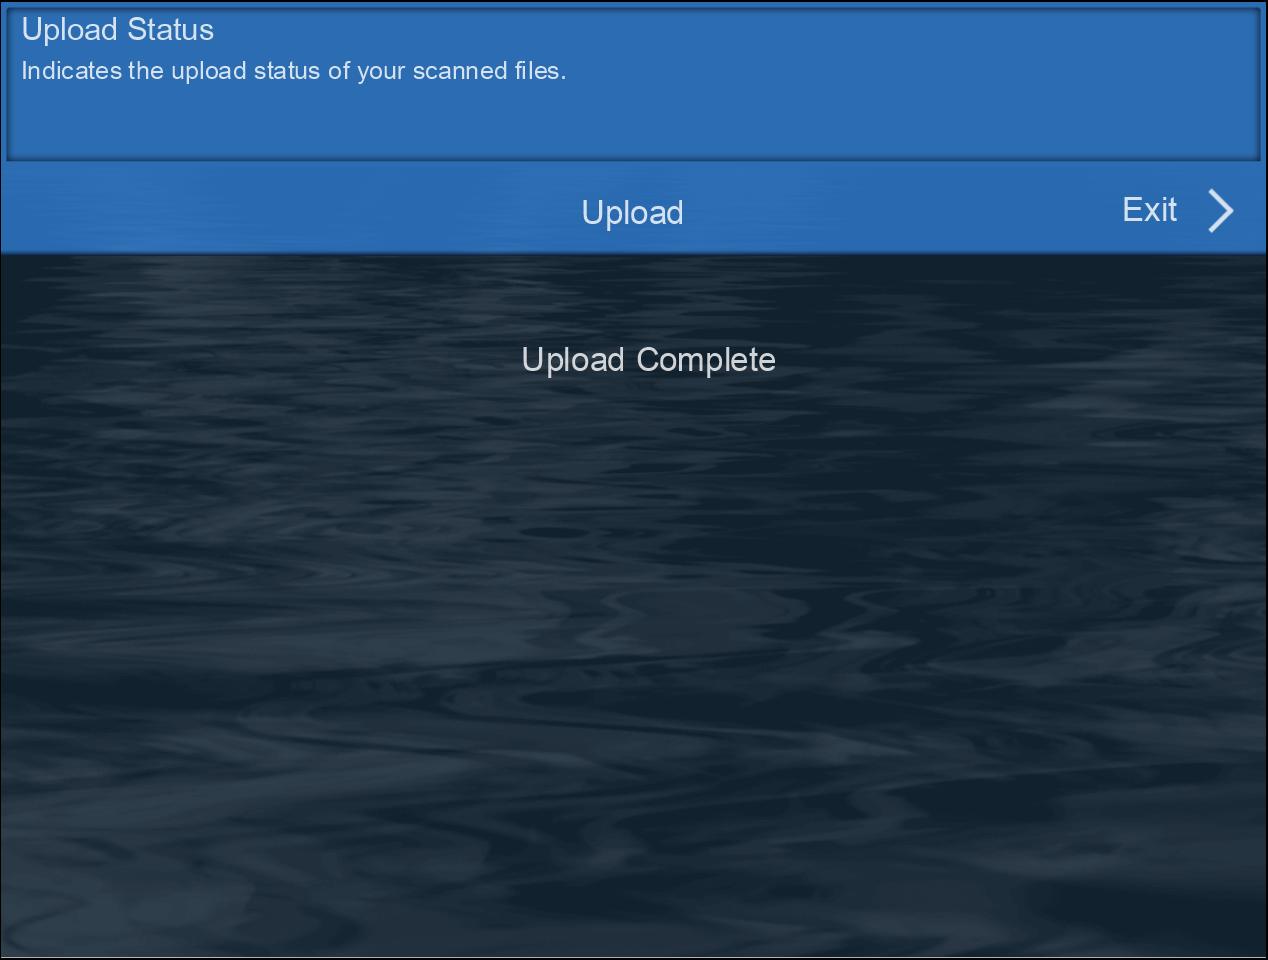
Save to/ Saving Destination
Save scanned documents by enabling and configuring the respective scan destination to continue
Notes: save to/destination may vary depending on your region.
Save to Local Folder
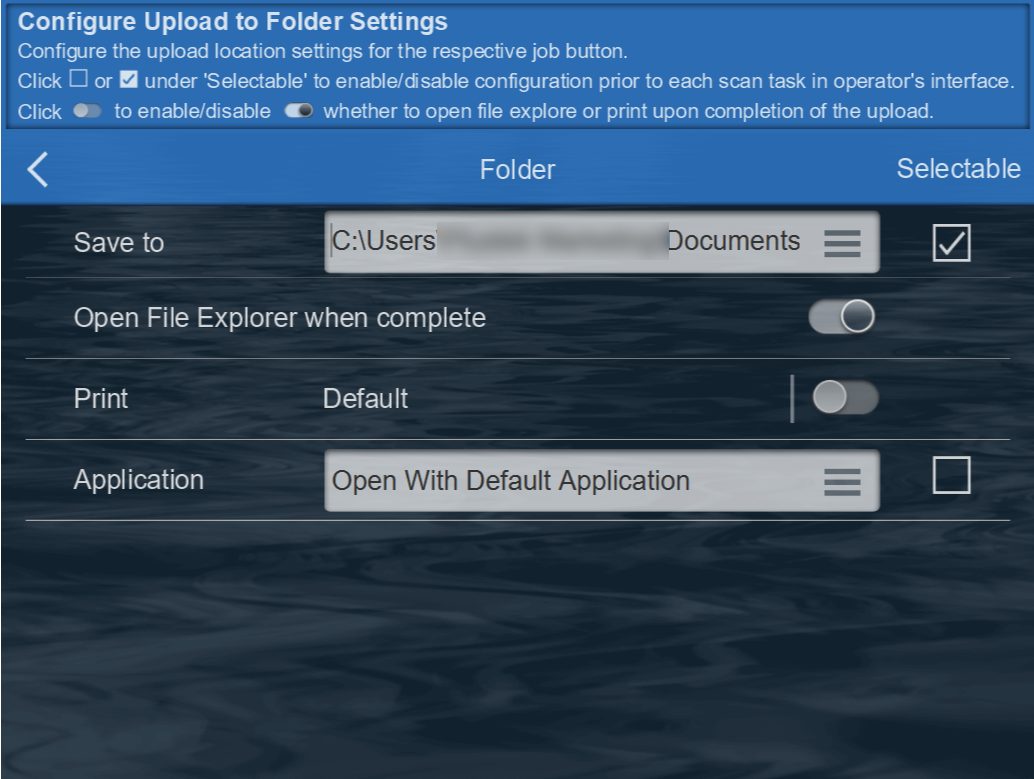
Enable "Folder" to configure the job profile/button to save to local PC.
Click  or
or
 under 'Selectable' to enable/disable configuration prior to each scan task in operator's interface.
Scan and save to the indicated path, where the folder is located
Scan and open the file when transfer is completed
Scan and print the document
Scan and perform OCR with ABBYY® FineReader®
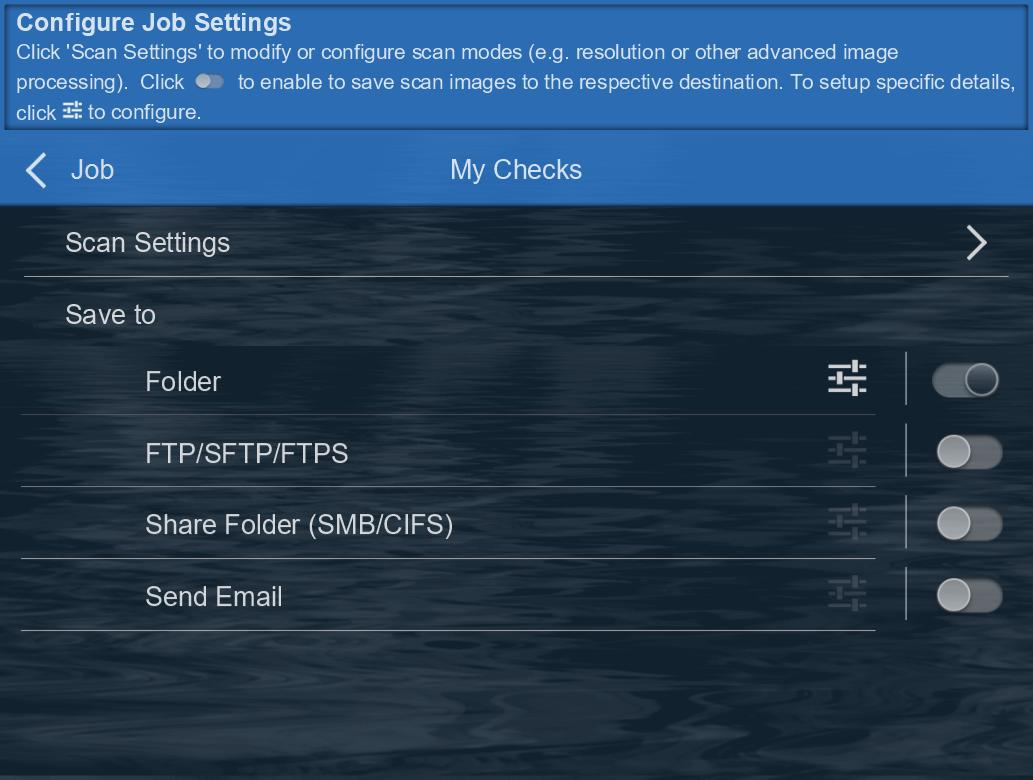
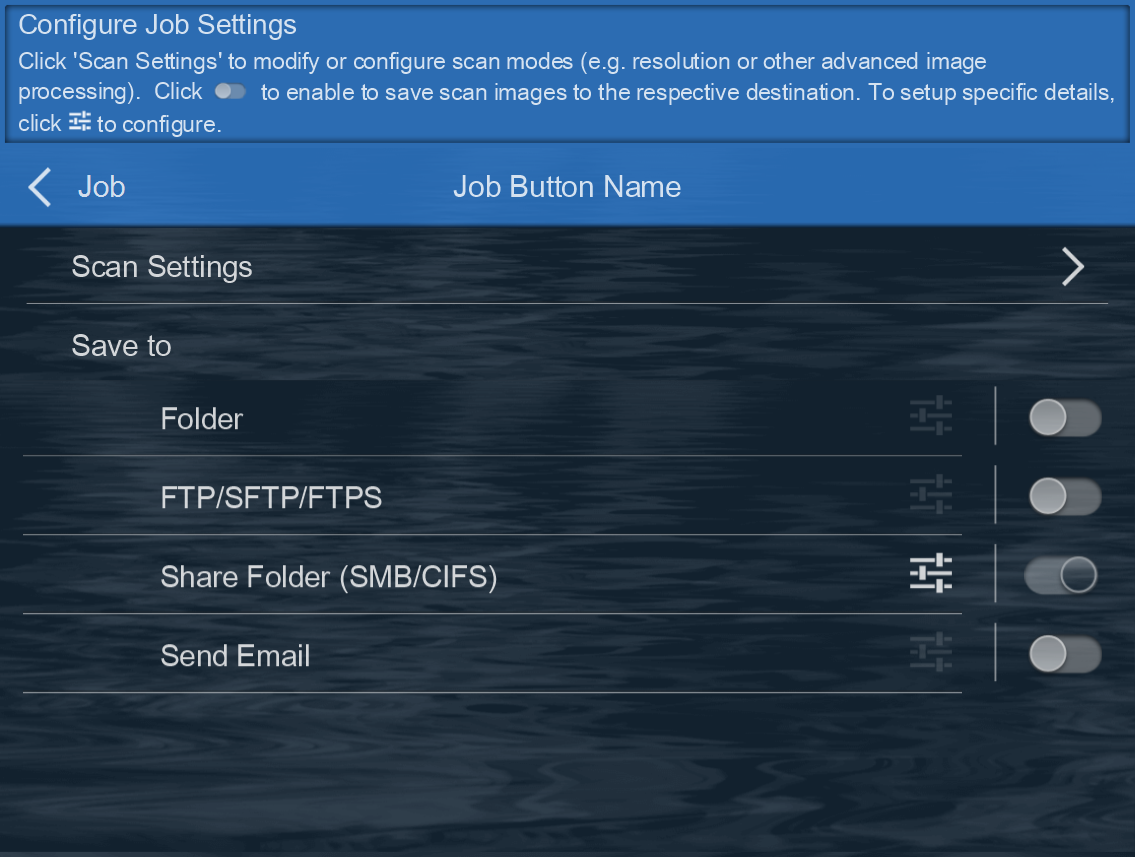
Save to Share Folder(SMB/CIFS)
❶ Choose save to Share Folder(SMB/CIFS), ❷ Setup the client address, username and password.
Click  or
or
 under 'Selectable' to enable/disable configuration prior to each scan task in operator's interface.
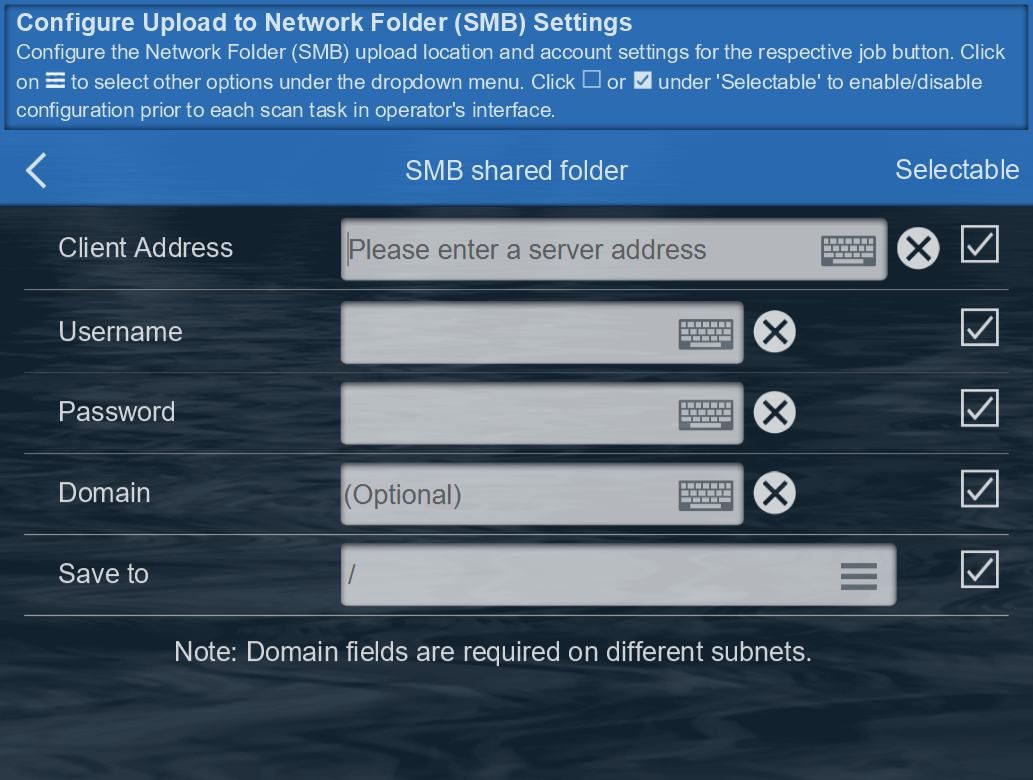
Client Address
Enter a computer name or IP address, or you can select the public folder from the list.
Example: 10.1.0.38 or mycomputer
Username
Enter your computer's username.
Password
Enter the password of your computer
Domain
Optional (MIS will specify)
Save to
You can choose the folder or manually type your path.
*If your folder sets as a hide folder, you need to manually type your path.
Supports Microsoft Azure SMB File Share
*You need to have a Microsoft Azure account.
Refer to:
http://plustek.com/us/products/network-scanners/smbazure.html
Note: enter the information directly to the eConnector.
Save to FTP/SFTP/FTPS
❶ Choose save to FTP/SFTP/FTPS, ❷ Setup the host address, username and password.
Click  or
or
 under 'Selectable' to enable/disable configuration prior to each scan task in operator's interface.

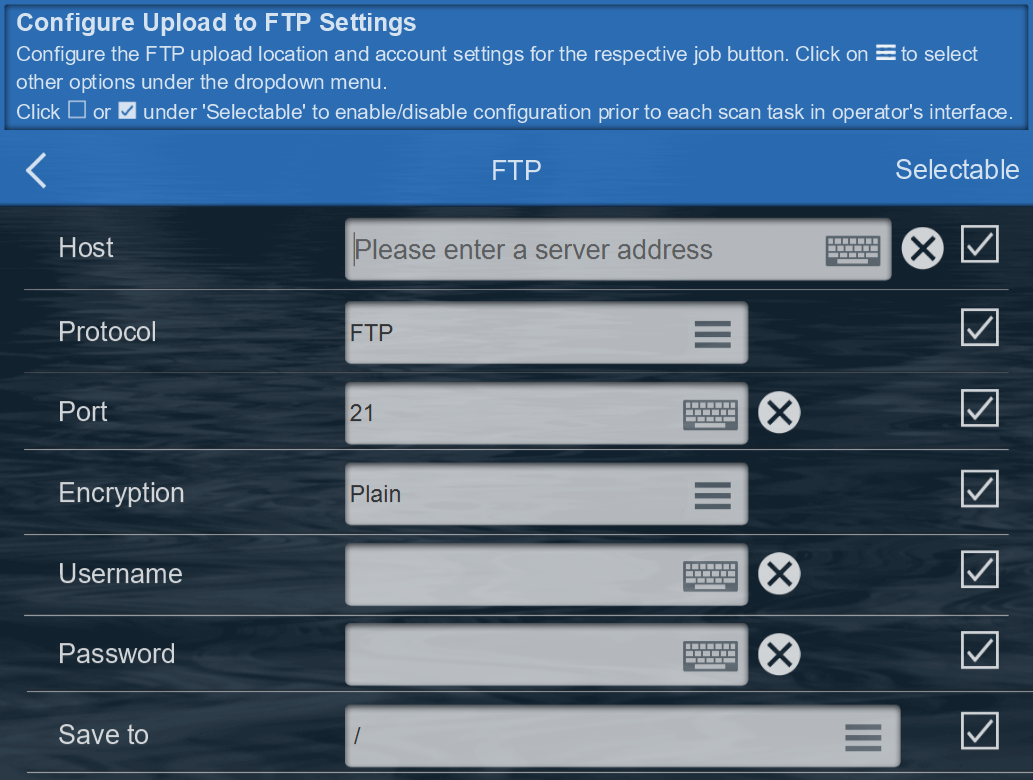
Host
The address of your FTP
Example: ftp.yourdomain.com or yourdomain.com
Protocol
Choose FTP or SFTP
Port
Enter your FTP Port. Example: 21, 22, 2121, 2222
Encryption
Only show when you choose FTP.
Choose Plain, TLS explicit or TLS implicit
Username
Your FTP username
Password
The password of your FTP account
Save to
You can choose the folder or manually type your path.
*If your folder sets as a hide folder, you need to manually type your path.
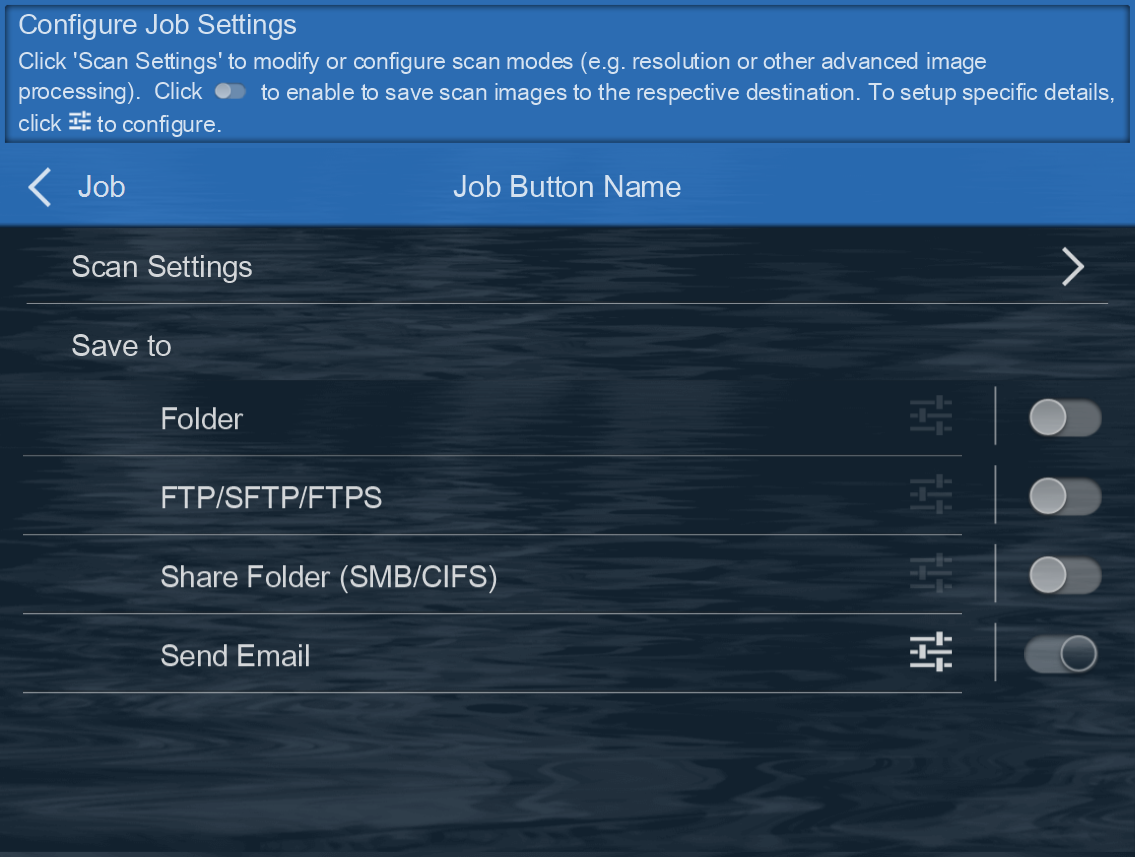
Save to eMail
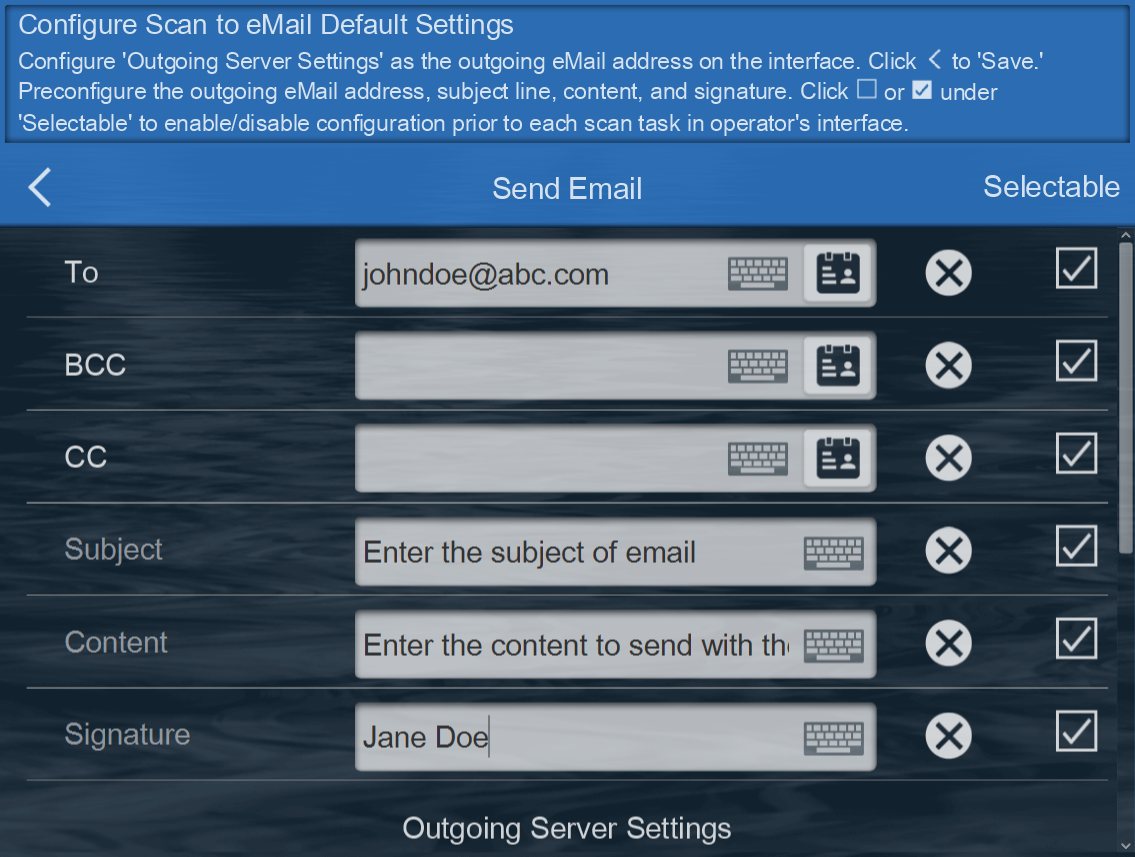
❶ Choose save to Mail(SMTP), ❷ You need to set SMTP outgoing server first,❸ setup or default the receipents.
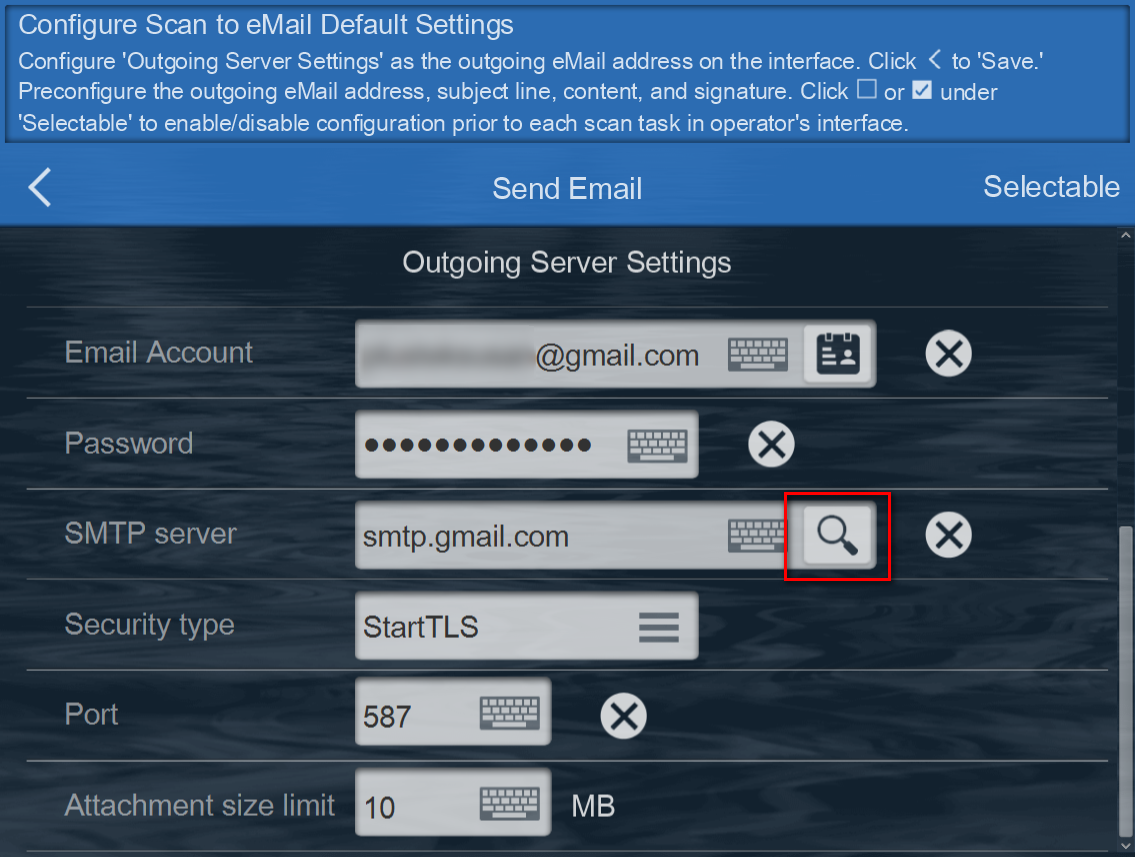
Email Account
Enter an email address.
Password
Enter your password.
SMTP server
After fill the account and password part, you can click 🔍to auto filling the SMTP server. And it will also auto filling the security type.
Port
Enter the Port. Common SMTP ports are: port 25, 465, and 587.
Security Type
Select the security type: None, SSL/TLS or StartTLS.
*If you don't know how to set the Outgoing Server, Authentication and Port, please contact your email provider.
Click  or
or  under 'Selectable' to enable/disable configuration prior to each scan task in operator's interface.
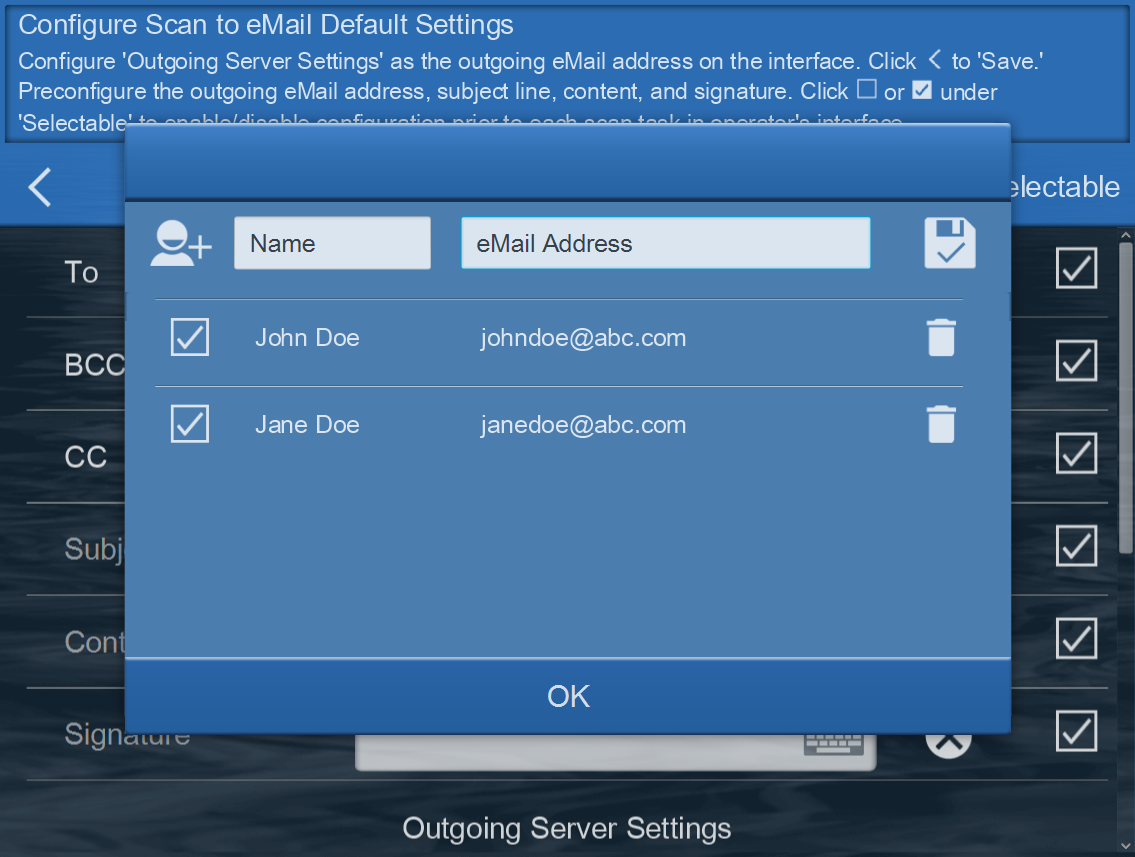
Click on  to store and select from the list.
Save to SharePoint for Office 365
You won't see this option if you are not a Office 365 account.
❶ Choose save to SharePoint for Office 365, ❷ Setup the site, library type and folder.
Click  or
or
 under 'Selectable' to enable/disable configuration prior to each scan task in operator's interface.
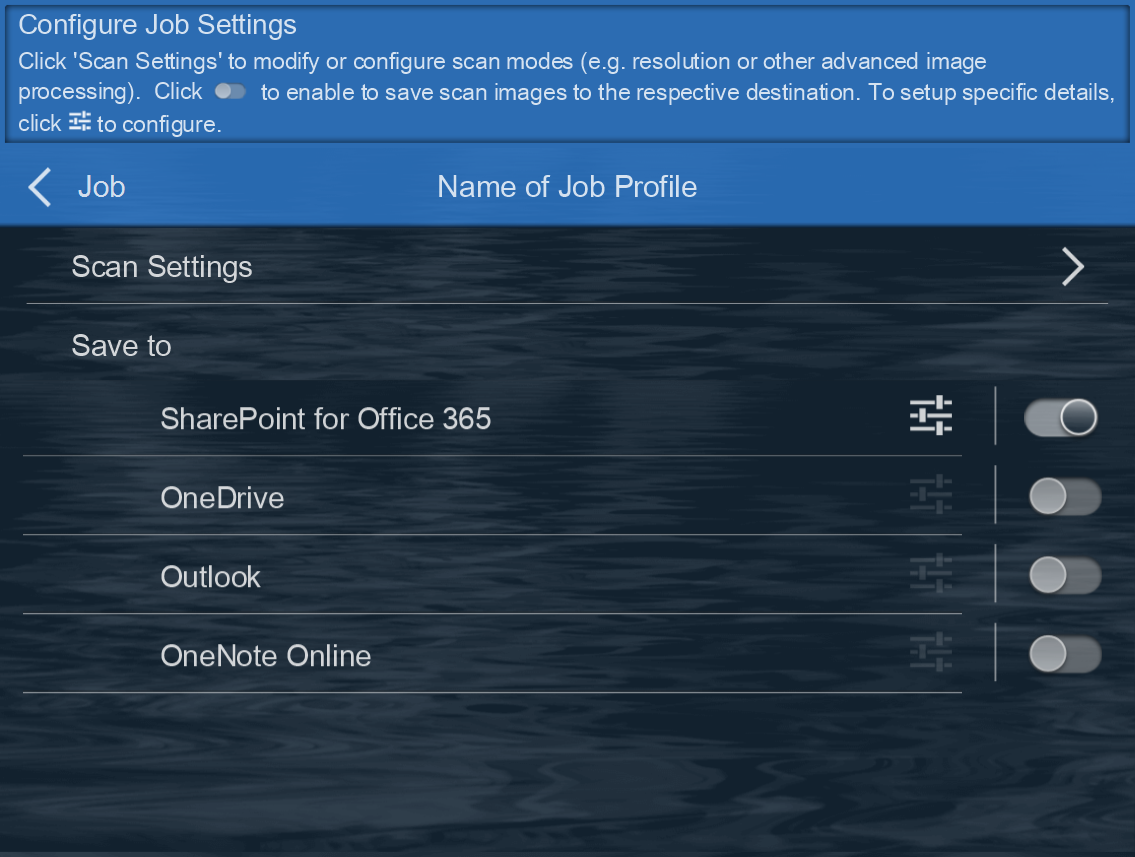
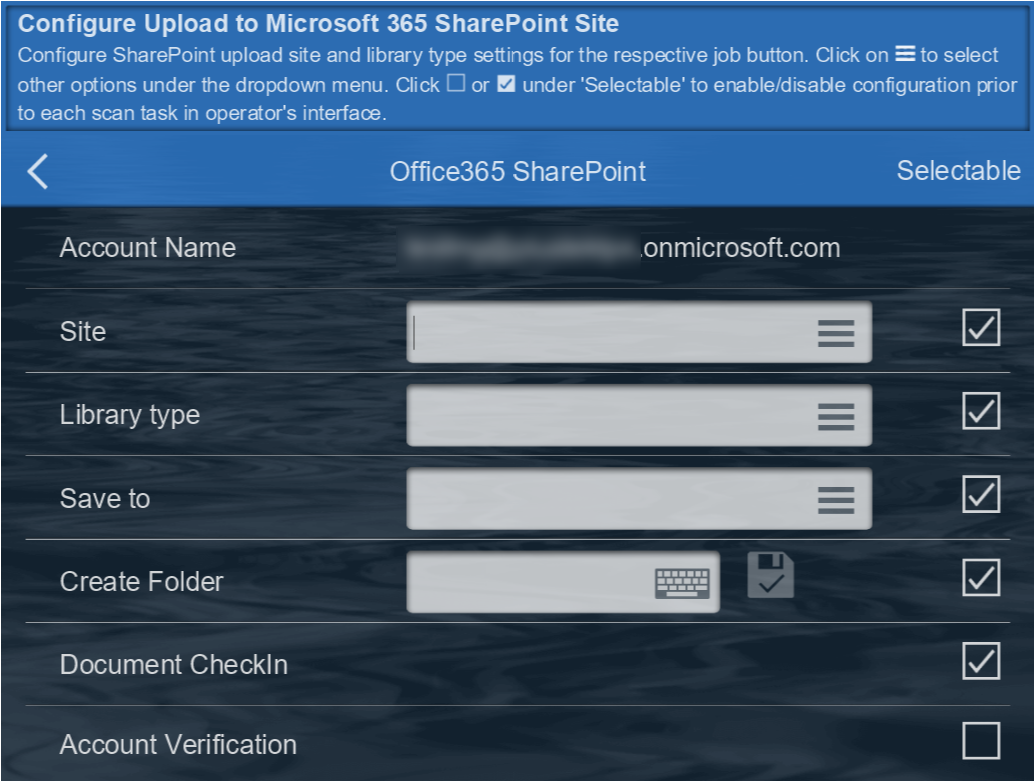
Account Name
Display your account.
Site➜Library Type➜Save to
Selct your site, library type and save folder
Create Folder
If needed, you can create a new folder.
Document Check In
If selected, you can add matadata after uploading.
Account Verification
A message box prompting for credentials will be required each time when enabled.
Save to OneDrive
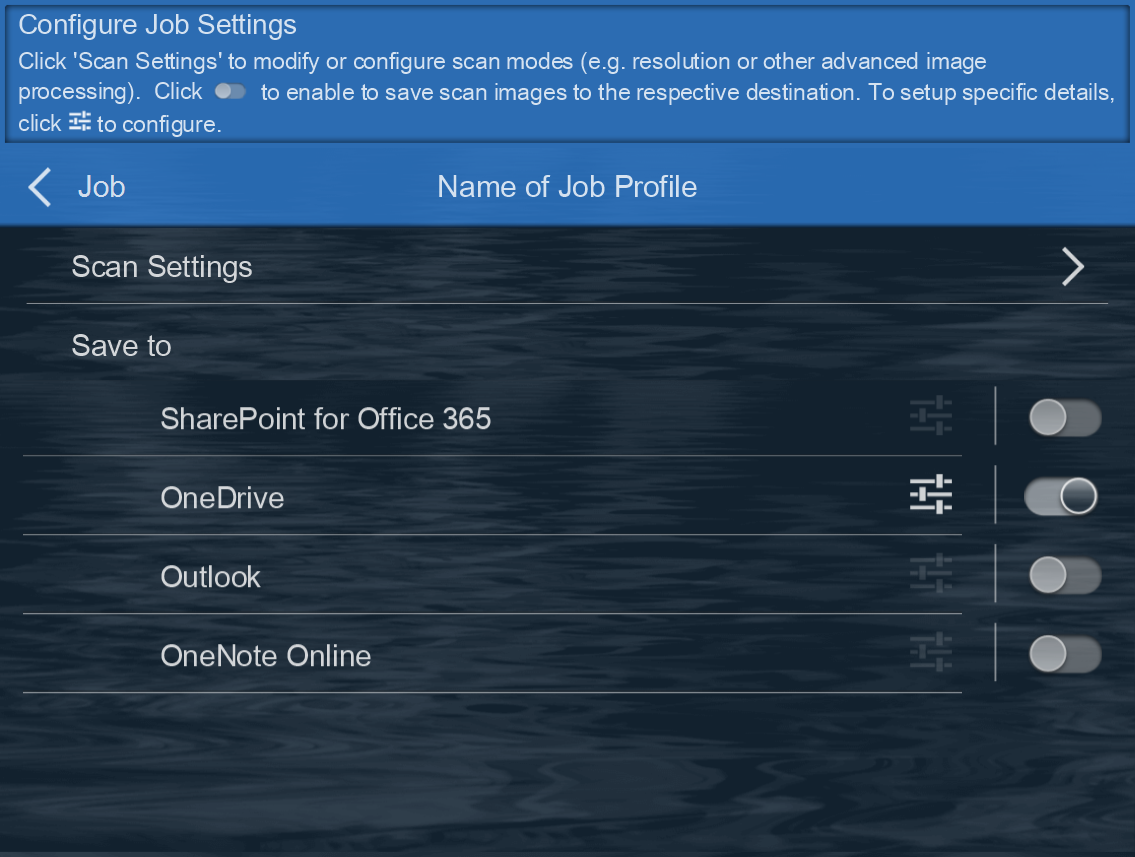
❶ Choose save to OneDrive ❷ Select your save folder.
Click  or
or
 under 'Selectable' to enable/disable configuration prior to each scan task in operator's interface.
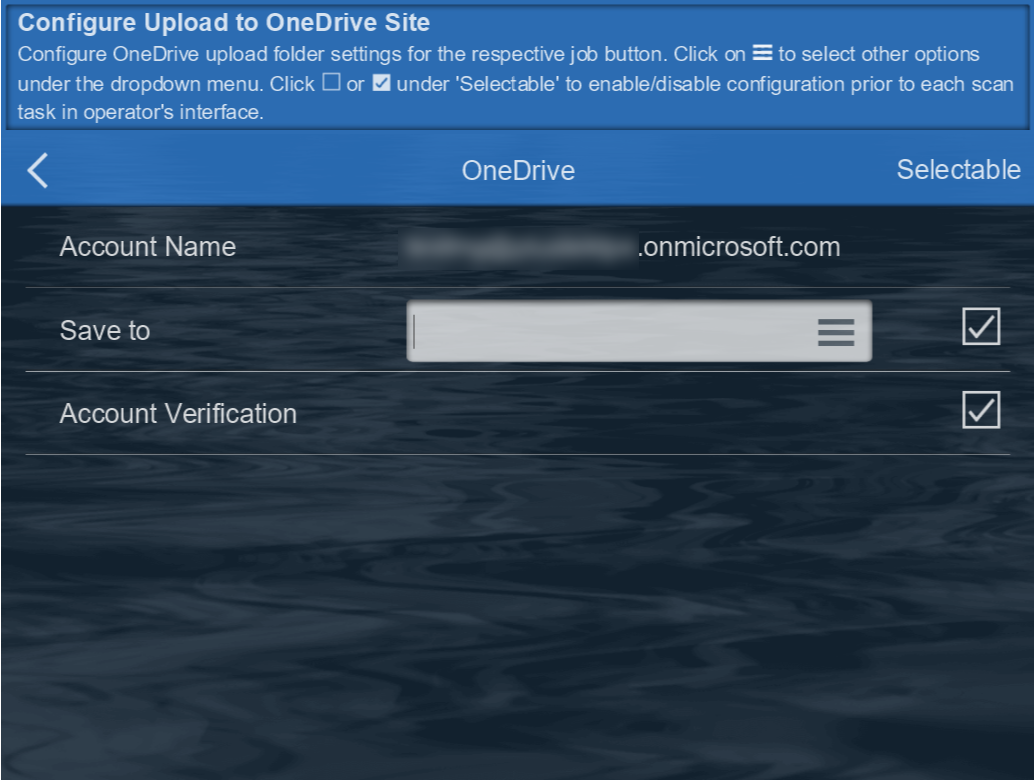
Account Name
Display your account
Save to
Select the folder.
Account Verification
A message box prompting for credentials will be required each time when enabled.
Save to Outlook
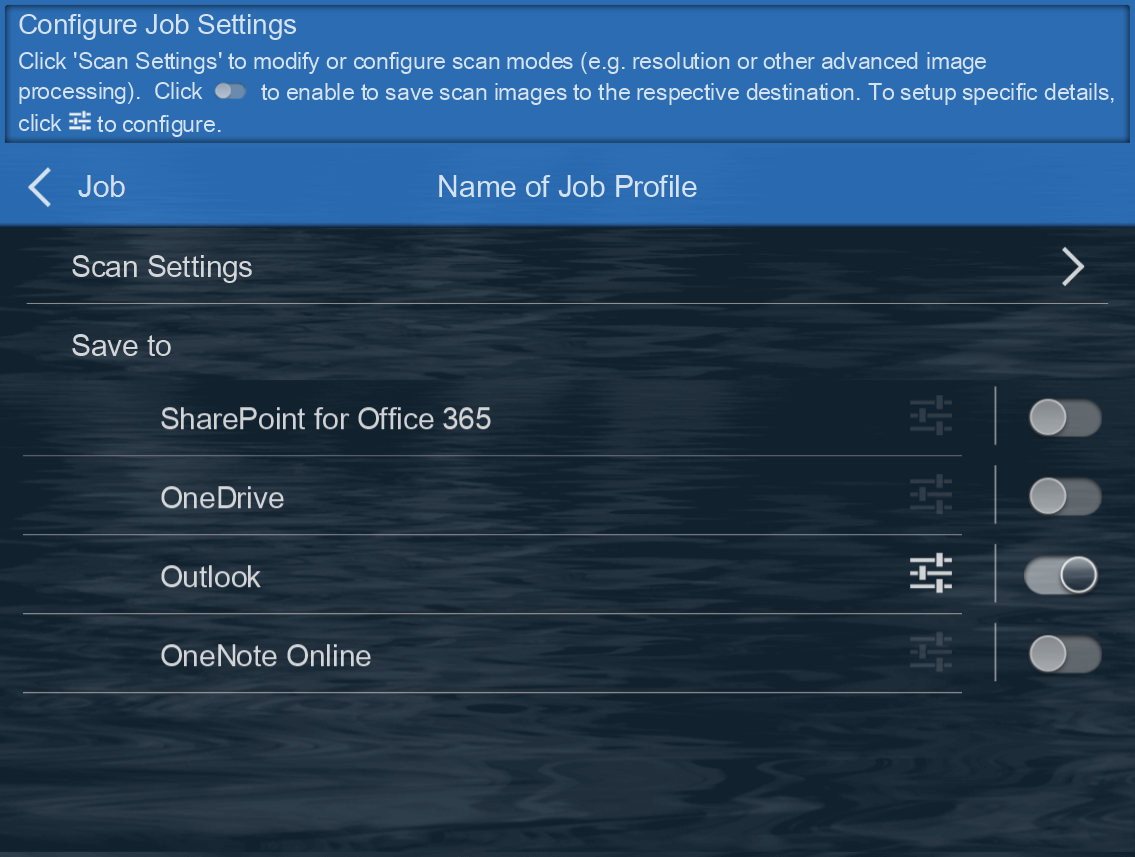
❶ Choose Outlook for Office 365 ❷ Enter your email information.
Click  or
or
 under 'Selectable' to enable/disable configuration prior to each scan task in operator's interface.
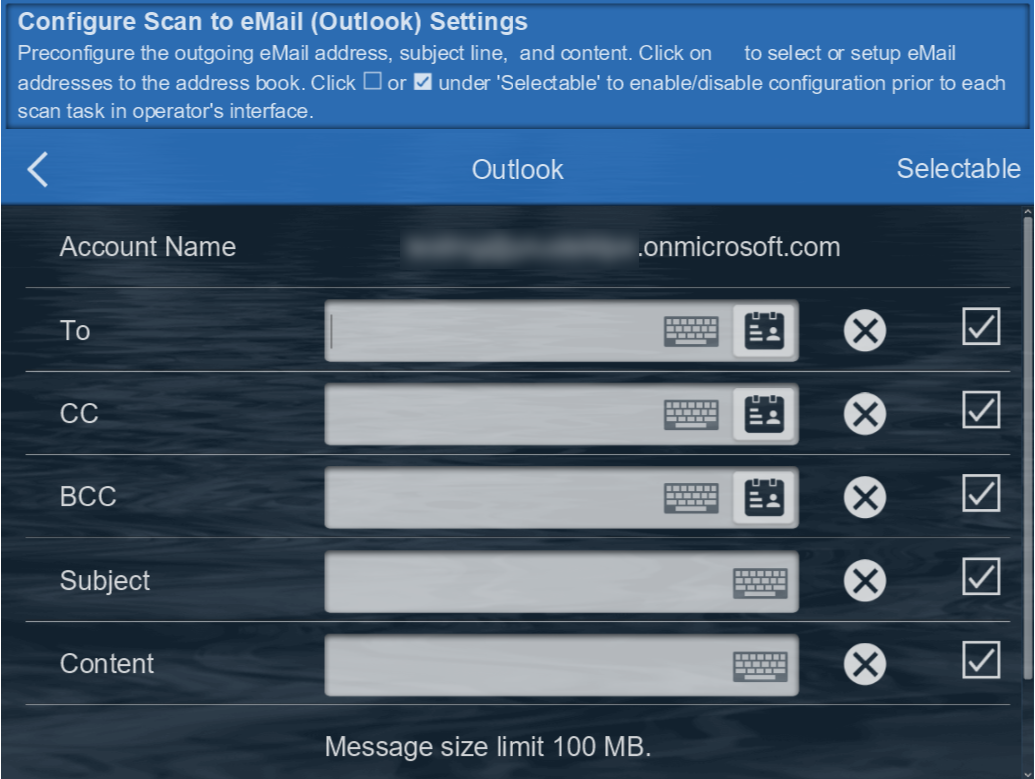
Account Name
Display your account.
To
Enter an Email address
CC
(Carbon Copy) - Put the email address(es) here if you are sending a copy for their information (and you want everyone to explicitly see this).
BCC
(Blind Carbon Copy) - Put the email address here if you are sending them a Copy and you do not want the other recipients to see that you sent it to this contact.
Subject
Enter your email subject.
Content
Enter your email content.
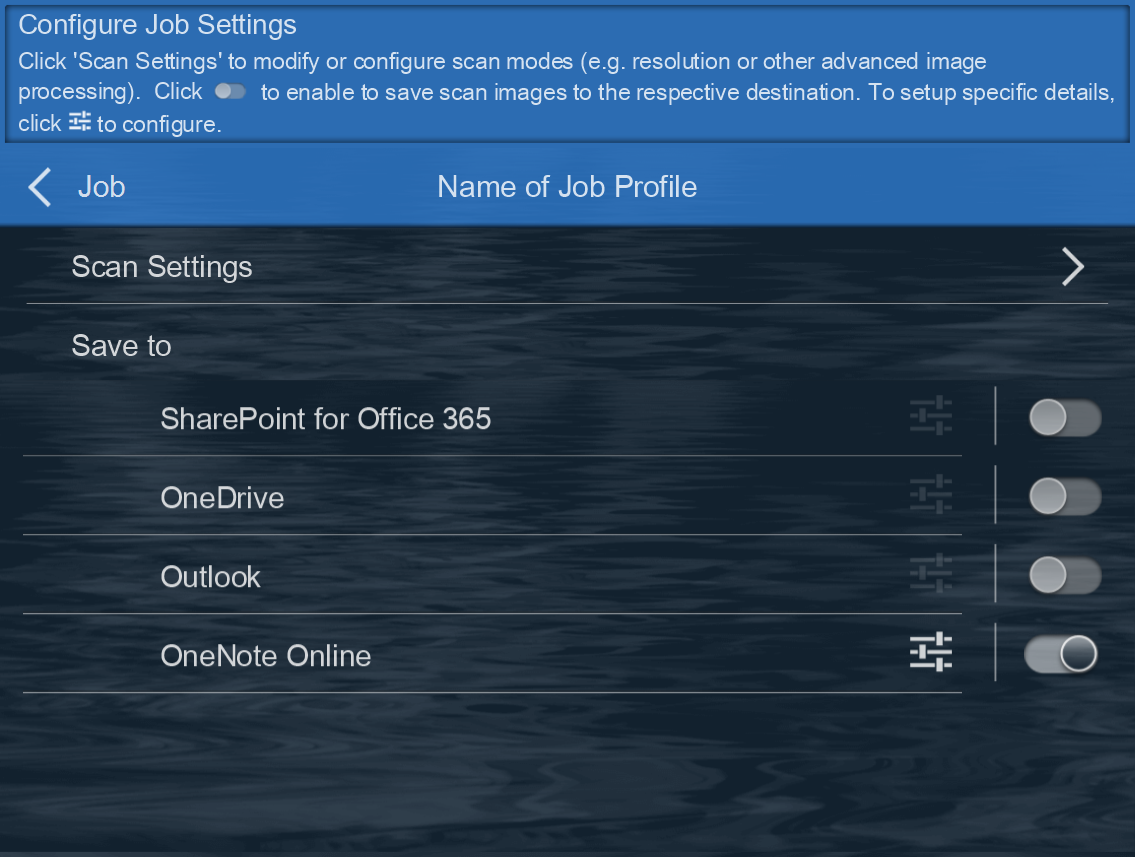
OneNote Online
You won't see this option if you are not a Office 365 account.
❶ Choose save to OneNote Online ❷ select the saving location.
Click  or
or
 under 'Selectable' to enable/disable configuration prior to each scan task in operator's interface.
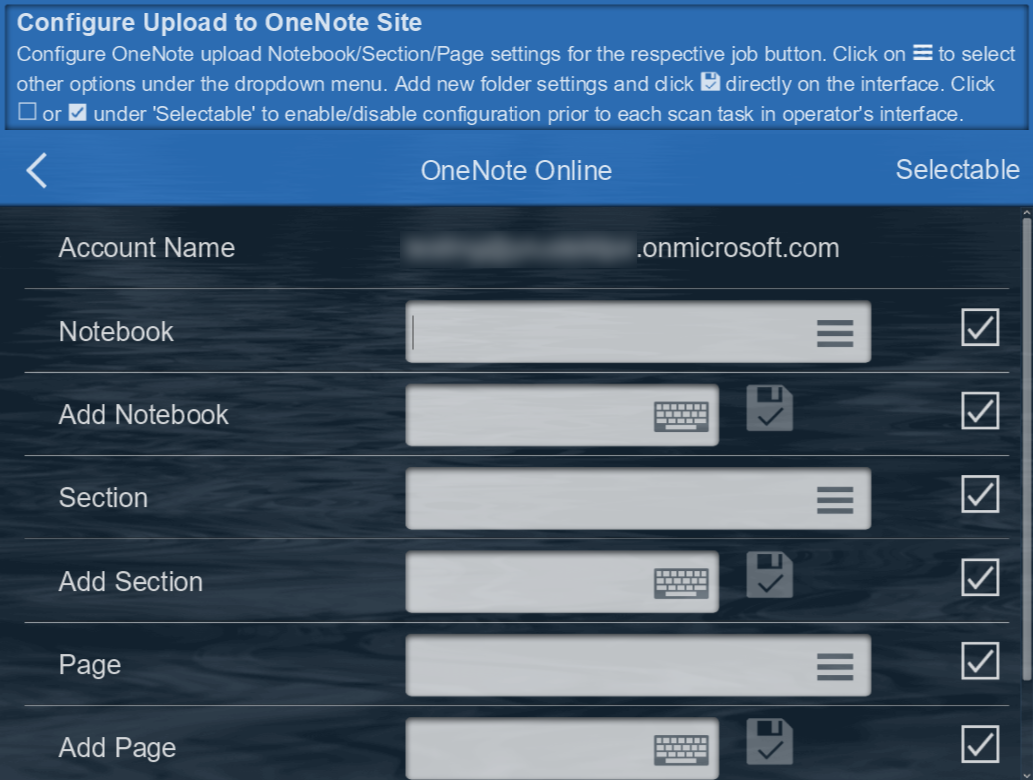
NoteBook
Select the Notebook you want to save the scanned document.
Add Notebook
Optional, or enter new notebook name.
Section
Select the section in the notebook you want to save the scanned documents.
Add Section
Optional, or you can add new section in the notebook.
Page
Select the page of the section in your notebook you want to save the scanned document.
Add Page
Optional, or you can add new page in the section.
Save to SharePoint On-Premises 2013/2016/2019
❶ Enable save to SharePoint
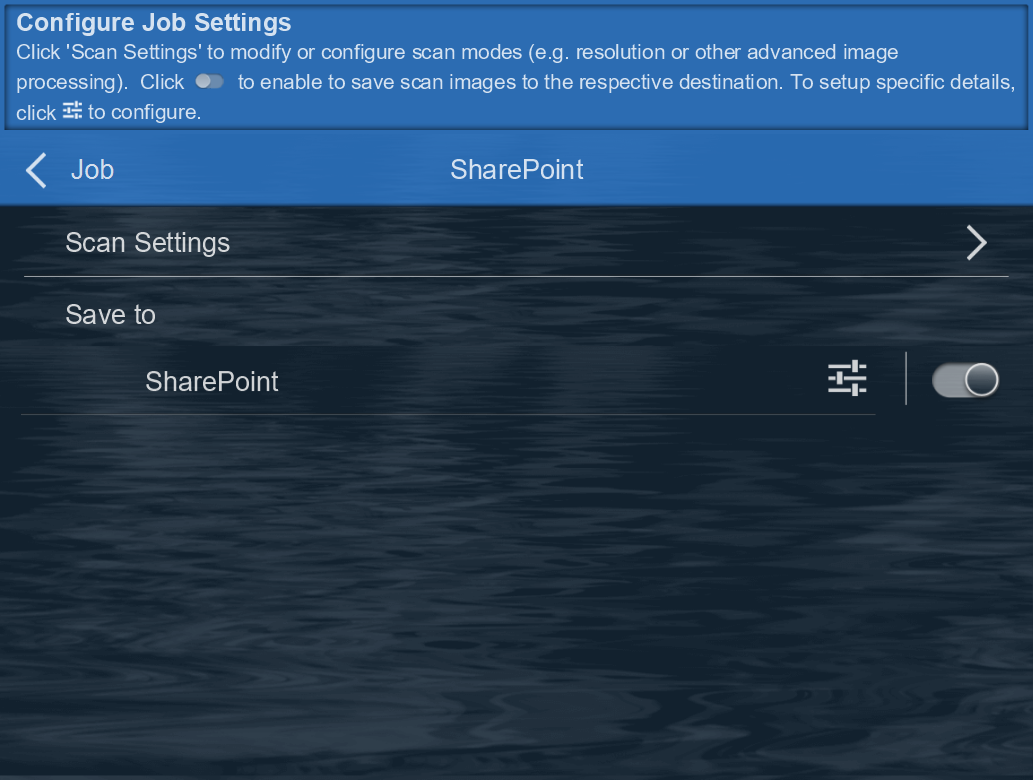
❷ Setup the site, library type and folder.
Note: Supports Windows Authorization and Forms-Based Authorization
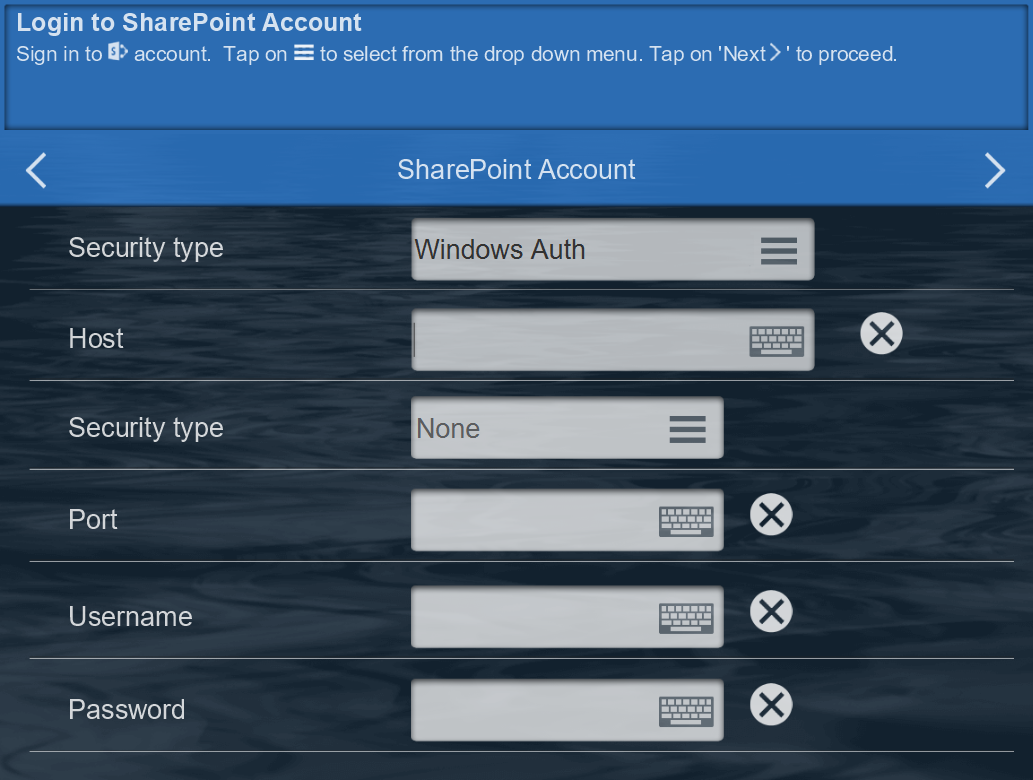
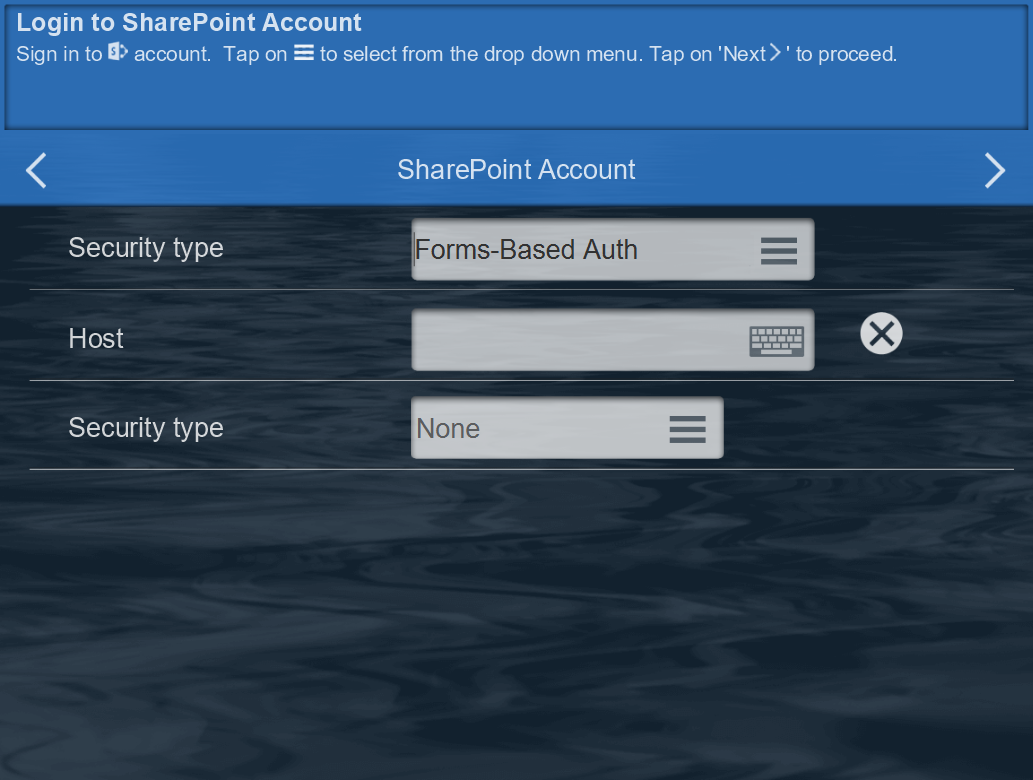
Host
Enter your host IP address or domain name
For example: 59.59.59.159 or example.domain.com
If the host is a site collection, you need to enter the entire path
For example: 59.124.104.159/sites/site_collection_name/
Security type
Select the security type: None or SSL.
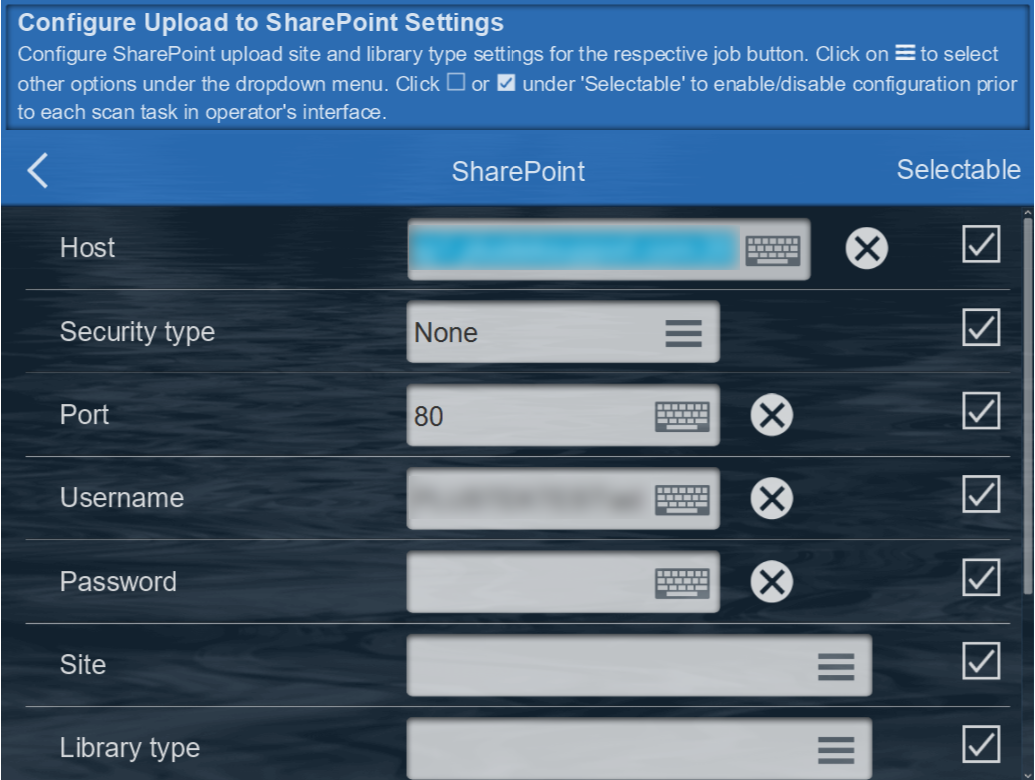
Port
Enter your Sharepoint Port, for exmaple: 80 or 443.
Username
Enter your Username
Password
Enter your Password.
Site➜Library Type➜Save to
Selct your site, library type and save folder
Create Folder
If needed, you can create a new folder.
Document Check In
If selected, you can add matadata after uploading.
Save to Exchange
❶ Choose Exchange ❷ Enter the information of the Email.
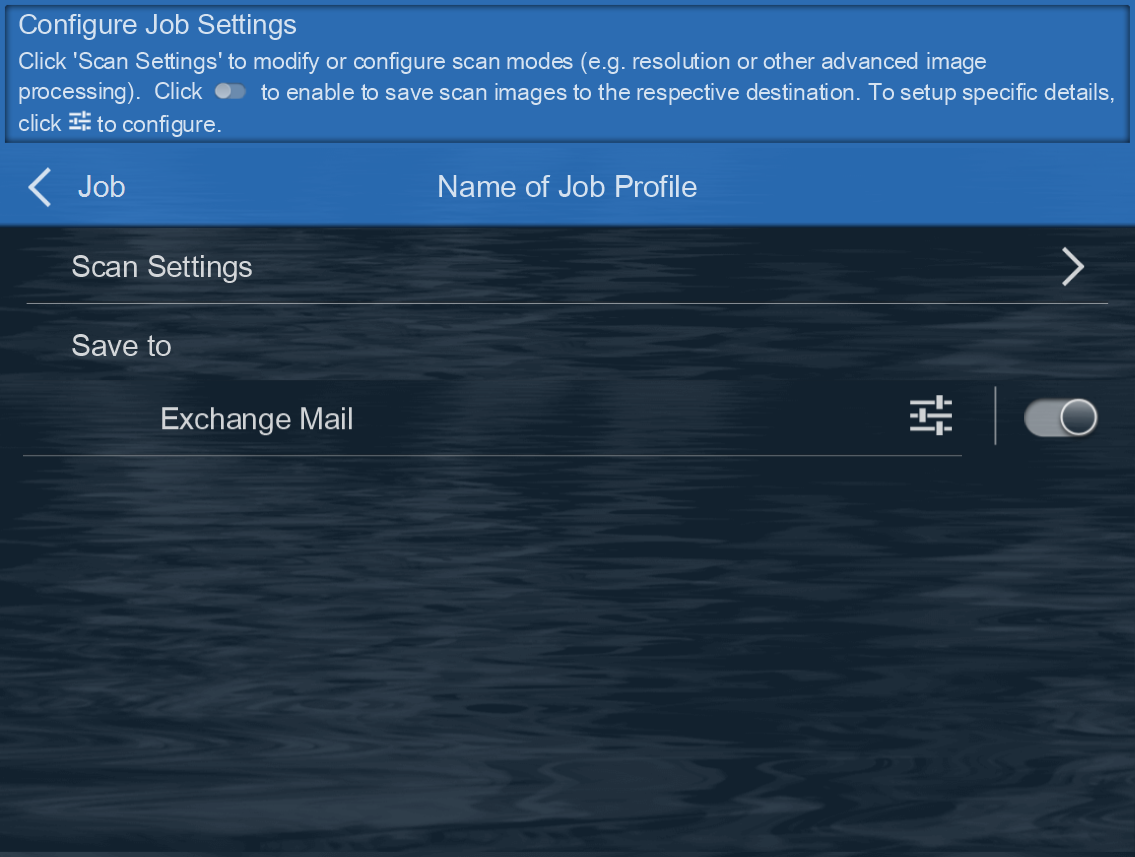
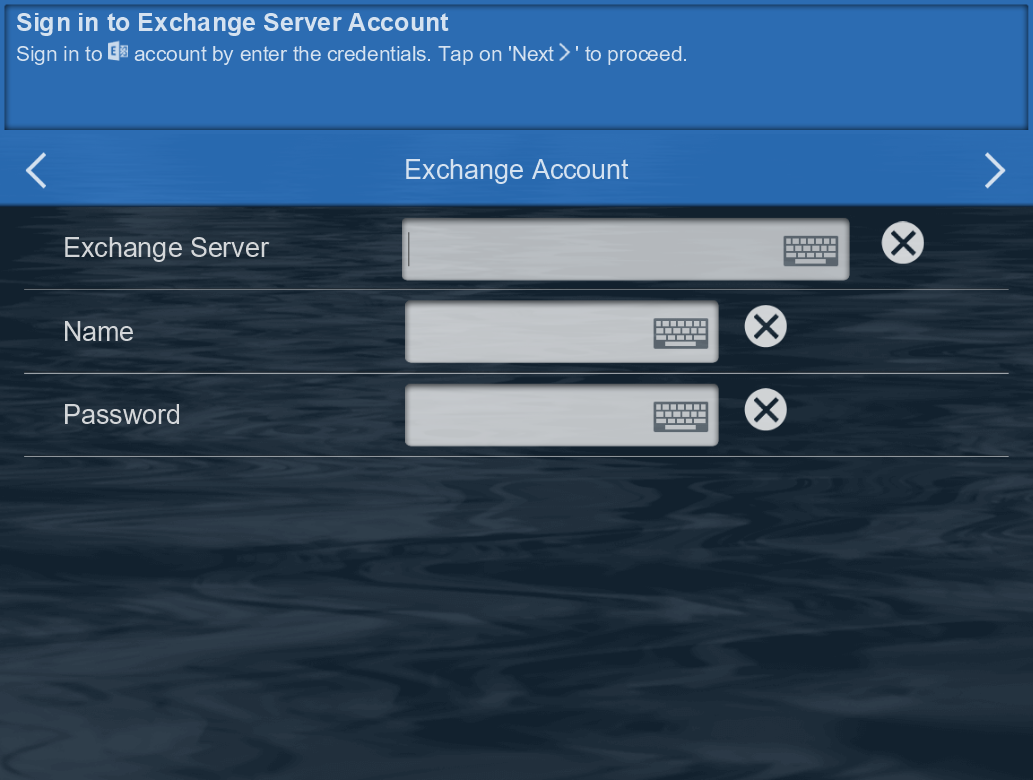
Setup Exchange eMail Message
Click  or
or
 under 'Selectable' to enable/disable configuration prior to each scan task in operator's interface.
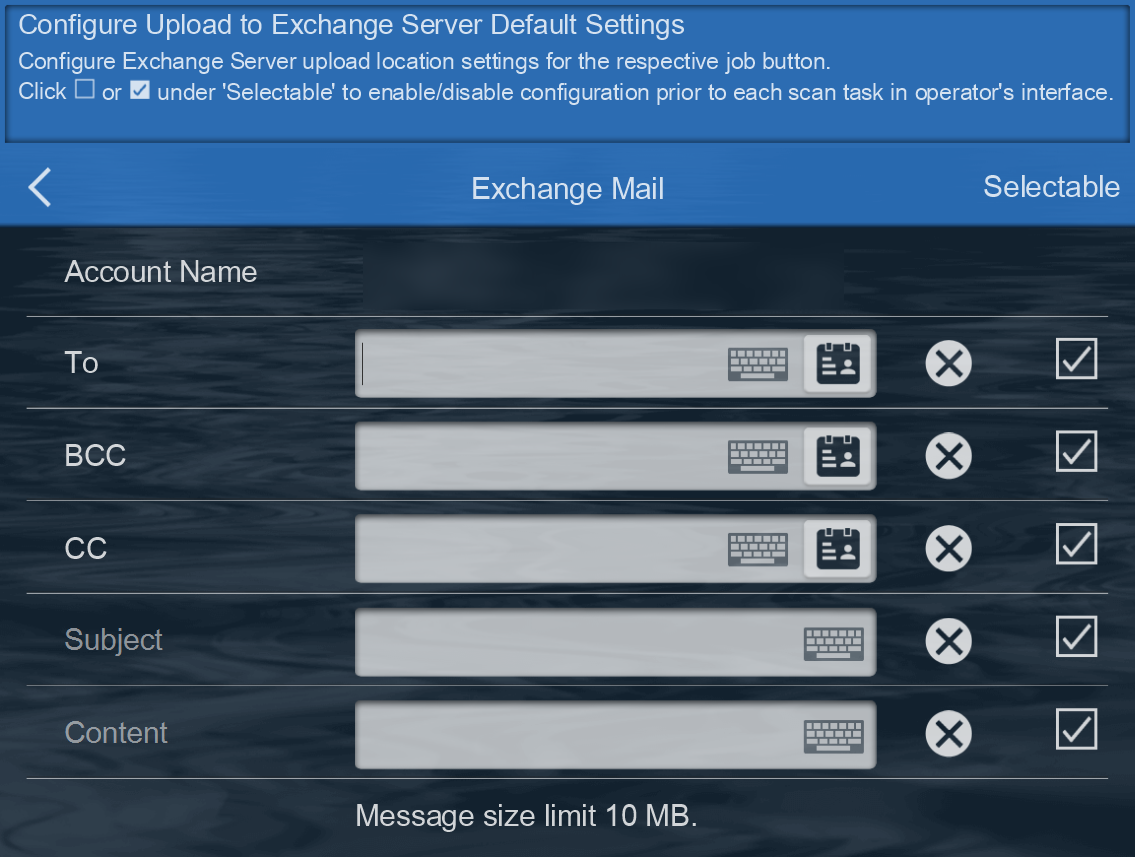
Account Name
Display your account.
To
Enter an Email address
CC
(Carbon Copy) - Put the email address(es) here if you are sending a copy for their information (and you want everyone to explicitly see this).
BCC
(Blind Carbon Copy) - Put the email address here if you are sending them a Copy and you do not want the other recipients to see that you sent it to this contact.
Subject
Enter your email subject.
Content
Enter your email content.
Save to Dropbox
❶ Choose Dropbox ❷ Select where you would like the scanned image to be save to.
Click  or
or
 under 'Selectable' to enable/disable configuration prior to each scan task in operator's interface.
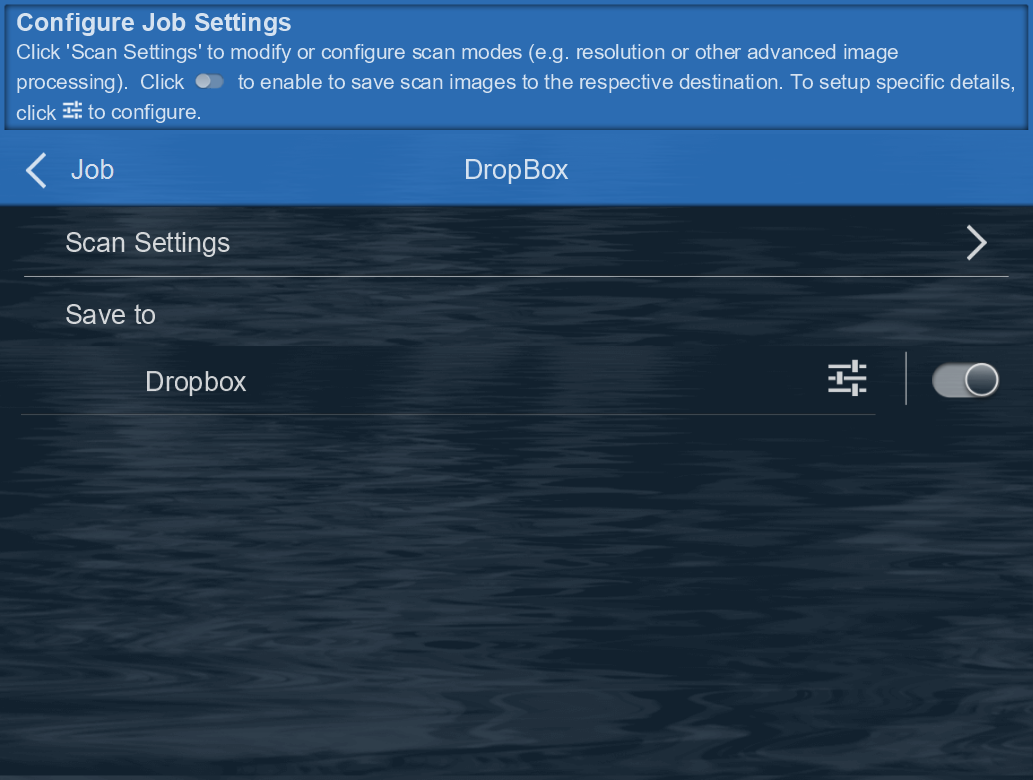
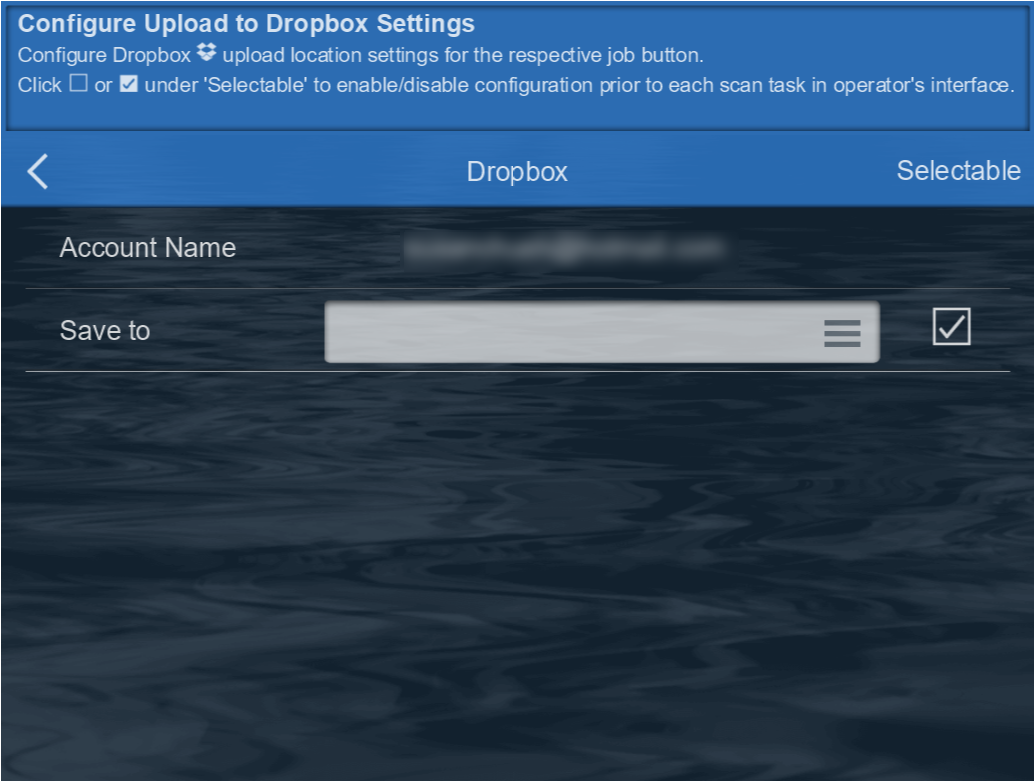
Account Name
Display your account
Save to
Select the folder.
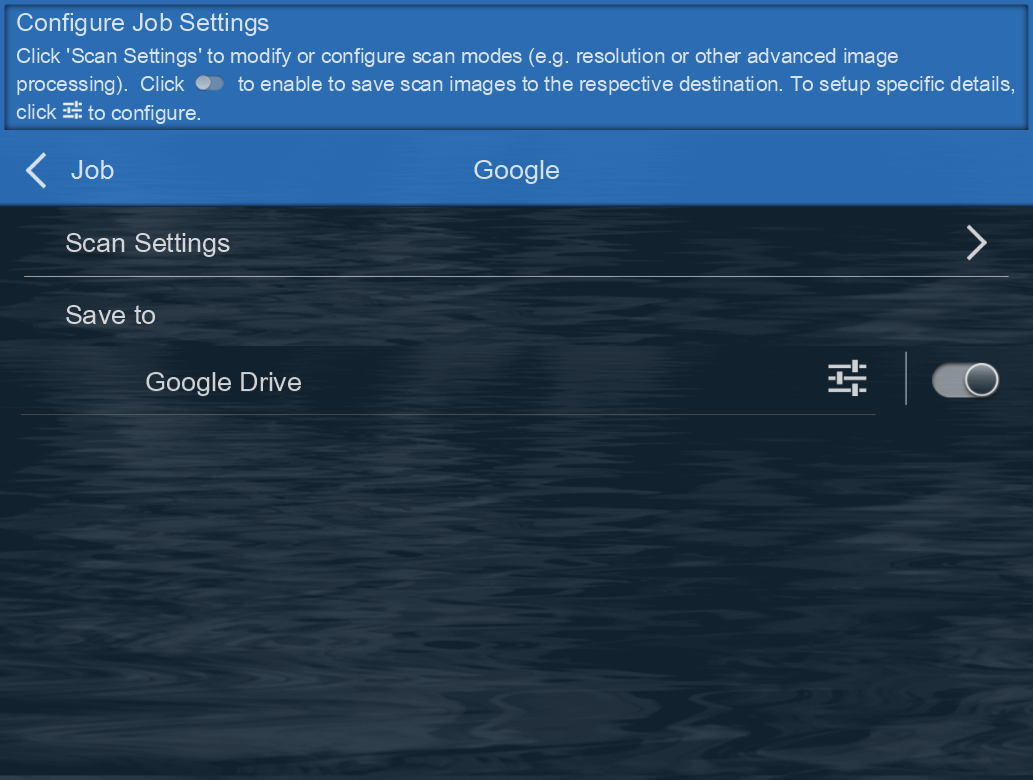
Save to Google Drive
❶ Choose Google Drive ❷ Select where you would like the scanned image to be save to.
Click  or
or
 under 'Selectable' to enable/disable configuration prior to each scan task in operator's interface.
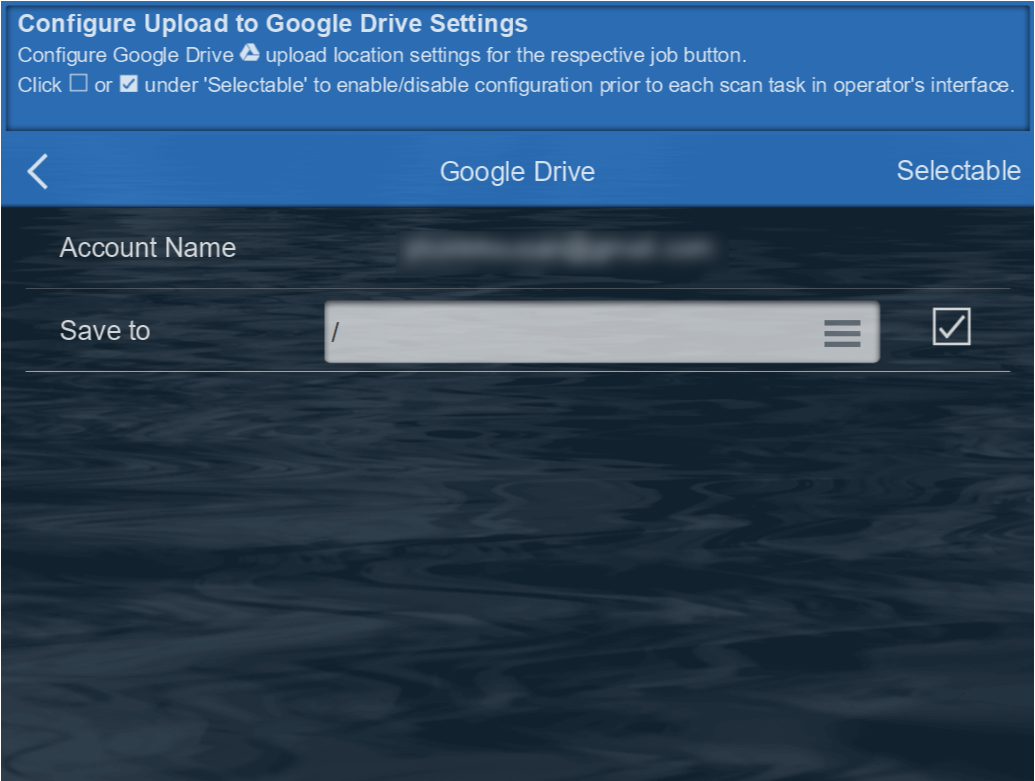
Account Name
Display your account
Save to
Select the folder.
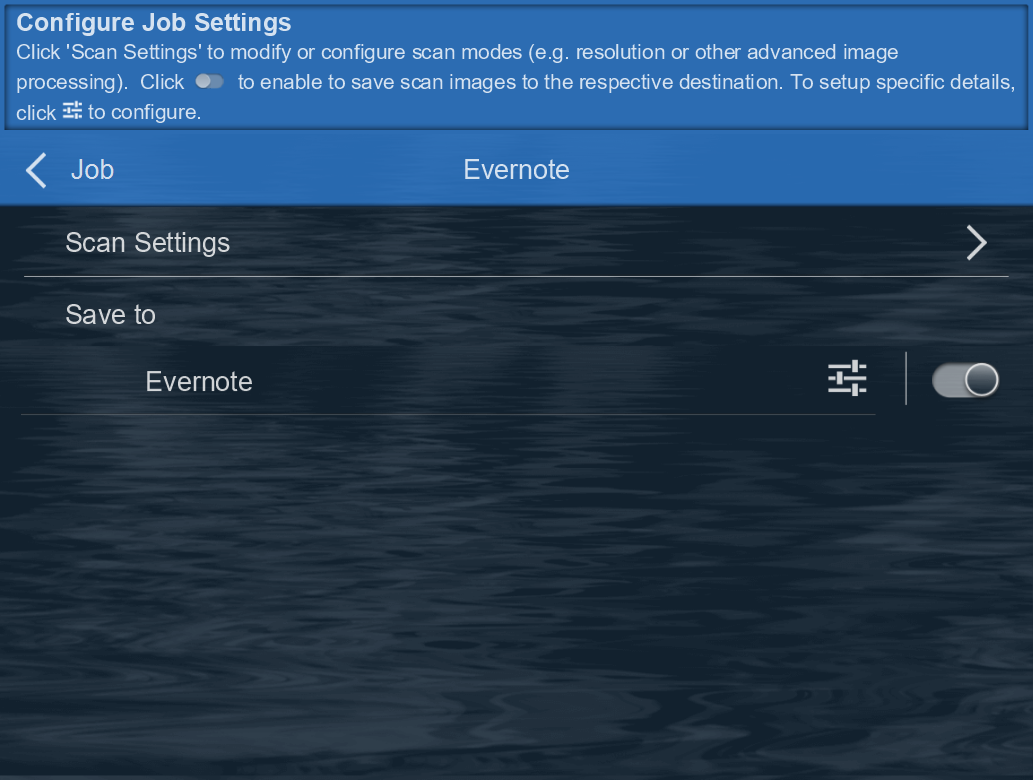
Save to Evernote
❶ Choose Evernote ❷ Select where you would like the scanned image to be save to.
Click  or
or
 under 'Selectable' to enable/disable configuration prior to each scan task in operator's interface.
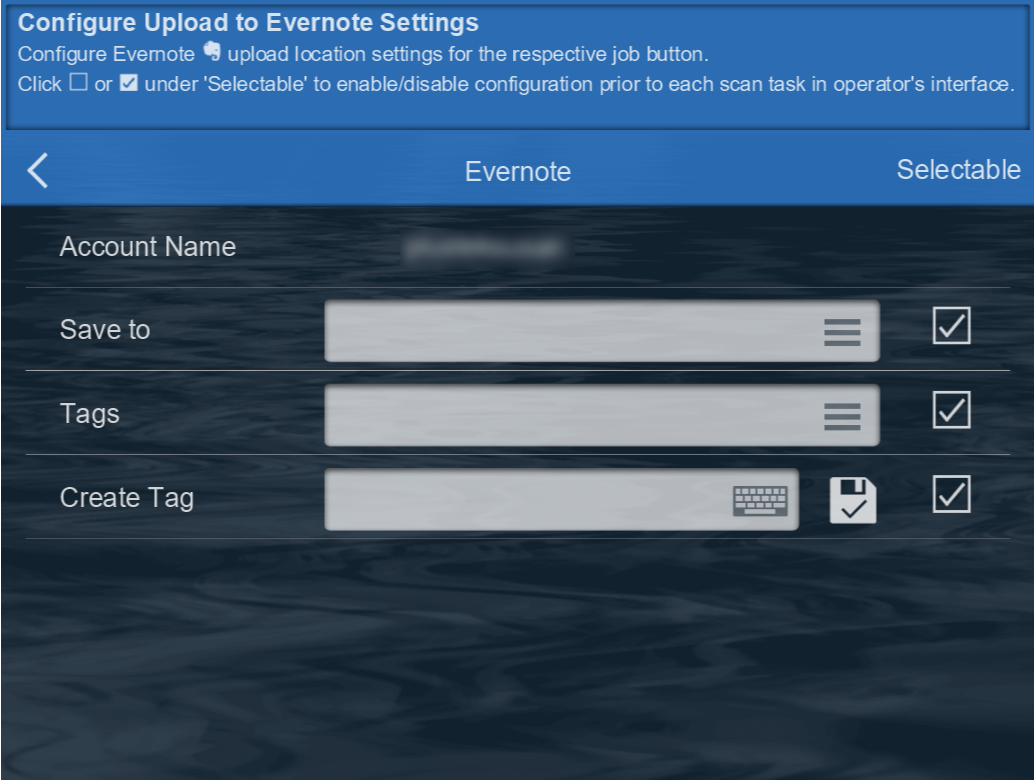
Account Name
Display your account
Save to
Select the folder.
Tags
Select tags (index) associated with the scanned image to be save and easily searched after uploaded to cloud.
Create Tag
Create a new tag (index) if not listed.
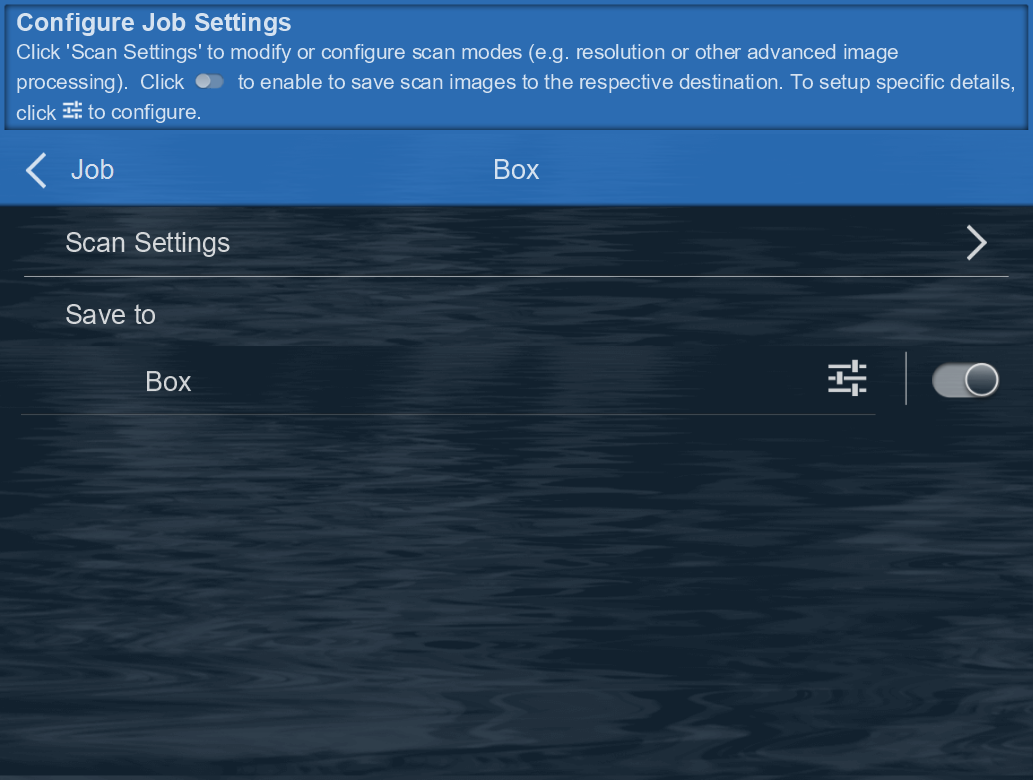
Save to Box
❶ Choose Box ❷ Select where you would like the scanned image to be save to.
Click  or
or
 under 'Selectable' to enable/disable configuration prior to each scan task in operator's interface.
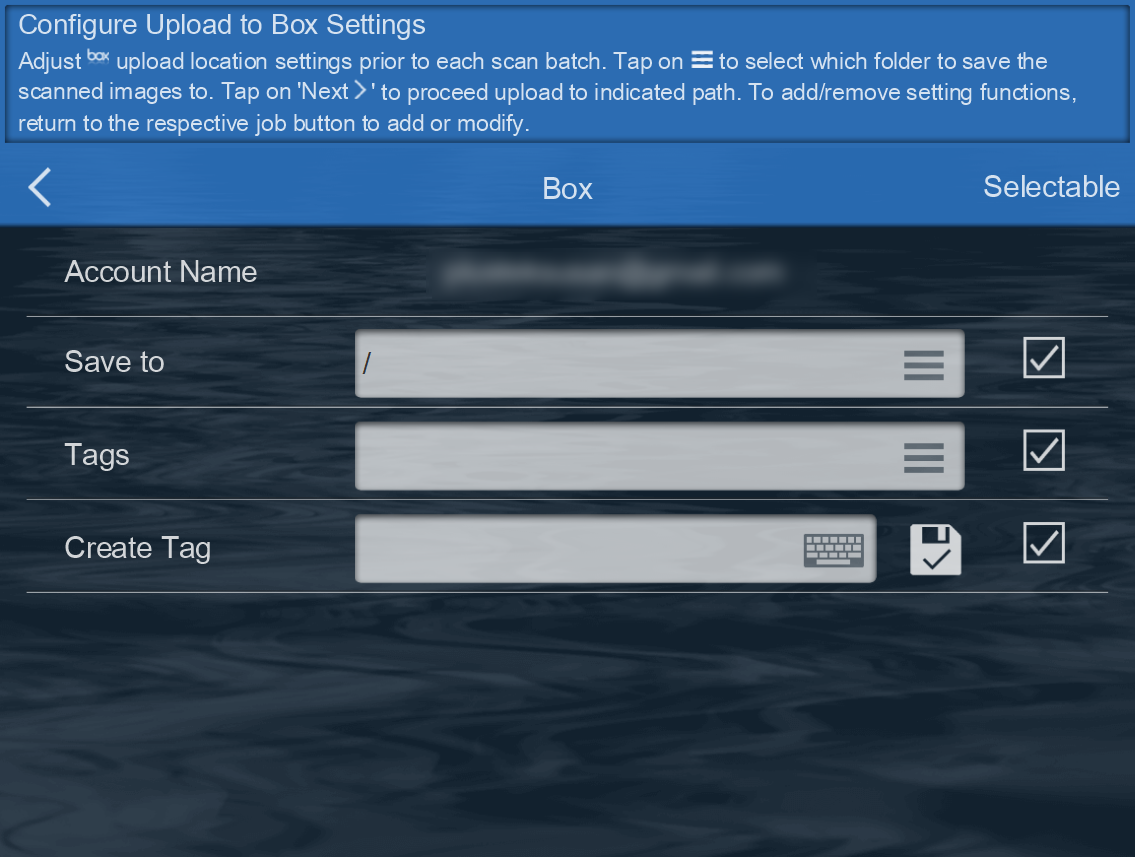
Account Name
Display your account
Save to
Select the folder.
Tags
Select tags (index) associated with the scanned image to be save and easily searched after uploaded to cloud.
Create Tag
Create a new tag (index) if not listed.