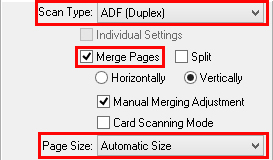
| Merge Pages
|


|
|
|
|
|
| When you scan double-sided documents, tick this check box if you want to output the scan images of both front and rear sides in one image. When you scan a document folded in half, tick this check box to generate a joined image. You can enable this feature only when you select ADF (Duplex) as Scan type and Automatic Size as Page Size. This function cannot be enabled when the Split function is enabled and vice versa.
|
|
|
| Check the radio button of Horizontally, and both front and rear image data are generated side by side in a joined image. The rear image will be placed at the right side next to the front image. Check the radio button of Vertically, and both front and rear image data are generated vertically in a joined image. The rear image will be placed below the front image. You can make the selection of Horizontally or Vertically only when the function of Merge Pages or Split is enabled.
|
|
|
| Tick the check box of Manual Merging Adjustment, and you are allowed to manually shift the merging position of the two scanned pages to rectify any up, down, left or right deviation.
|
| · | If you select Horizontally as the merging mode, you will enter the Horizontal Merging Adjustment window after the scanning is done showing the two scanned pages ready to merge. You may click the arrow buttons to move one of the pages, with one click moving one pixel.
|
| · | If you select Vertically as the merging mode, you will enter the Vertical Merging Adjustment window after the scanning is done showing the two scanned pages ready to merge. You may click the arrow buttons to move one of the pages, with one click moving one pixel.
|
|
|
| When the adjustment is done, click OK to start the merging.
|
|
|
|
|